Chalkboard windows are such a great way to add some charm into your home. Old windows can be found at flea markets, thrift stores, and even on the side of the road (like mine!) It’s a quick process to turn them into a chalkboard in just a few simple steps. Learn how to make a chalkboard window with this step by step tutorial.
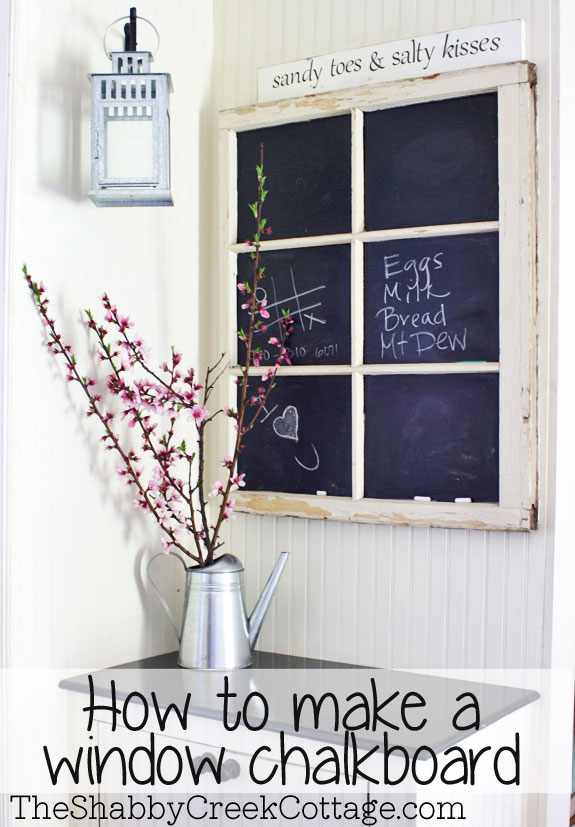
My Chalkboard Window has been such a big hit over the years that I finally decided to do a video on how to make it from start to finish. Check out the video below from my Youtube Channel:
CHALKBOARD WINDOW SUPPLIES
- Chalkboard Paint (found in my amazon shop)
- Old Window
- Foam Brush
- Clorox Wipes
- Clean the window well. Make sure that any debris from the frame is clean. Also be meticulous in cleaning the glass, since it will become your chalkboard surface.
- Seal the frame. You can repaint it, or if you find one with chippy paint that you adore, seal it with a spray polyurethane. Let it completely dry before moving to step 3.
- Tape off the frame. Use newspaper for the bulk of the frame, and painter’s tape to seal off the wood frame.
- Apply chalkboard paint. For this project, I used the kind you paint on with a brush, but you can also use spray.
- Chalkboard spray paint is a snap to use. Make sure to use 5-6 thin coats, spraying in a well ventilated area (or outside).
- Cure the chalkboard. Let the paint cure for the amount of time noted on the can (usually 24-48 hours), then rub the entire surface with a piece of wet chalk to help set the paint up for easier chalk use.
- Hang it up. Enjoy your new chalkboard!


I have a small window I picked up recently at a sale just for this purpose. Thanks so much for sharing how you did yours. Please tell me what brand of chalkboard paint you used? BTW your window/chalkboard looks awesome. ♥
Oh I love it! I had a window one time but never found a good place for it! That is SUCH a good idea!! I’ll have to look out for a window and a place to put it! hehehe
Hugs, Lisa
CUTE! And thank you so much for your sweet comments on my window treatments at Rhoda’s Burlap party!
great project. i have a few old windows i think i may give this a try.
marie
another fab idea with great step-by-step.
i would like to offer you my treasured blogger award. the html is available toward the bottom of my left column. 🙂
happy weekend!
xo
Awesome! I have a few old windows that I wanted to do something with. I’m going to do this tomorrow!
I think this is one of the most awesome window re-do’s ever, thanks for sharing because I missed it the first time.
♥ Teresa
I absolutely love this idea. How cute! I may try to make one of these myself. Wish me luck, I’m not too crafty!
Very clever, and quite attractive too! I came over for the Pink Saturday Birthday! Have a wonderful weekend, love your blog!
love, love, love it!! You’re so clever!
Have a super sweet week, Gina!
Melly:)
I love it! I am about to do something similar with an old wooden screen door.
That is the cutest project ever!!! How creative…. 🙂
Now, where do I find a window???? hahaha
I love it.
I would worry about the glass cracking while being used.
It’s been 5 years and no issues at all 🙂
Is it safe to go right over the glass?? I have several of these windows and have thought about turning them into chalk boards but was never sure if the glass and the paint together would make a safe enough surface.
Yep! I’ve had mine for 5 years and it still looks brand new 🙂
I have a window frame but the problem is it doesn’t have glass in it any suggestions on what to put in the window spots to make this!? Thanks!
You could cut some pieces of masonite and use window glazing points to secure them from the back. If you paint before you install, it would be even easier 🙂
Thank you I’ll definitely be trying this I absolutely love it!
Trying this today Gina… I’ve never painted on glass before. I didn’t use the spray paint, I’m painting it on and so far it looks like it is going to come off… I’m waiting for it to dry before I give it another coat… Hoping it works LOL
Susan
Love this! I’d like to feature this in a post I’m writing for Friday on what to do with old windows. I’d like to use one of your images and I’ll provide a link to your site -this post. I’m also asking my readers to pin from the original source. Please let me know if this is not okay and I’ll remove it. Thank you – Dawn @ We Call It Junkin.com
Wow! That’s beautiful, and the best part is that since it won’t be exposed to the elements, it will last indefinitely.
I just have a new weekend idea =)
Thanks Gene, have fun!