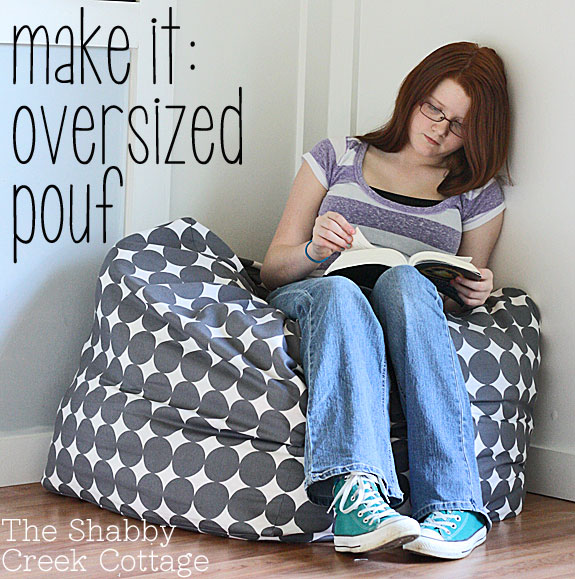


First, cut six pieces of fabric 24 inches by 24 inches (yes, that’s square.) I used this gorgeous grey polka dot fabric from Fabric.com (mad thanks to them for providing me with this fabric!)

Before we start – think of this like a big dice (well, die is singular, but you get the point.) It’s going to be a big old cube – so we’re going to sew together 4 piece end to end and then sew up the ends so you have a four sided loop. Start by sewing the first four pieces. Sew them together end to end to end to end and then sew together the ends.You’re going to use a 1/4 inch seam allowance all the way around. {I hope I said all that right. Once again, if you have questions, just leave a comment.}

Next, we’re going to put on the ends. Start in one corner, giving it a 1/4 inch overlap, so that the pieces line up properly. Start 1/4 inch in from the corner, because as you sew all the way around you’ll need that extra allowance for the last side.


Pull the fabric out for the last edge you just sewed so that the fabric will make a turn to line up with the next side. Sew it all the way around, making each turn and sealing up in the last corner.
Repeat the steps with the other end, but leave a few inches open in the last seam on one end so you can stuff your pouf.

It’s going to take a LOT of stuff. Mine held 4 odd king size blankets, 2 full size comforters, tons of scrap fabric and about 8 abandoned floor pillows – plus I put quilt batting all the way around each side to help even it all out and not be lumpy.

It may look complicated, but I seriously made this pouf in less than an hour. I probably spent 10 minutes of that time finding more and more stuffing. It goes really quickly once you get the hang of sewing on the ends (which is the hardest part.)
If you’re interested in making your own pouf but still have questions, I’d be glad to help you any way that I can! I try my best to respond to questions in the comments section, so if you leave one be sure that you come back to see your answer.
*Thanks to Fabric.com for partnering with me on this post. All words, ideas and opinions are my own*


Love it! The fabric is perfect for this project and Bre is so cute sitting atop her new pouf!
So cute! I need several of these and never even thought to try and make them. Thanks for making it look like a do-able project!!! YAY!
How fabulous is this ?? Awesome job and your daughter is so cute and looks very happy with her “pouf” ! This has gotten me inspired to try on my own now, I’ve had my eye on Rachel Ashwell’s Shabby Chic pouf , but at several hundred dollars a piece , I knew I could never afford them. Thanks again ! 😀
This is fantastic!!! I want one to lounge about in and drink my coffee! Pinning for later!
Very clever. Good for you for figuring this out!!
Thank you so much. I have been wanting to make a pouf and couldn’t figure out any tutorials I found online. I am going to try following yours, I think I understand your instructions. Oh and love love love that fabric! Great job!
How fun!!! That fabric is darling and she looks like one happy girl 🙂
So fun! Great job Gina!
I will totally feature you on KOD Gina. G+ and Pinned.
Very cute. That old be great in our guestroom for the grandkids.
So cute and perfect for any teen. I am sure your girl is loving her room makeover.
Very nice! Love the polka dots! Maybe I need to clean out my over stuffed linen closet and make one!
I love it! I love that it uses old stuff for the filling! Cute post!
Put a zipper where you left the empty seam so you can access your stuff
Put a zipper where you left the empty seam so you can access your stuff
If anybody could figure it out it’s you Gina. It’s a matter of taking it apart, then putting it back together in your head. I usually look at something and figure out how the parts would go back together. The first time I made pants I went to get a pair and bam it made sense to me what pattern was saying. I have to see how the parts work together, sounds like that’s how you figured this out.
Your daughter is so pretty, looks like she loves her pouf and Mom for making it for her. What a great Mom and sewer you are gal. Happy days
This would be a great way to recycle old sleeping bags! I am so inspired. I am working on my son’s bedroom…he would love one of these to sit in when playing video games.
You can also use packing peanuts! When I was ordering all my Fiestaware from Macy’s and Kohl’s they would send huge boxes full of it!
I made a bean bag chair for my grandkids that is very similiar to this. I bought large bags of packing peanuts, but they break down very quickly. After it was getting pretty flat, I bought some quilt batting, tore it as I stuffed and it worked beautifully. Wish I had just used the batting first
Also, I made the bag the first time out of white sail cloth and then made a patterned cover for it with a zipper so it can be taken off and washed.
This is just what I need! My daughter has bugged me for one, but as you said, they are expensive! Hmmm I may need to give this a try. Thanks so much, and I Looove the fabric you chose!
Julie
I’m NOT great at sewing but I feel like this is something I could actually make. Great tutorial!
Kelly @ View Along the Way
Now days Voip Pbx come packed with a lot of features. You can basically customize your Voip Pbx to fit your business needs. When you see the features, you will know how your current phone system is not good enough. I have been using hosted pbx from Telcan. With this business phone service, I can customize the welcome greeting, route calls to multiple numbers, even program what phone number to call at what time, have a professional voicemail, get my voicemail emailed and the list goes on. It is very easy to set up using wizard. Check out Voip Pbx
Great idea and helpful tutorial. I have been looking for a beanbag chair bag our granddaughter could use to store all of the stuffed animals she refuses to part with and has run out of space in her room. What a perfect solution! I think I might even be able to sew one of these up with the help of your very clear tutorial.Now I just have to figure out how to add a zipper.
I have been trying to figure out a way to store all of our extra blankets and have some seating for our children in their playroom. I think with a zipper in one seam this would be perfect. Thank you so much for this tutorial.
Hi there! It looks great! I’m curious on how and if you have washed it yet. Looks way too big for the washing machine and dryer. A zipper would help to unload the stuffing to wash it. Call me silly, but I can see my 97 pd dog climbing up on it! Oh the dog hair!
No, I haven’t washed it yet – but you are so right, it would be much more practical with a zipper. I’ll have to take out the stitches when I do wash it, and I’m thinking I’m going to put velcro in the space to make it easier next time. Great suggestion!
Gina when I made my grandkids bean bag chair, I made the first one out of white sail cloth, then chose a pattern for the outter fabric and put a zipper on it. Now it can be taken off and washed whenever it needs it.
I have been looking for bean bag chair ‘bags’ to use for stuffed animal storage/seating for my kids – and I think this pattern will work beautifully! I’ll make them a little smaller (my kids are 4 and 6) and certainly will try velcro or zipper closure so they can get at their ‘stuffies’ themselves. Thank you!
Stuffed animals!! what a great idea. I have 2 or 3 garbage bags full of those!
I love this project– I wouldn’t share my pouf with my daughter! I’d keep it for myself! I featured your project on the frugal sewing site Sewistry.com. You can find the link here: http://sewistry.com/2013/08/diy-oversized-pouf-sewing-tutorial/. Thanks!
I found your instructions on Pinterest and I made one of these last night. Thank you so much, your instructions were spot on!
Love my new pouf!!!
So glad I found you!!!
Great! I suppose with a zip it could become summer storage for winter blankets?!
Hi. I am attempting to make one of these for my son’s room for Christmas. I have sewn pj’s,pillows,and pillowcases and an apron before so not new to sewing,but certainly no expert as I have not tried anything too complicated. So if you could please help I would appreciate it. When you say sewing up the ends of the squares do you mean that you put 2 squares together right side to right side and sew up a seam along one side and then do that again with another square until all 4 squares are together? For me pictures and diagrams are my friends. Thanks!
Hi Gina,
thank you so much for this tutorial. during my pregnancy I actually bought a small pouf to put my feet up for £15 – what a rip off when it’s so easy to make yourself!!!!
I was just wondering what type of fabric you used, as most fabrics tend to stretch.
Cheers
I love your choice of fabric and the way it all came together. We are the same…I spend sleepless nights just thinking of how to attack a project. Sometimes, my husband thinks he’s guilty of something as I do not talk to him or anyone when I am in that state of mind. I made something like this a few years back but used what we here in the Philippines call “rugged thread”– the kind you use for jeans, tote bags and seat covers. I also used my serger on all joints and to further strengthen the cube, used piping on all joints. It became an added design feature. Because I knew it would take a lot of beating and it would be used on the floor, I added a strong zipper closure. It lasted years but I eventually had to give it up as it just looked too grimy after a while. My sister’s purchased bean bag exploded so I had the good luck of inheriting all the little styro beads inside. The fabric on the outside just served as a cover as I housed the styro beads in a muslin of the same proportions so I would not have to run around the house picking up these pesky beads or risk getting some of them in my nose every time I needed to wash the thing. You are smart for using blankets and pillows as this would be good storage as well. I never thought of that!
first time I open your website and like your idea, I have four grandsons and grand daughter and this will be very useful. I am a sewing lady. enjoy it all the time. I will make it and will make more space in my cabinets. Thanks a lot. will be in touch.
I like the cube idea . I’ve pinned patterns with different shapes it might be neat to knit with really chunky yarn too .
I’ll have to see what I have in my fabric and yarn stashes. thanks!
I love this idea. We had extra bedding hiding around the house and used those to stuff with – the huge difference, was the velcro I used. Ours is storage!
I love your stuff. It inspires me! I BARELY sew and I’m pretty sure I could do this. I have 6 daughters and 5 sons. (youngest is 10) So I’m going to be frequenting your blog from now on! Oh, BTW, My oldest girl is an interior design major and I know she’ll like it too.
I need complete and detailed requirements, policies and procedures, anyone help me please? = ).
I love this poof idea and thank you for sharing … it would be a great hideaway to store all of these
Nice! Love it
Thank you 🙂