As a little girl growing up in the country, surrounded by miles of farms, Charlotte’s Web was always one of my very favorite books. I’ve probably read it a couple of dozen times, and it always brings me to tears even as a grown up. When I was asked to do a blogging challenge with Online Fabric Store and 7 other bloggers to create projects from childhood books, I’ve gotta admit – I was a little scared. {So if you’ve landed here from Laura’s blog – I’m so glad to see you!} But then when I found out my book was Charlotte’s Web I was all like, “Ahhhh! That’ll be easy!
And I was wrong.
It took me about a million bad ideas to finally get around to a good one – and while you wouldn’t really think that a floor pouf and Charlotte’s Web go hand in hand, well look closely.
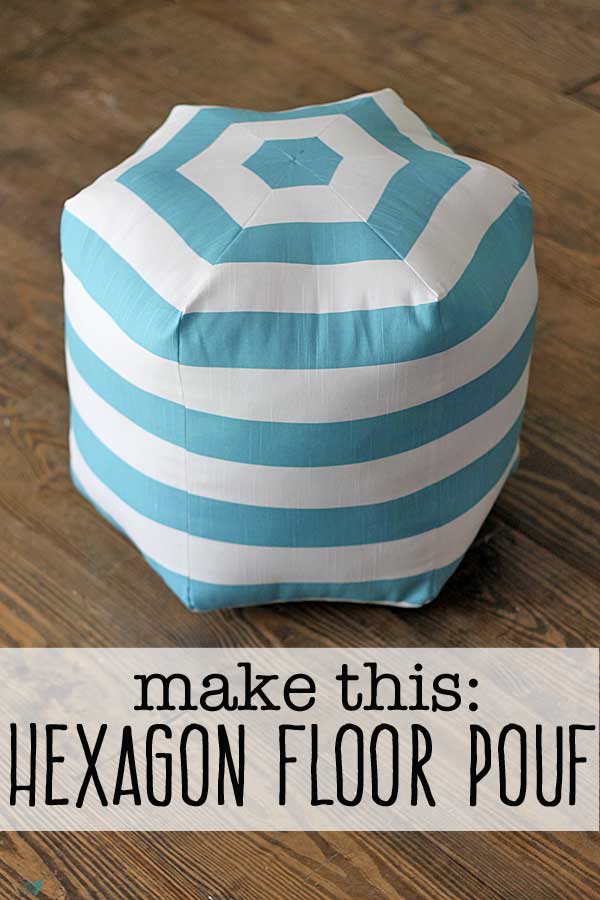
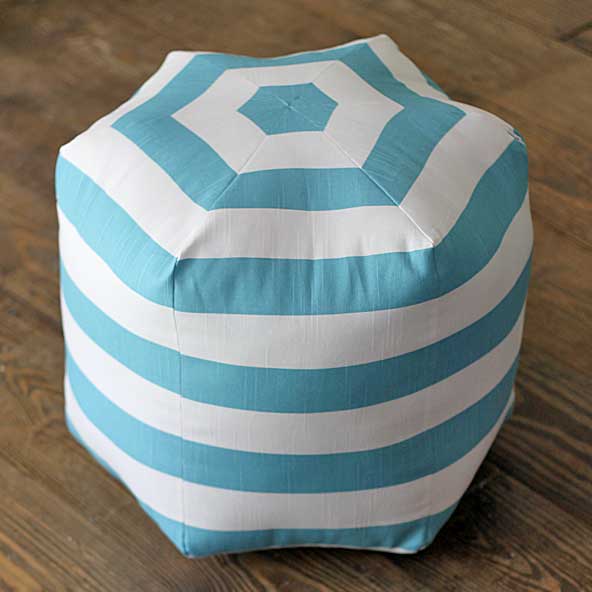
Kinda looks like a spider web on top, huh? So that was my inspiration for using this beautiful fabric from Premier Prints.
Now I’ve made an oversized pouf before, and I thought this one would be more complicated, but honestly it was tons easier. And I love this shape, but I’m not giving the prices that these cost. $400 seriously? Yeah…. let’s make it!
The hardest part is figuring out the math. Now, if you’re going to do one and want the same hexagon pattern that I used, go with a 2 inch stripe fabric {I used this one}.Online Fabric Store & Premier Prints has tons of colors and you’re sure to find a color that works for your home. If you don’t care about the pattern, this same size will work for nearly any pattern.
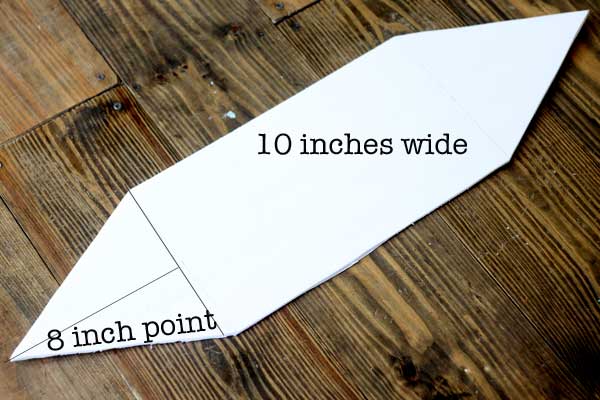
If you use a 2 inch stripe, let me break it down for you. Create a pattern on a piece of 30 inch long foam core board (it’s easiest to work with and you can pick it up for like $1.) You need a 10 inch wide strip – and I just measured from the corner on each end with a yardstick and made a mark then lined them up and made my cut line.
After you have the 10 inch strip cut, measure in 5 inches (that’s half way) on the width and make another line. Now go down 8 inches from each end and draw yet another line. Create the tips by lining up your ruler with the center point on each end and the marks you made to create the 8 inch line. Do that on all four corners and trim them all out.
So all total – your pattern will be 10 inches wide on the straight parts – the V portion is 8 inches deep on each end – and it will be 30 inches long total.
Because I know nothing of math, it took me a good three hours to figure that out. If you’re all geometry smarts and stuff, you can probably figure it out on your own and do a different size. Me, not so much. But, this size will work and create a pouf the size of mine.
WHEW! The math portion of this post is now complete. Let’s get to cutting.

Running your pattern perpendicular to the stripe, line it up on the outer line of a color (or white if you’re so inclined) and then it should line up perfectly on the end of the other portion of the same color. Trace it and cut it out. Oh, and it helps if you use the straight edge from the first cut and just work back from there.
Now cut six pieces and you have enough for your pouf. It will take a little less than 2 yards to make this DIY floor pouf.
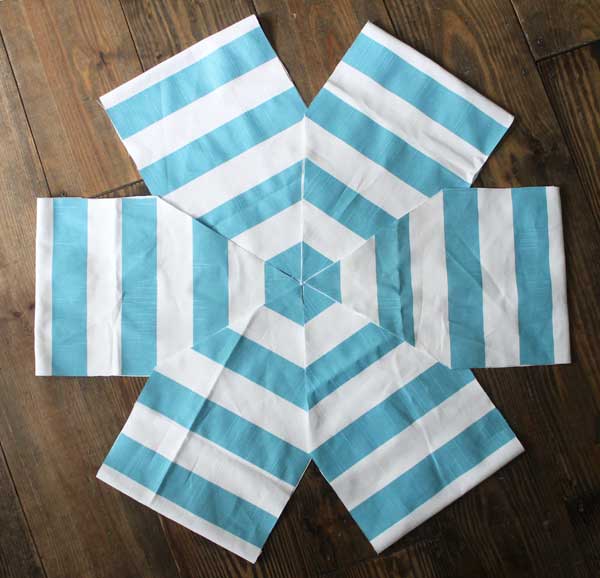
Ta da! It’s going to look like they’re a bit to big, but it’s all good – we need seam allowance, peeps.
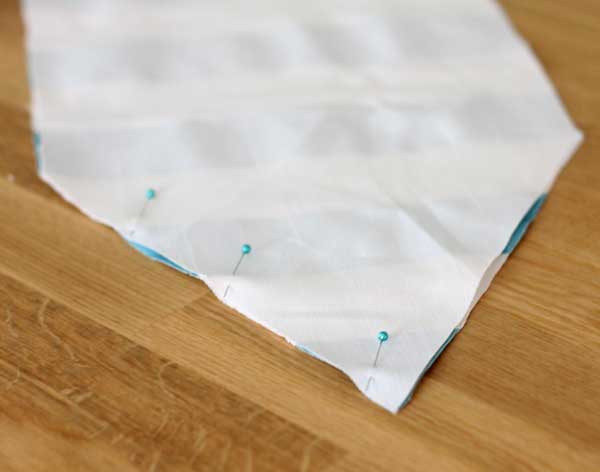
Start by pinning two pieces together from tip to tip along ONE side, and sew it together with a 1/4 inch seam allowance. Do that two 2 sets of the pieces, and then we’re going to put a zipper in the 3rd set. Be really careful to get the stripes to all line up – because that’s where the magic happens.
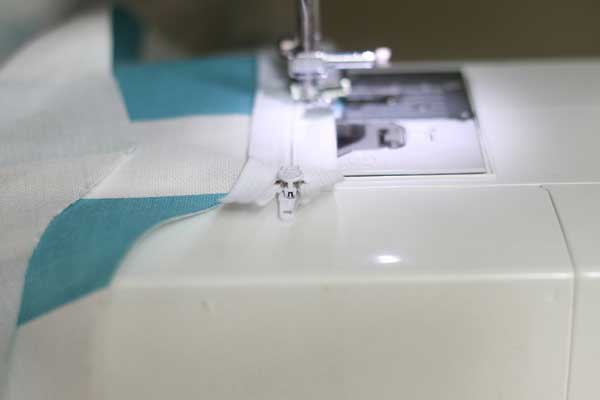
On the last set of two, you’re going to install a zipper on the straight portion only (not the V part). To learn how, jump over to my zipper tutorial. Just make sure the stripes line up perfectly when you’re installing the zipper and you’re good to go. After you have it installed, sew up the V parts on each end of the zipper.

After you have the zipper in, start pinning the unfinished edges of one set to another, the sew them up. Then pin together the last set and sew, until all of the pieces make a big circle. Be sure to make sure the zipper is open so you can turn it out right.
It’s going to look like a flat balloon when you’re finished – don’t worry, it’ll all come together.

To get it super full and really well padded, you need two 50 oz. bags of poly fill. Just stuff it all in there tight and zip it up and you’re done!

See the pattern? That’s from being careful while lining up all those stripes. It seems complicated, but once I got the pattern right, it really took less than an hour from start to finish.
Once you’re finished, kick back and enjoy your DIY floor pouf by propping your feet up and reading a good book. Might I suggest Charlotte’s Web?
 Want to see the next project? Jump on over to see what Lindsay has whipped up at The White Buffalo Styling Co.
*Thanks to Online Fabric Store for partnering with me on this post. All ideas, words, images & opinions are my own. Except the last graphic. Ashley made that. Because she rocks. I’m shutting up now*

Love this project. Could you give final dimensions of the pouf?
Sure! (I had to go measure – haha!)
It’s right at 15 inches tall and 18 inches wide.
Thanks for stopping by!
I saw it as a web right away. Very imaginative!! You did an excellent job and the poof is adorable.
This is so amazing! Definitely a throwback to Charlotte’s Web. Thanks for the DIY instructions. Going to give this a try!
How cute, and you even did a zipper that’s great. I have never tried a zipper but I may have to follow the tutorial you linked to.
Love this! I’ve always wanted to try a DIY pouf! Yours looks amazing!!
So perfect! I’ve seen these stuffed with the little plastic pellets as well- Do you prefer the poly-fil over the pellets?
I’ve never seen the little pellets – but I’m thinking I would make a HUGE mess trying to use them 🙂 I like polyfil because it’s easily available, but you could certainly use those, too!
Awesome job on this! I love projects like this…it looks complicated, but then you break it down and I feel like, Hey! I could make that!
How fun is this. I love it and great tutorial too.
Hey, I really love your Poof! The colors beautiful & you did an absolutely wonderful job lining everything up perfectly but I’m kind of confused! The 30″ foam board that you used you said that you needed a 10″ wide strip but then you have 8″ on each side of it. So does it need to be 26″ wide & only 5″ long after you cut it out? I’m sorry if I sound like a dingbat. I see what your doing but when I read the directions I get lost. Plus when you show all of the strips laid out they only have one point. Do you have it folded in half? PLEASE HELP ME!! I would love to make one of these for my daughter. Thank you for your help!
Let me see if I can help. You need to cut a 10 inch strip. Then measure down on each side 8 inches and make a mark, so the V part on each end is 8 inches from tip to the center (not along the sides, but down the middle.) The photo with them all cut out is with them folded in half (because I couldn’t make it work with them all laid out full length.)
Hope that helps. If not, let me know and I’ll try again 🙂
The measurement from point to point and the width would be more understandable.
Love this so much – the stripes make it awesome!! Thanks for the tutorial – pinning 🙂
Oh & one more question. It looks like you lined it, did you? Thanks!! 🙂
Nope, no lining. The fabric is pretty thick, so I just used it alone.
How long are your strips from top tip to bottom tip? Also, 10 inches wide, not long, correct?
The strip is 10 inches long, and 30 inches long from tip to tip.
10 inches for the rectangle and 10 inches for each tip from the end of the rectangle to the tip? How wide? 10 inches?
Hi Amy, the V parts are 8 inches long on each side, with an overall length of 30 inches – and it’s 10 inches wide on the straight part. Hope this helps!
Ok so if you lay the foam board out in front of you measure 10″ up & cut that out then measure 5″ up & draw an 8″ line on each side, is that correct? So the whole piece measures 30″ from tip to tip? Instead of answering me in both places did you line the strips?
Yep! You’ve got it! And no, I didn’t line the strips. Hope this helps!
Thank you so much!! It takes me a little while to catch on sometimes! I promise I wasn’t trying to be difficult. It really is adorable!! Thanks again & have a Blessed day! 🙂
No problem! I want to make sure you understand so you can make one, too 🙂
SO cute! One of my fave books as well. ;} Can I has one? ;}
That “web” is the greatest. I don’t think I’d even attempt it! You are one clever, creative girl! Thank you for sharing your ingenuity !!
Gina,
Love the color of the pouf and the perfect spider web.
Wonderful job my friend!
karianne
It looks great Gina! Charlottes Web was perfect for you!!!
LOVED the book – and LOVE your pouf !!!
This would be so great in my little guest room – thanks so much for sharing!
Hugs,
Suzan
Hi Gina, I also love this pouf. Is it sturdy enough to sit on? Thanks.
Yep – I sit on it all the time (and I’m a big girl 😉
Love those stripes! Great tutorial!
I would put some batting inside to even out the appearance of the stuffing, like they do inside chair cushions. If you want to use pellets, make a lining to hold them, from muslin.
LOVE this! =)
So sorry, I’m also confused. how wide is the foam core and how long? You say 30″ long and at each end the tips taper in 8″. That uses up 16″ out of 30″. That would leave 14″ in the middle that has not been cut, is that correct? I also want to know how WIDE to cut this strip of foam core. Is it like this
then 5″ across?
You cut a 10 inch WIDE strip from the foam core, which is 30 inches long. You will have 14 inches in the middle that is 10 inches wide, with an 8 inch long triangle on each end (the point of the triangle is in the middle at the 5 inch mark).
So glad I read the comments! I was confused at first with the shape, etc. But now I see how you get the points. For lining up the stripes, do you just place them at the same point on the fabric for each wedge shape?
How much fabric did you need to make this? I’m going to make this for my dorm but don’t know how much fabric to buy!
Hi April, it took about 2 yards of fabric to do mine, but there was a bit left over.
Also, (sorry) did you use the grain line or does it not matter with something like this?
I didn’t – but I’m not an expert sewer, I just do things my own way.
Love this! It is super cute! I think it would be great to have in my classroom, however, I do not own a sewing machine, and would have absolutely no way of knowing how to sew in a zipper. Do you make these and sell them? If so, I’d be interested 🙂
Saw this post yesterday, made it my project for today. The directions
were great and it turned out really good! The stuffing seemed expensive
to me so I bought 3 bed pillows at Wal Mart and stuffed it with them!
Thanks for the pattern!!! Love it!
Pinned it and plan to make it. I’m new to sewing but I think I can do it. I would love for you to share this with our readers at the Home Matters Linky Party. http://wp.me/p4fJXd-ZM
Hey there. This is suuuuper cute and very doable for a diy’er. Thanks for sharing! I am thinking about making these for our well used living room. How does the poly fill hold up to every day use? does the poof keep it’s shape? Have you needed to add fill over time?
THANKS BUNCHES!
Melissa
All these months later mine has held up great! I haven’t had to add more at all 🙂
Thank you! I can’t wait to make one! Great blog!
Hi,
I am from india n I loved this tutorial…………..looking forward for newer ones
Hello, I love this!!
I am curious though, do you think it would work if there were 5 pattern pieces instead of 6?
I’m not sure, but you could try 🙂
What length of zipper do you use?
I used a 22 inch zipper and cut off the excess
Wow you’ve made a nice and easy pattern to do. Thanks gonna make for my little girl
Not sure if this will work, trying to load a picture of the pouf I made using your pattern. Thanks, I made two of them. I’m calling it the gobbler, because it requires so much stuffing I tore up old sheets and fabric scraps to fill it!
https://flic.kr/p/WjC1wz
Oh my gosh Desiree, it is beautiful and love the name, LOL 🙂 Great job!!!