
Welcome to day 3 of Six Days of Spring! I’m sharing projects all week that take old things and bring them back to life, like today’s tutorial on how to make an upholstered stool from a cable spool. Fabric is always a great way to bring a pop of color into a room, and an upholstered stool can be a great option. They’re so flexible – you can use them as a foot stool or an extra seat in a pinch. So let’s make one!

First you’re going to need a spool. Since Mr. SCC is a Dish dude, I have easy access to more than I could ever use. If you can’t get one, you can use two rounds, just give it more support in the center to make up for the center of the spool. Mine has a plastic core and wooden ends.

First, we need to give it a little more strength. We added in several pieces of 1×2 by screwing through the top and bottom of the spool to sandwich the supports. He put them about every 8 inches.

Next, we took pieces of cardboard and covered up the sides, by attaching it with staples. See, we’re recycling!

Now for the squishy bits. I used chair pad foam, cutting it with an electric knife to fit the top. Once cut, sit it aside.

I added a layer of quilt batting, first by wrapping it around the sides. I stapled it onto the top and bottom to keep it nice and secure.

Next, I put the foam back in place, and put layers of batting over it. I stapled around the edge, then trimmed off the excess.

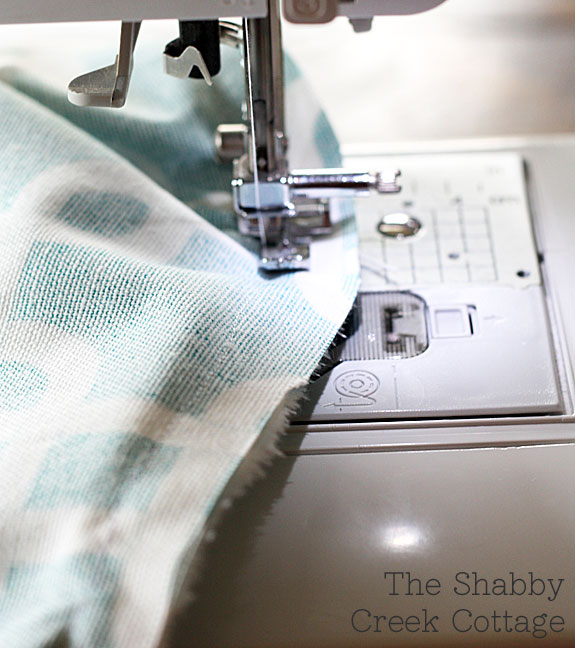
Next, I made a muslin cover. I started by measuring the circumference of the stool, and about 10 inches to the height. First I pinned the side together and sewed it into a sleeve, making sure it fit nice and snug on the ottoman. It was a straight line stitch, simple and sweet.

Using the ottoman as a template, I cut a round for the top.

Next, I stitched the the tube that I created to cover the sides to the top – think like a top hat.

After it was all stitched up, I slipped it on the ottoman right side out.

I took all the excess and stapled it to the bottom of the ottoman, making sure that the fabric was nice and tight all the way around.

Now let’s start with the pretty fabric! I used a beautiful turquoise fabric from Fabric.com. I traced the top of the ottoman giving myself about a 1 inch seam allowance.
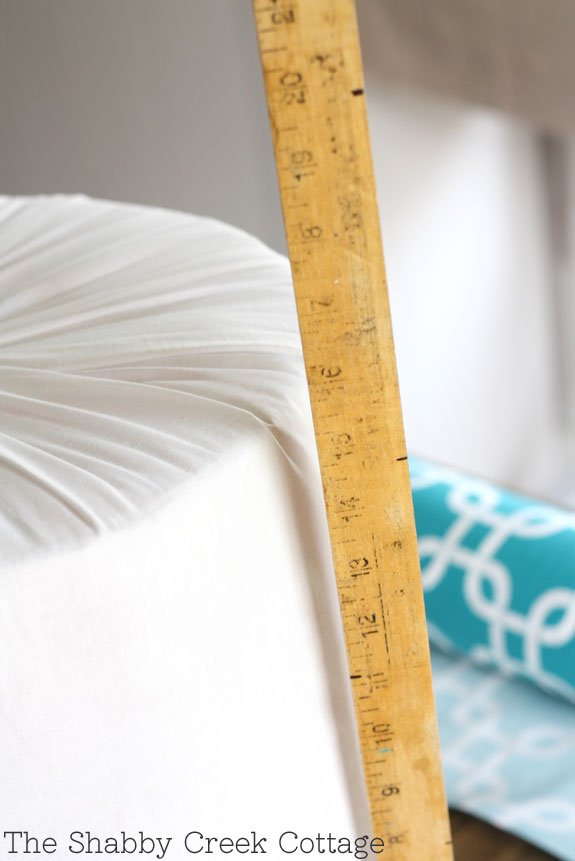
Next, I measured the height and added about 4 inches, to make sure it would go under the bottom once finished. {We’ll get to that in a minute.}

Just like with the muslin, I measured around the width, pinned it together and stitched it into a tube.

I pinned it together, using the stool as my guide, inserting cording as I pinned.

Once it was all pinned together, I slipped it off and stitched it together.
We’re almost done!

I ironed a hem on the open end, turning it in 1/2 inch, then another 1/2 inch to create a small tube. I stitched a line really close to the top, leaving a 3 inch opening to feed the elastic through.

I used elastic cording to hold it on when it was finished. First, pull the elastic tight around the stool to measure, then add 2 inches so you can finish it. Tie the cording to two safety pins, one to each end of the elastic. Pin one end to the hem in the fabric to keep it from slipping away, while you feed the second end through the hem. Once you have it through, tie it up with a secure knot. {Remember the old scout saying “Right over left, left over right, makes a knot that’s nice and tight.”}

Then stitch up the opening you left for the elastic, and slip it onto the ottoman.

Now kick your feet up – you totally deserve it after all that work! It may look complicated, but I made the entire stool in under an hour. I’d say that’s an hour very well spent!


Geniale!!!!!
Adorable! Great thinking and it’s beautiful!
Susan
This is simply FABULOUS my friend!!! You rocked it and talk about Step by Step directions…WOW!!! hugs…
This looks AMAZING! Love that your looked past it’s original use.
~Heather
I love this!
I have an old ottoman that has some duck tape holding it together. Duck. Tape.
I should really try to cover it.
-Angie
LOVE the Fabric!!!
OK, that’s enough! Not only are you terribly talented, but you have access to all the spools you could ever need?? I shout..UNFAIR! Cuz now I want one so I can do this! Ah, well, who knows? I might find one. But you ARE one clever chick and I love your blog! Dona
That is so smart!! I love that color too 🙂
That is gorgeous Gina! I absolutely love it.
Wow, you make this look so easy and quick! Seriously it would take me about an hour just to pin in the cording. I have an ottoman in my garage that my mom and I started to recover last summer, but never finished, I think this is the kick I need to get it done. Love the fabric too!
Julie
I need a dish dude – this is fabulous!! Love the color and shape – it’s perfection!
Kelly
OH Gina this is perfect! Now I need to see if anyone I know have access to the spool… yes I want to paint one with black chalk paint for a teen boy’s room. It will fit perfectly next to the chair under his bed. 🙂
I can see it now, there will be all kinds of women following the “dish dude” trucks around town! Beautifully done!
Absolutely fabulous! Great instructions and the end product looks marvelous!
What a great project! I love how you re-used the spool and your directions are great. I may be trying this project this weekend . . .
Such a fantastic idea! I love the fabric that you chose. 🙂
Love this! I need a couple of those for my family room! I am pinning this! Life to the full, Melissa @ DaisyMaeBelle
I love your adorable spool stool! The tutorial is very helpful as well. I used this exact same fabric in my classroom this year! I love it…the turquoise shade is beautiful and it is such a good quality fabric…:) Nice job….thanks for sharing!
Vicky
Life On Willie Mae Lane
You clever, clever girl! This is so creative and you used just gorgeous fabric! Looks great next to your chalkboard wall!
~Pendra
I love everything about this project especially the fabric.
Wow I love what you have done with the spool. You are a very clever girl. I wish I had talent like you to do this. The colour is great and it looks so great with the chair. Well done Gina
This looks awesome, Gina! Pinning so I can make one. 😉
This is TOTALLY awesome! I was just looking at two of these on sale on Craigslist in my area and thought to myself….there’s got to be something I can do with those! Now I’m rushing back to see if they’re still for sale!! Thanks for the inspiration!! Excellent job!
Excellent tutorial!
Oh I just absolutely love it Gina!! It looks amazing and that fabric is perfect!!!
This turned out awesome! What a great transformation. I never would have guessed that stool used to be a stool. Great job! Jen
you are way too talented lol, send me some! love that fabeic!
Way to think outside the box, it looks great!
Under an hour?!?! Please tell me you’re kidding. That is so gorgeous how could it take so little time; unless of course it’s being made by a sewing whiz. Love it!!
Oh my goodness. This is such an amazing tutorial! You have really outdone yourself on this love. I love everything about it. Love, Love.
omg how wonderful I have one of these in my store. You will make me learn how to sew. I don’t know if I can forgive you for that
I love this! Sooo cute! I am working on a post for my weekly Trashtastic Tuesday Series and I am gonna put a little feature of your stool with a link back to you tutorial on my post today. Thanks for sharing!
You are my hero, seriously! This is so amazing and, I have a spool just waiting for inspiration, you just gave me some-great tutorial too! Pinning!
Soooooooooooooooooooooo Beautiful!!!! And extremely creative! So smart and trendy! Thanks for sharing!
An hour? Really. What a load of BS.
And what is with all of you people blowing flowers up her but?
My grandmother used to do the same thing with old juice cans, a lot sturdier and she didn’t need a man to bring her the cans and make the structure for her.
Oh, and she filled the cans with beans so the thing wouldn’t topple over with the slightest touch.
Some of those stools are still kicking around…. Yours will be in trash by the end of the year.
Very good tutorial! Thanks for sharing.
Thanks so much Alysun!