Love print candles? They’re perfect for celebrations like birthdays or weddings, but can also be beautiful for holidays, too. Unfortunately, they can be somewhat pricey – but you can DIY it for pennies. Why spend up to $20 for a candle when you can make it for around $2? It’s super easy and can be customized any way you’d like.
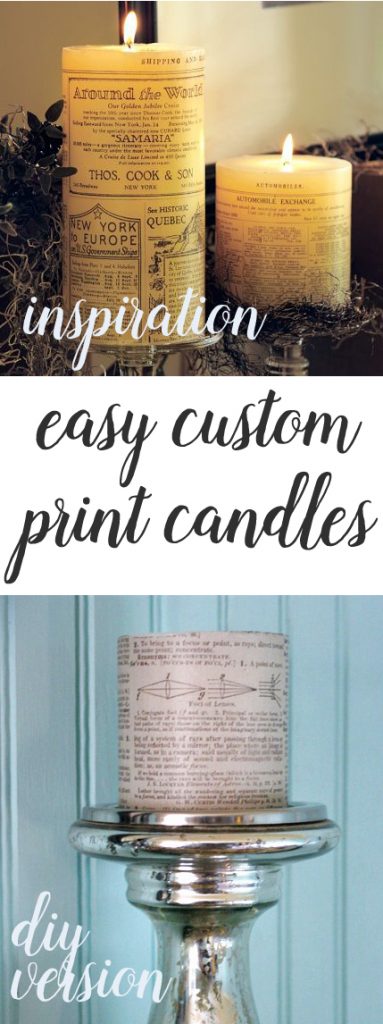
 I love these newsprint candles from Pottery Barn (no longer available)– but at $16.50 for the small one, I thought it was just a tad bit pricy.
So let’s DIY print candles
 You’ll need:
- A smooth sided candle (4 to 5 inches tall works best)
- tissue paper (the kind you wrap gifts with)
- gift wrap tape
- card stock
- scissors
- push pins
- hair dryer
- printer <that’s the affiliate link to the one I use
 Cut a piece of tissue paper to be the same size as the card stock, then tape them together around just on the edges. Just 2-3 bits on each edge will do. Then run it through the printer so you print on the tissue side.
 You won’t need the entire piece printed, just the size of the candle.
 Next, trim the tissue so it fits just around the candle neatly, then use a pushpin to hold it in place.
 Using the hair dryer, blow directly through the paper towards the candle. You want to slightly melt the wax so that it will grab the paper. It only takes a few minutes and you’ll see the melted wax adhere to the paper.
 And then you have custom print candles. These candles burn into themselves, not all the way across, so the flame never meets the paper. As always, never leave burning candles unattended.
While they may not be 100% the same, it’s a great way to get custom print candles on a fraction of the budget.

Great idea, I love it so easy but it looks fantastic and is so much cheaper!
Bee happy x
Have a delicious day!
Your newsprint candles look great and easy to make! Much better than paying $16.50!
OOOO! I LOVE THIS! Can’t wait to try this out!
Thank you darling Gina! It has been so much time I was wondering how to print on tissue paper… and now I know!
Have a wonderful day
Silvia
These are just gorgeous and look fun to make. I just made some printing on fabric…thansk for the hair dryer tip!! 🙂
Lina
Fancy Frugal Life
Love it!
Can you still light the candle if it has tissue paper around it?
I find it safer to make a candle with a smaller-than-usual wick so the candle will burn down the middle and nowhere near the paper. Also, don’t put near a vent or a window breeze just to be extra safe.
I love this idea! I may borrow this for one of my Handmade Christmas Gifts! I can see taking words that are meaningful to the person to personalize them.
My daughters and I did these for gifts one year but used spray adhesive instead of the hairdryer.
Love it!!
I love this idea….now I know what every woman in my life is getting for Christmas hehehe! Xoxoxo ~Ashley
Brilliant! I can’t wait to try this one out!!
Wow…that does sound pretty easy!! Love it! Thanks for sharing
Thanks for the quick and easy tutorial. Love it! Just saw these at PB last week.
They look fantastic!
I cannot wait to try this!! I had a candle similar to this years ago, hated to use it but did and now it’s gone. Have seen them in PB, etc but too expensive. Thanks for the tutorial!
I’ve seen those candles and always wondered how to make them myself! Great tutorial! Can’t wait to make my own 🙂
I love how this turned out.
http://www.shabbytochicqueencreek.blogspot.com
i love your blog soo much, im 18 and finally decorating my bedroom from when i was like six. haha im doing it all shabby chic and collecting all my furniture off ebay and using all your little tricks to make it look amazing! keep posting i love itxxxxxxx
I love this! It’s probably one of my favorite projects recently.
I love this Gina!
Ok that is too cool, I can’t wait to try it!
VERY cool! Love it!!! I am a fellow 31-dayer making my rounds! Glad I found you and can now follow you! I hope you come and visit me too at http://sewnso.blogspot.com/p/31-days-of-sewing.html
Gina, these look great!
Can you share your best sources for cheap pillar candles? I have to do flowers in a big Baptist church. Their inspiration photo calls for various white pillar candles on a burlap covered table, but I haven’t been able to find cheap candles yet.
I’m so doing this. Thanks.
Love the idea! And the results are great!
I think you were inspired by my post on Can’t Stop Making Things. I copied the PB music candles. Check this out.
http://www.cantstopmakingthings.com/2010/11/pb-knock-off-candles.html
(I wish there was a way to embed this url. If you go to my site you will see this on the right column)
I love the Halloween theme. Keep up the good work.
I love it! Pinning it for later!
totally pinworthy! this would be an awesome way to customize candles for birthday celebrations or another occasion!
thanks and i’m loving your blog!!
amy
I love this idea Gina! They look simply beautiful! 🙂
Who would have thought! Awesome project – a definite Must Try!
This is a great idea. I have a batch of candles that I just made that I want to try this on. Thanks for the great tip!
Are you serious? I can’t believe it is that easy! I can’t wait to get home and try this. I’m starting my holiday list right now! I have a candle making kit I can’t wait to break out and now I can decorate them too?? Thank you!
So when you run it through the printer (tissue on cardstock), do you remove the cardstock, before wrapping around candle and heating it..? Obviously the ink side would touch the candle right?