Farmhouse floors have always been my favorite, you know.. the warm, worn, wood floors that are perfectly (and naturally) aged. Unless you purchase salvaged flooring, it’s really hard to get the actual patina of worn down floors. You can mimic it with pre-made planks all day long – but there’s nothing like the real thing. So when we decided to do our own farmhouse floors with 1×6 pine planks, it was one of those things that only gets better with time. The more we use them, the more worn they get, and the better we like them.
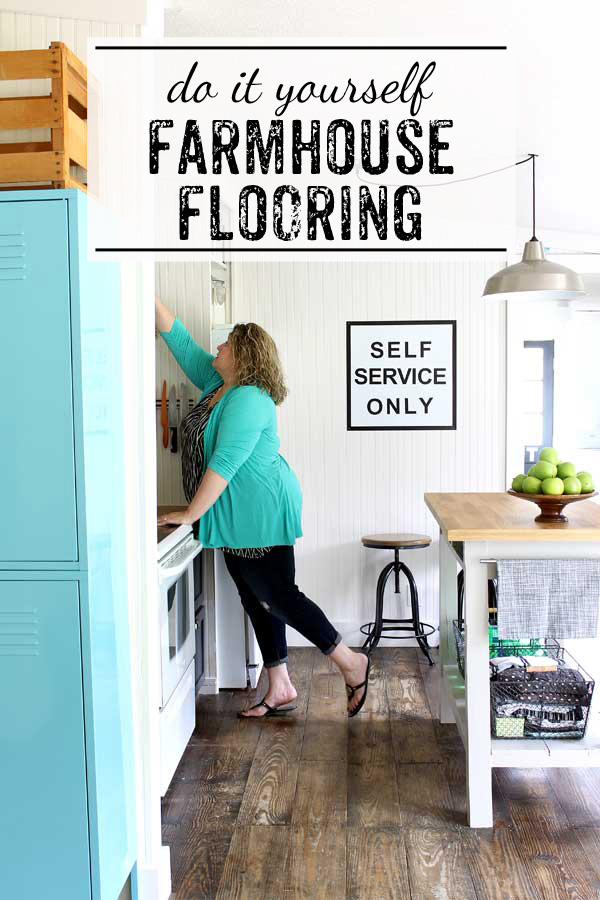
DIY FARMHOUSE FLOORS
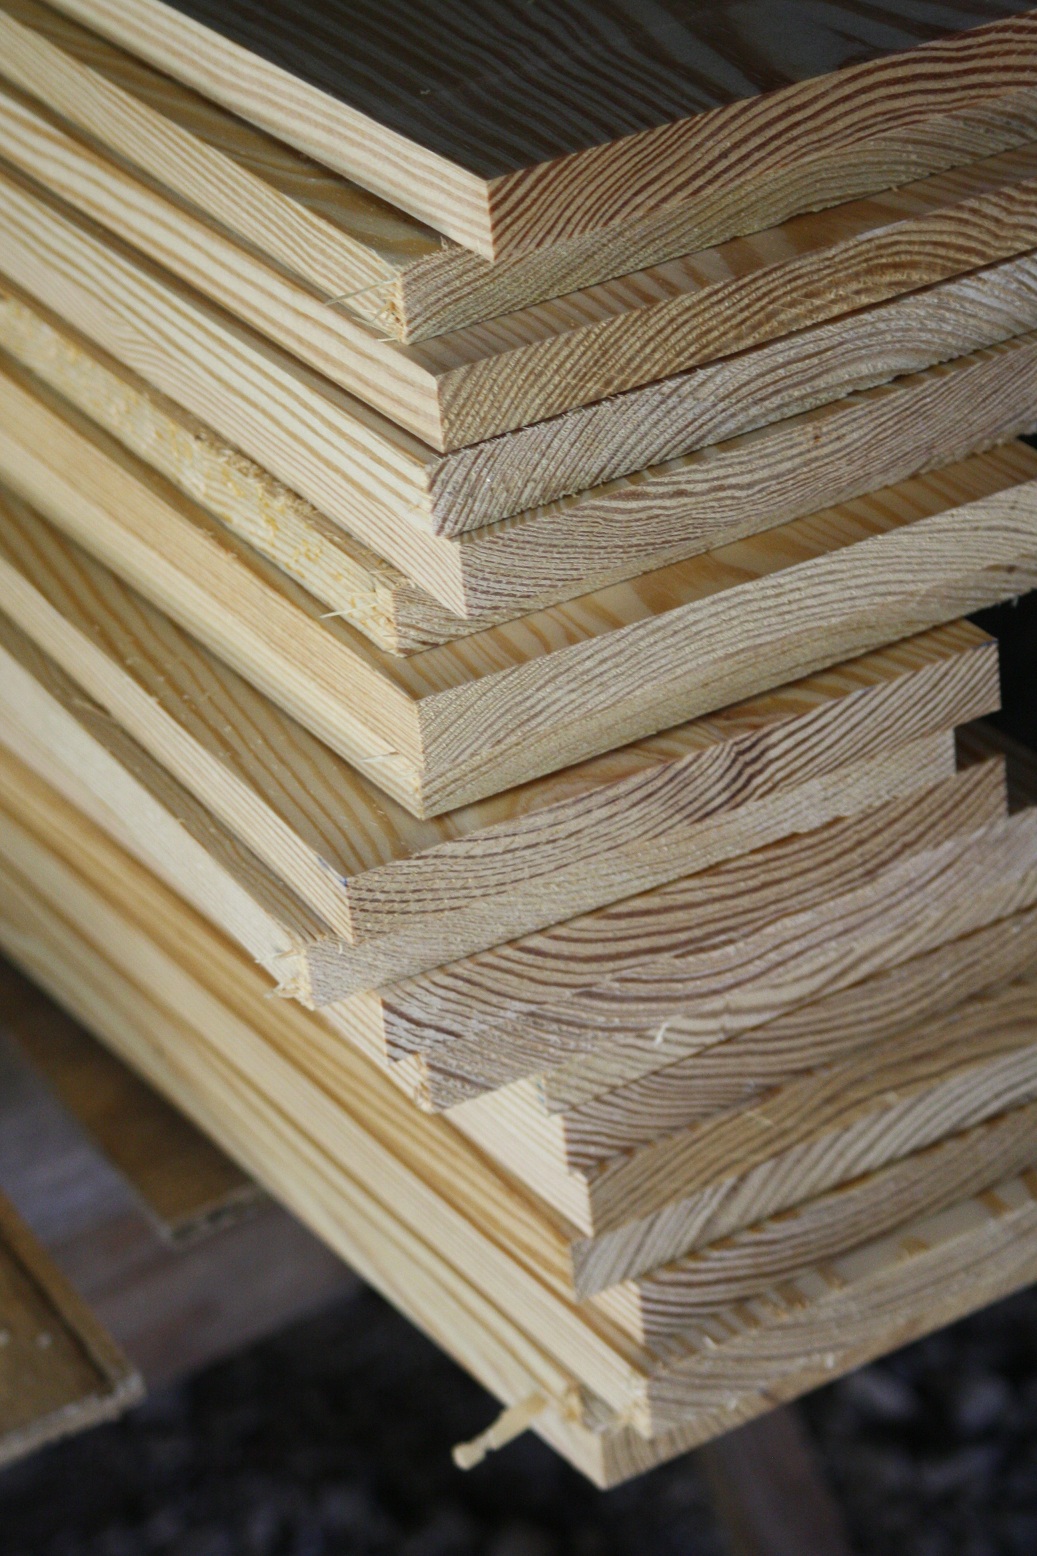
I’m not a conventional kinda girl. We had contemplated floors for our kitchen for over a year. We went back and forth about a bajillion times – vinyl floors, prefab floors, peel and stick tiles – we looked all over the place. But, in the end, we chose something that’s not even “truly” flooring. We figured that since we use 1×6 #2 yellow pine for everything else, floors made sense, too! We bought 8 ft planks for about $4 each, which equaled about out to about 75 cents a sq ft, once you add in all the stain and paint. It does not, however, factor in time.
 First, we cut all the 8 ft planks into 4 ft pieces, then cut about 6 of those in half again to 2 ft sections. I sanded each board, one by one, top, ends and knocked the sharp edges off the corners for a worn farmhouse feel.
We predrilled the holes, to prevent splinters and splitting. Then we used wood screws, attaching it straight to the subfloors. We thought about using pin nails, but decided that the exposed nail heads were our favorite part of old farm house floors.
As I sealed the floor with poly, I made sure to fill in the tops of the screw heads to keep them from collecting too much dirt. Real wood farmhouse floors for a fraction of the budget – now that’s my kind of flooring.
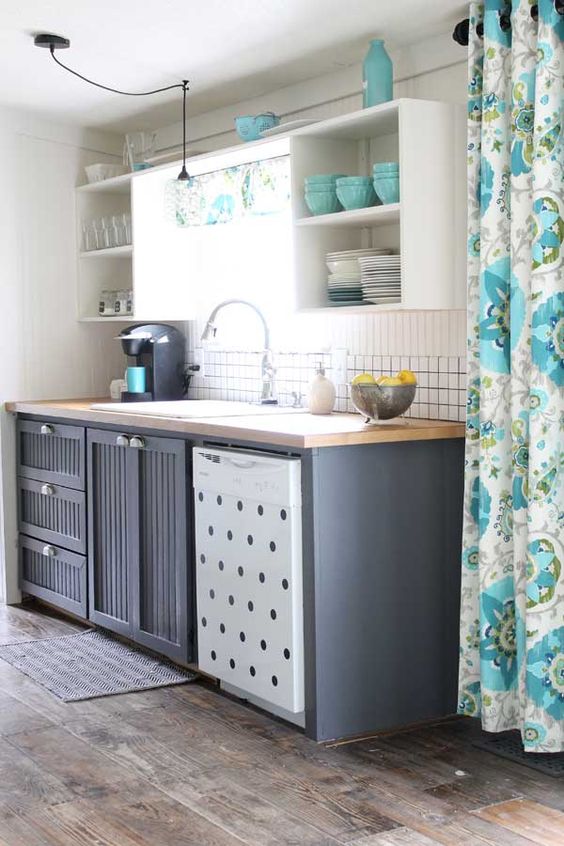
Six years later, these floors are still going strong. They are relatively easy to clean by damp mopping with Murphy’s Oil Soap. We love them so much that we’ve used them in almost every room in our house.
- 50 ways to get the farmhouse look on a budget – great finds under $25!
Top 10 Farmhouse Kitchens – so much inspiration for that Fixer Upper vibe.
15 farmhouse style decorating ideas – beautiful ideas for all around the house.
Farmhouse style pallet projects – building furniture from pallets has never been prettier!
Love your floors. They look great! You will love having hardwoods. I really like mine and they are so easy to take care of and don’t show dirt. Can’t wait to see the kitchen reveal. Love & blessings from NC!
The floors look fabulous. A lot of work, but the end result is stunning. Great job. Hugs, Marty
I love wood floors and yours look great!
I’m curious to see the entire kitchen. Looks neat so far!!
How exciting! I love the look of your floors and look forward to the kitchen reveal.
Your floors look outstanding! Looking forward to the kitchen reveal:)
Blessings,
Linda
PRETTY!!!!
smart AND good-looking, my kind of floor (:
they look amazing so far, looking forward to seeing pictures of the whole room
Cool! Love the exposed nail heads. I too can’t wait to see the finished result! My neighbor did much the same as you did to her entire upstairs and it’s VERY unique!
Donna
Gina, the floor looks awesome!! Can’t wait to see the whole kitchen! Great job!
Looks great, alot of work but well worth it!
I can’t even imagine how much work that must have been! The end result is beautiful though. And how cool that you have a floor that is totally unique. Love it!
Lovely! They are going to look gorgeous! Can’t wait to see them finished.
Your floor looks fantastic! Can’t wait to see the complete kitchen! : )
Those look fantastic! I can’t wait to see the big reveal!
Some project and WOW! you did such a good job.. Looks great.
Yvonne
That is AWESOME!!! I LOVE farmhouse floors!! and what a great cost efficient way to get them!! I can tell your kitchen is gonna look GREAT!!!!
Quite the project! You must be so proud of how they turned out.
Awesome work Gina!! It looks amazing ~ boy you guys work fast 🙂
Looking forward to Friday!
xo,
Shellagh
you and I think way to much alike…
we are having a renaming party for Bessie, stop on by…
Sarah
http://flyingheartfield.wordpress.com/2010/05/31/party-time/
whoops, forgot the link!
So far, so good. It will be cool as they start to get their own patina.
I just popped over to see your PS, which is yummy! And I just love what you did with your floor- come do mine?
So sorry for the belated Pink Saturday visit! I realize I’m two days late (and a dollar short, haha!) but there are so many pinks and so little time over this holiday weekend when relatives are visiting! Happy Belated PS!
In Shoes We Trust,
Maggie @
“Do these shoes match this purse?”
Gina, the floor looks FANTASTIC!! I can’t wait to see it all put together. You are a smart cookie! 🙂
Goodgriefamundo!!
They’re beautiful.. Can’t wait to see the rest.
Wow…nice
Lucky you!!! They look beautiful. I want to get new flooring so bad, one of these day.. ENJOY!!
Debby
This is an ingenious idea!!! I swear I love the internet!! Thanks for sharing.
This looks like a fabulous make over! Can’t wait to see it all together. I am thinking it will make me want to tear out the carpet in our living room!
Your floor looks fabulous! I am so envious of people with wood floors. I want them soooooo bad! Looking forward to seeing the whole kitchen 🙂
Loving it so far! Waiting (not so patiently) for that reveal! 🙂
Those floors look Fabulous!! Can’t wait to see the entire reveal.
Wow! These floors are fantastic! I’m looking forward to seeing what else you’ve got up your sleeve. I’m a blogging newbie that’s hoping to have a little something ready for Transformation Thursday this week or next.
Alison
Can you tell me if you hosted a Supply Swap a while back – I received a great box of things from a “Cat” from Cherry Hill NJ with no return address and I can’t locate her – can you tell me if you hosted it? Thanks, Jennifer
I’m really enjoying your blog. I’ve linked you on my sidebar so I can keep catching up!
I LOVE this idea. My pastor and his wife did this about two years ago at their house but with wider and longer pieces. I am “pining” for floors just like it at my house…ha, ha..pun intended!!! I love how their floors are wearing over time. And I appreciate seeing the same idea done a little differently. Thanks for sharing!
Creative and pretty solution… Can’t wait to see it all done! Lezlee
Looooooooove how it looks!
Your floors are so beautiful. I love them.
I love the look of the floors. Thinking of doing it here, but we are a high traffic house (9 kids) and I’m wondering if they will hold up. Does anyone have any experience with this?
Love your blog, love your FLOORS!
Love these!!! We are currently without flooring in our living room & kitchen, debating on what to go with. This is perfect, though I will have to paint mine, I’m a “shabby girl” obsessed with white.
Your style is amazing. We build for a living and I never would of thought of using planks on the floor. But it looks so farmhouse pretty. I love the grain and color!
http://www.theruggedrooster.com/blog
I love it…been wanting to do my upstairs like that. Beautiful job. Thanks for the info.
hi. do the planks expand and shrink with the change of the seasons?
Hey Anna,
We’ve had them for years and they look even better now, so no issues there!
Do you have an issue with the boards separating?
No issues Beth, they are holding up great!!
Absolutely love!! Do you still feel that staining them after they are installed is the way to go? Wondering if a pre-stain might be easier?
This is one idea I need to save!
Thanks Annet! I guess you could do it either way 🙂
I love this! Definitely going with this flooring in a couple weeks. One question: what did you use as a transition from room to room? (i.e. living room to hallway) thanks!
Hi Shanita, we carried it throughout 🙂 Good luck with yours!
I have been wanting to do something like this in our entire upstairs, which is currently carpeted. The best part of your article is seeing the photo of what the floors look like years later. Thanks for sharing. I’m tired of reading how-to stories of flooring techniques that probably will not last long at all. 🙂
Thanks so much Tim! I say go for it, you won’t regret it 🙂
I second the appreciation for the later photo.
Thanks Sam!
Couple questions-did you use wood screws, or drywall screws? You said wood a couple times, and then 2″ drywall black screws at another point. Then, did you use 2′ & 4′ lengths, or 4′ & 8′ lengths? Did you have any problems with warped lumber? Or does it screw down fine if it is warped? I bought a sample piece and it is quite warped (wet when it was bought obviously), and worry once I buy the quantity needed, and they cut them down to 4′ lengths from 12′ boards, they might be wet and warp again. So anxious to do this in our bedroom-just the look I have been searching for! Thank you!
You are so welcome 🙂
We used drywall screws – but you can use wood screws. Ours didn’t warp, but if the are slightly warped you can put them cup side down and once secured with the screws it should stay put. Our boards were dry when we bought them. We cut a few pieces at 4 ft to start every other row to offset the cut ends and used 8 after that. I hope that helps, good luck!
Hi Gina, Very happy to find your site. I have an old house with a nearly 800 sq ft “great room” which is not very level. Everything I’ve looked at requires a level floor or at least flat. I actually was thinking about pine planks before I found your site but kept feeling like there must be something wrong with the idea or someone else would have done it. Now I find you!
Questions:
Why did you use 4′ lengths and then stagger them 2′? I understand staggering but was there a practical reason you wanted this regular pattern or was it aesthetic? I could see using random lengths and random widths in my project but want to be sure I’m not missing something.
It looks like you butted them as close as possible to each other (no gap between) and then let the poly fill in any gaps. Is that right?
Did you get push back from the lumber supplier when you told them you wanted to use planks for floors? I sometimes hate to tell people what I’m using something for because I get that “are you crazy” look or they just tell me so outright.
Sorry for the long comment. Thanks again for the inspiration.
They look great and I love the idea that they just get a better patina as time goes on. I don’t want “perfect” floors. If they get gouged or scratched I love it just adds to the character and can be repaired… or not!
Hi Doug,
Thanks, we love our floors! We chose those lengths simply because we liked the look 🙂 Yes, we did butt them as close as possible and lastly, no, we did not tell the folks we purchased the wood from, we just went with it! Good luck to you!!
I really like the color of the cabinets around the dishwasher and the polkadots on the dishwasher. My wife would love that!
Thanks so much Bob, she must have great taste, LOL
Been trying to get up the courage to do this in our upstairs bedrooms. What did you to use to fill the tops of the screws with then? Thanks!
Hi Mark,
We left them unfilled, other than the poly. We like the rustic look 🙂 Go for it, you will love them!
I’m mid project in my master bedroom & wondering what you did for the gaps? I was considering a wood filler or putty or wondering if getting a good amount of poly in there does the trick. Most of the boards are close together but every now & then, we end up with a good sized gap between 2 boards.
Thanks for the help!
Hey Jessica,
We did not have gap issues, we did butt them as close as possible and that seemed to do the trick for us. I’m thinking the wood filler if the gaps are large as you mentioned. Good luck!!
I have wanted to do this, but wasn’t sure the best type of wood to use. I like pine but wasn’t sure how well it would hold up over time. What made you decide on pine for your wood choice? THANKS!
Hi Michael,
We just love Pine and I will tell you, after over 7 years they look even better! We love the natural look and the farmhouse feel they give off. Good luck!
Looks amazing! Do you think I could do this right over the existing tile in our kitchen? Or would that have to be removed first? If I did do it over the kitchen do you think I would need anything to make it “stick” to it? Or just place it right on it?
Thanks Deanna,
I would definitely remove the tiles 🙂
Hello!
We are doing these floors this week.
What polyurethane sealer did you use?
That’s awesome April!! Good luck, I know you’ll love them 🙂
Hey April,
Here is a link to the sealer we used 🙂 http://amzn.to/2l8etgD
Do you have animals (dogs/cats) and if so, how well does/has the floor held up where their food dishes are?
Hey Amie, yes we have both and we have had these floors for years and they look better with time, they look more Farmhouse-y 🙂
For the wood planks, did you use a jointer to make the sides flat against each other when screwed to the floor? Or did you just leave them how you got them?
We’re planning on doing this soon.
Hey Travis,
No, we just butted them up against the next and they still look great years later! Good luck!
Is there a particular sheen for the stain? And what about tour poly sheen? We’re starting our floor tonight, but I don’t want super shiny or super dull. I know the sealer will make the greatest difference, but I want to be prepared when I drive to town for stain and see a hundred different sheens!
I don’t think so DeeDee, we used Minwax Jacobean stain, I don’t think the stain comes in different sheens or the Poly. I could be wrong so it’s probably best to check with an expert where you buy your stain and poly from. Ours are not shiny as you can see from the photos. Good luck with yours!!!
I’m in LOVE with this!! If I can get my youngun’s talked into doing that in my home I will be having it done!!! Thanks for the idea!!!
Love the floors, but LOVE the Curtins in your picture, where did you get????
Thanks Deanna, I made them 🙂 Here is a link to how I made them, https://www.theshabbycreekcottage.com/make-grommet-top-curtains.html
Have a great day!
It’s a fine idea but the picture doesn’t look like the cheap stuff, that is, #2 1X material. It is true that if you sort through and pick out the best boards in any given place you can find clear sections of varying lengths as I used to do for making drawers. Otherwise, that material is going to have knots and will not look nice and clear like the picture. Some people don’t mind knots but I don’t like them. It is also hard to find any quantity of boards that aren’t at least somewhat warped and twisted this way and that as a result of it being quickly slab cut and maybe not kiln dried as much as it should have been. If you have jointer, planer and tablesaw you can correct deficiencies like that if you don’t mind random widths (could be nice actually)
I am SOOOO copying this idea, but using pallet boards (nicer ones) instead of buying the pine boards. Yes, very labor intensive, but I think it will look super rustic, which is what I’m going for. I too plan on using drywall screws. A few questions: Did you put some kind of underlayment down – paper or anything? And, did you only screw the ends of the boards or did you put some throughout, especially on the 8′ pieces?
Hi Sheila,
We did not put anything underneath just put them directly over the subfloor. The screws were just on the ends. Good luck with your!!