Why are outdoor rugs so expensive? Indoor rugs, I can kinda understand – because a good one can last you at least a decade. But outdoor ones might last a couple of years at best in our kinda weather. So when I started putting together things for our brand spankin’ new front porch, I knew I’d want to find a DIY outdoor rug solution. After some smart shopping and lots of thinking, I figured out how to get a pretty rug for under $25.
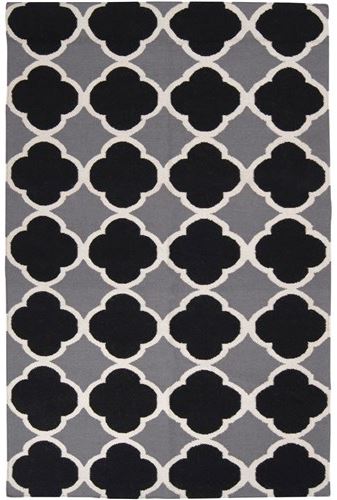
First, let’s take a look at the rug that inspired my DIY outdoor rug project. This pattern from Zinc Door was right up my alley – however the $358 price tag was not. I mean, we just spent like 90% of the budget on wood and paint and nails – this one thing would put me over budget in a heartbeat.
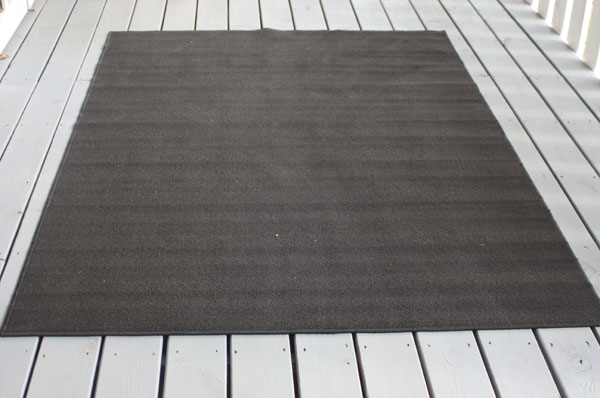 This rug, however, was $20 at my local Walmart. Yes, Walmart. It doesn’t say outdoor rug, but it’s made from the same material as my indoor/outdoor rug in our half bath that came from Ballard’s – and it’s under a roof, so I’m going to take a chance on it. $20 isn’t worth crying over if it gets wrecked in six months.
How to Paint an Outdoor Rug
Besides the rug, I also used:
- Scrap cardboard from an old box
- Pencil
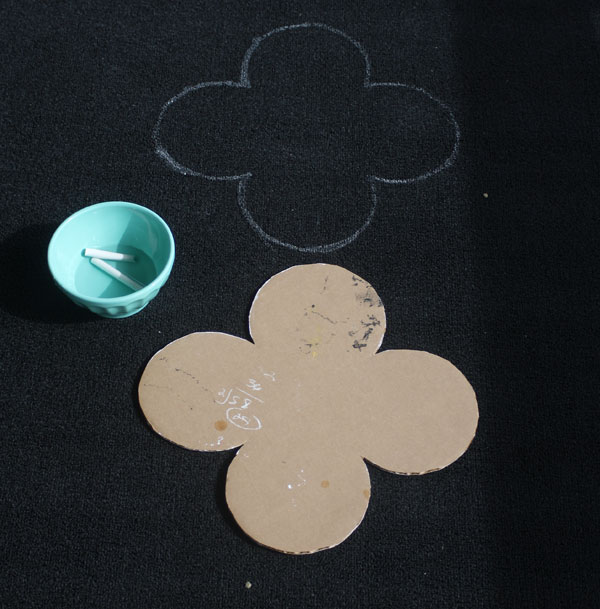
- Cereal Bowl
- Chalk
- Water (in the cereal bowl)
- Fabric Paint
- Soft Bristle Paint Brush
- Scissors
- Measuring Tape
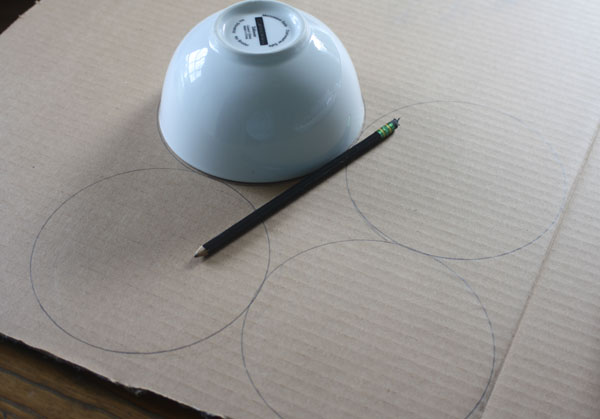
I started by tracing my bowl four times in a square pattern, with the edges touching.
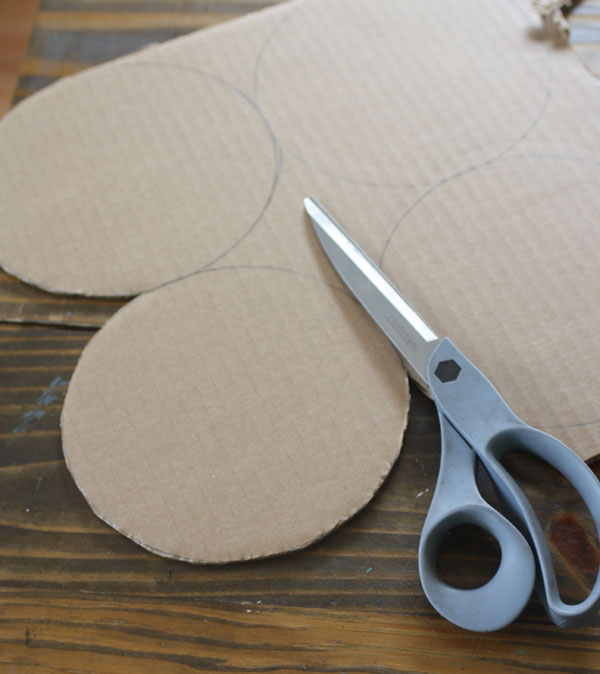
Next, I used the scissors to cut out the pattern, just going right to where the circles meet on the outside, think like a four leaf clover.
Next measure your rug and place the pattern in the center. Using cheap – NOT DUSTLESS – chalk, trace around the pattern, then move it to the right and left, making a whole line all the way across the rug. Use the bowl to put water in to soak your chalk, because dry chalk won’t show up well – but wet chalk does. It will take a lot of chalk, so be sure to have 5-6 sticks to be sure you have enough.

Then, using your brush, paint right over the lines, I used my brush as the width guide. It won’t be perfect – but that’s ok, it just adds charm! Use the bristles to kind of work the paint into the rug a bit so it will be a fairly solid line.
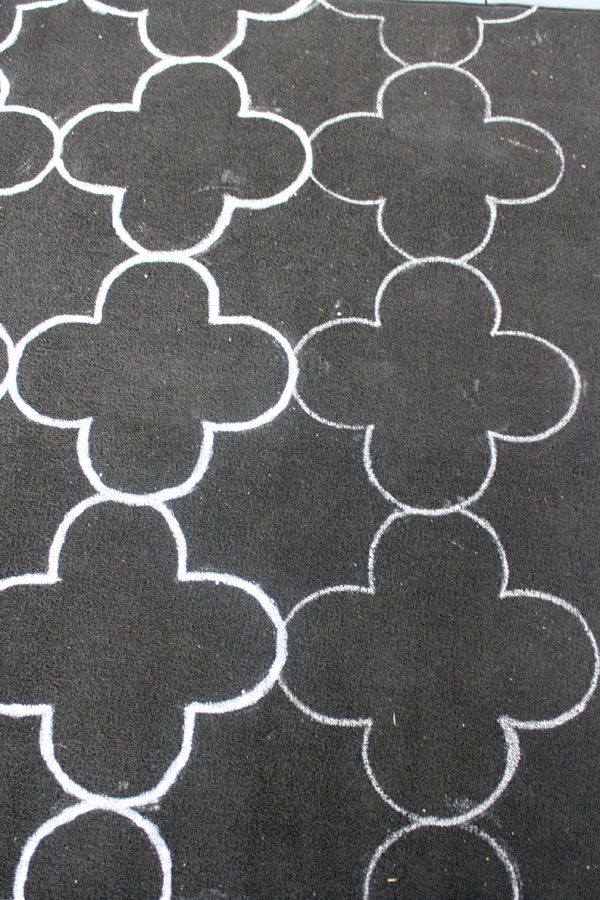
I traced a line, painted it, traced a line, painted it, over and over until I was finished. You’ll probably have chalk smudges, but a vacuum will clean it right up after all your paint is dry.
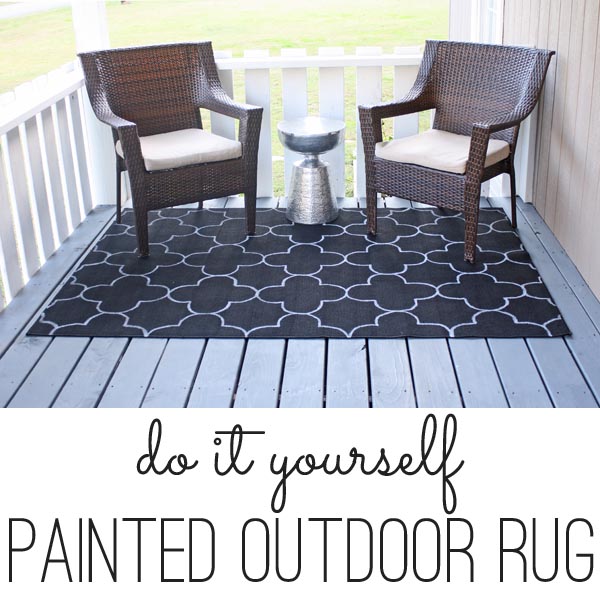
Two hours of work and about $25 in supplies gave me the look I wanted for an outdoor rug without breaking the bank.
(Edited to add: I get a lot of questions about how the outdoor rug is holding up – and after two years it still looks great!)
awesome idea! you’ve got me thinking now!
Thanks! You could do it on any fabric, too!
Did you use any kind of sealer afterwards?
I didn’t Deborah but you certainly could 🙂
That is a great idea! I love it so much. You sure can’t beat that price ~Sonya
I know, right? I thought the price was the very best part 🙂
Hi Gina, First of all, what a creative lady you are! I love your painted rug design. Now for the disclosure: I’m the social media manager for Green Decore which is a retailer and wholesaler of two fab ranges of outdoor rugs – the flat plastic ones which are woven from straws made from recycled plastic bottles and the fluffy dhurrie type rugs which are woven from yarn made from recycled PET fibres. At first I thought the price of outdoor rugs was a little steep but I actually have four outdoor rugs now and am totally blown away by the quality and durability of them.
I’ve been using two of them in Crete, Greece where I live – I keep them out on the balconies and they haven’t faded at all in the hot sun (I’ve had them for four years and they get a lot of use) – in fact, they look as good as new with no wear and tear at all. This is because they’re woven from heavy duty plastic straws and edged with heavy duty binding tape – no frays or breaks in stitches at all. The great thing about them is that when I go to the beach, I roll them up and take them with me to use as beach mats. They really are much stronger and more durable than beach mats I’ve bought in the past (which last two years at the most even though I’ve always been very careful to roll them back up properly and store them well). These rugs stay really cool in the hot sun, even when the sand is much too hot to walk on. They’re also great to take along on days out in the park and picnics, etc. The rugs I have in the UK for when I visit are also still looking new, despite being taken along on family days out on the beach and on picnics.
All of the Green Decore rugs are fully reversible for two different looks so I’ve come to the conclusion that with the wide range of designs and colours and considering just how durable my rugs have been (I’ve seen cheaper ones in shops and had a quick feel and they are nowhere near as well made and durable as the ones I have) that these rugs are great value for money.
They’re easy to clean with a quick hose down and dry quite quickly. When I’ve used them on the beach, all of the sand shakes out really easily too. I’ve used the ones in the UK in the hallway (keeps the hall floor/carpet dry in rainy weather, which we get a lot of in the UK) and in the laundry room or kitchen. They’re soft and comfortable underfoot, so nice to walk on barefoot, quite springy in fact.
Having said all of that, I am still so impressed with the rug you’ve painted and your creative skills 🙂
Hi Debbie,
Thank you so much!! And, wow! Your rugs sound amazing as does living in Greece and being able to grab your rug from your balcony and head down to the beach!! Thanks so much for sharing and your kind words 🙂
Hi Debbie
Just wondering if there are different kinds of these plastic straw rugs? I purchased 2 from World Market. The were used on a covered porch in Daytona Beach, Florida, so it was hot, but not in full sun or rain. Anyway these two rugs completely deteriorated with about 6 months. I kept seeing this blue dust on everything lol, that was the beginning of the end. 🙁
Are you familiar with the World Market rugs I’m referring too?
Gina, I totally love your idea and will be using it in another space. I’m a bit of a rug fanatic and I’m always looking for good deals on unique designs to make my space come together.
Thanks so much for sharing.
Thanks Pamela, good luck when you get around to it, I’m sure you’ll love it!
Pretty, Gina! This looks great!
WOW! brilliant- gonna copy this one for sure!
Thanks for sharing, Gina!
If you do, send me a photo, I’d love to see it!
Wow Gina… This is amazing! Your method to make the stencil was super cool too! Your carpet looks amazing on your porch!
Thanks, Donna!
Always love a great DIY rug project! Thanks for sharing how you made the template!
Yes, thanks for sharing how you made your template. This is exactly what I’ve been looking for and hope to have a beautiful rug like yours very soon. Do you think that house paint could be used rather than fabric paint?
You probably could, but I’d add some textile medium (a liquid that makes it compatible to fabric) so it would work better.
What a fabulous idea! I love this and how you came up with your design to use. You are so creative!! Steph
Thank you! It was due to pure laziness, I tell ya. I am way too impatient to stencil.
Love this, Gina. Pinning!
Amazing!! Your ‘get-it-done’ courage gives me hope for my own projects!
Great idea and your rug looks good–probably the best DIY outdoor rug I’ve seen around DIY land. I wonder though…if you could put a poly topcoat on it to protect it from the elements and/or foot traffic. I was thinking of making your version for my back deck, which is uncovered, and my front porch (covered). what do you think?
Thanks! I don’t know about the poly coat, I’d think it would make it hard and not so nice to walk on? It should definitely work for the covered porch if you use outdoor safe paint though!
freaking. brilliant. ;}
Love that you used a bowl for the pattern! Brilliant Gina!
What a fantastic idea! You did a beautiful job I love this so much!
I love this! And how smart how you made that stencil, and to use the chalk! Great tips.
Love this idea! I’ve had my eye on an outdoor rug at Lowes, but haven’t bought it because of the cost. I am going to try this, first, by creating a stencil. Wish me luck and thank you, so much!
I seriously love this! You make it look so easy and I bet feel happy whenever you walk past it because I know I would!
Hi Gina
This a great project. I might even do one myself it looks very easy. Thanks.
This turned out great! I love the affordable price too.
This is such a great idea! It looks like something that I could actually do.
What type of material is the rug made out of? Trying to find the same type at my WalMart. Also, how has the paint held up to being walked on?
It was a poly-blend I think? It’s actually held up really well! I was kinda worried about it, but it’s been months now and it still looks great.
I loved the way you created the pattern and the way you used the wet chalk marks to keep the pattern true.
I redid a front porch for summer using a 60 X 108 in tablecloth as a rug cover. The fabric is polyester and is washable. I used 24 in Square fatigue shop mats found at Harbor Freight. I hot glued the inner edges together and then cut down to the size of my porch which was 4 feet by 7 feet. Then I flipped the mat/rug over and hot-glued the fabric to the back. This took about 2 hours to complete. It lasted all summer and now its time to change out my fabrics.
Okay… project number two you’ve inspired me to do!! Just finished staining our deck, and I’m absolutely doing a rug like this to put on it!!
This is such a fabulous idea Gina! I can’t believe how simple it is to make and the cutout is genius. I will have to try this! Thanks so much.
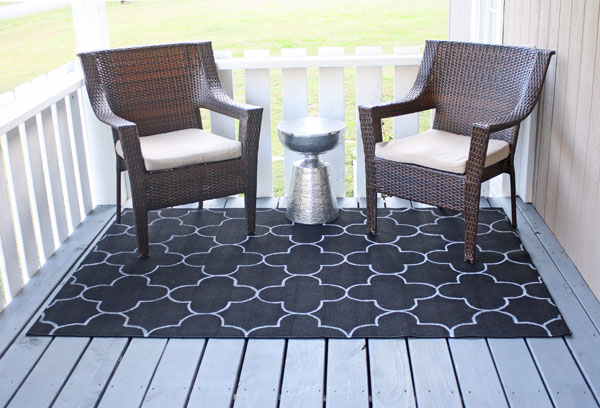
Beautiful rug!! Can you tell me where you got the woven chairs? Or the name of them.
Thanks Lindsay!! I got them at Target but it was several years ago!
Hi Gina,
I’m another one of your fans living in Greece. I just love your made-over carpet and am wondering about something. I bought one of those woven plastic straw rugs recently, It’s dead ugly but I had planned on spray painting it with enamel paint. Then I started looking for instructions on how to do it and found out that paint will not really adhere to this stuff. Sooo, my question is – have you ever tried the technique you used here on such a carpet. I thought to use heavy upholstery fabric and a permanent spray adhesive and then use polycrylic to seal it.
If you have any thoughts on my dilemma please send me an email.
Much thanks,
Hi Lisa, I have not but I know they do have spray paint for plastic outdoor furniture, maybe that would work? Maybe try it on the reverse side just to see before doing the actual side you would be displaying. Good luck!