Working on my home has been a serious priority this year, which is kinda obvious since I’ve basically finished up six spaces in the last six month.
Holy cow… did I just say six in six? Yeah, I guess I did.
Anywho, I’m on track to do seven in seven, because we just started our master bedroom makeover. I’ll tell you more about it all next week, but we’ve gotta start at the bottom and do everything from scratch, so why not start with the floors?
All throughout our house the floors have slowly been ripped out, one room at a time, and we’ve been replacing them with our DIY 1×8 pine plank floors. I know, I know, it’s kinda controversial. I get emails about them nearly every day, people questioning my crazy idea. Well crazy kinda works for us, so we’re still going with it.
We first did our DIY wood floors about 3 years ago in the kitchen (aka the most used space in our house), and slowly worked our way through the rest of the house. With only the living room left to give new floors, it’s obvious we’re obsessed with the look, feel and durability of the cheapest flooring option we’ve ever found.

Our room started with some seriously ugly 90s carpet that was worn out and yucky. Blech! Although we’ve done a few rooms already, I’ve never really done the whole project as a post – so go grab a glass of sweet tea, because we’re gonna walk through the whole project, m’kay?
Got your tea? Alrighty then!
First we had to rip out all of the old carpet, which in a traditional built home isn’t that complicated. However, in a mobile home they put down the flooring, then build the walls on top of it. Walls built ON TOP of carpet. Sigh. We tried a bunch of different methods, but the best way to go is to take a chisel and cut through the carpet all the way around the room.

So that’s what we did. And by we, I mean Mr. SCC. I just stood back and took photos. Oh, and I provided copious amounts of sweet tea. I’m such a good wife.

After he had all the carpet up and outta here (woohoo!) We cut 1×8 number 2 pine planks down to 4 ft lengths for most of the room, plus some 2 ft pieces for starters. I actually did help with that, hence no photos. So it’s either photos or labor… gotta pick my battles. But, we’ve already done a full post on our floors, so I’m covered, right?
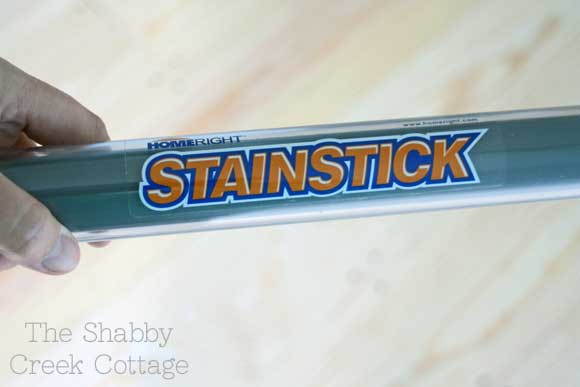
Ok, let’s get to the staining part. Usually we do it on our hands and knees the old fashioned way, but my friends at HomeRight asked me to try the StainStick and sent me one to use for this project.* Uh… hello! Dude, it was SO much faster than my old method. Like for reals. It took me less than 1/2 the time than normal.
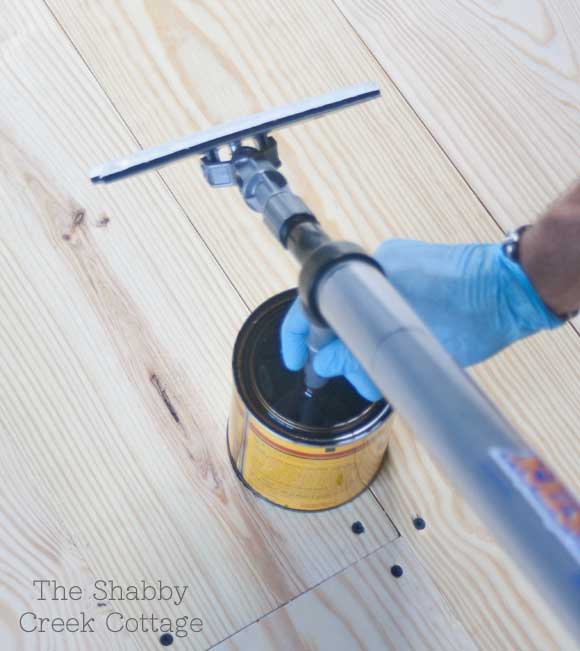
It was pretty easy to use, you just insert a little straw-like thing into your stain, suck it up into the stick and stain it up. If you were doing a tiny space (like our bathroom) I’d say it might not be much different, but a larger space is perfect.
And it works on wood decks & porches. Guess who’s working on those soon? That’d be me. And again, by me I mean Mr. SCC.
Back to the bedroom….
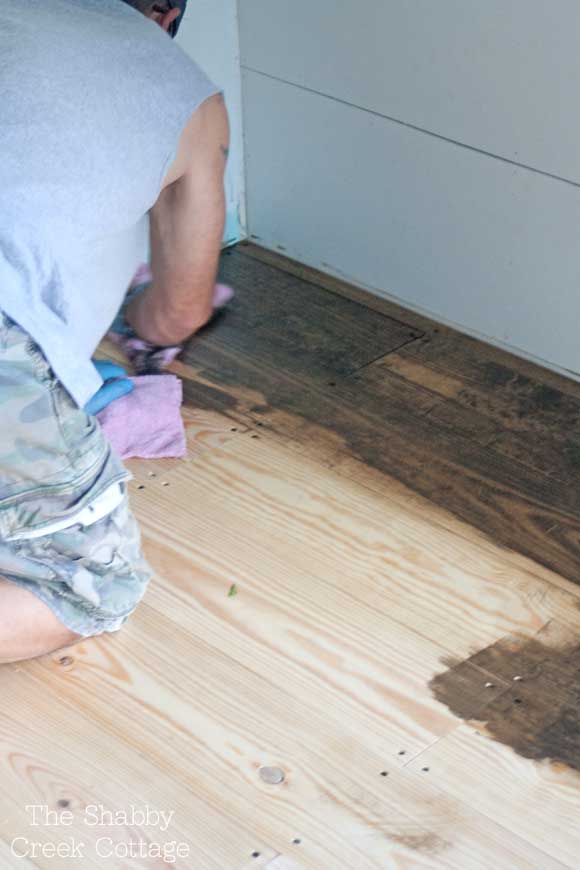
It was fun to spend a little quiet, quality time with my sweetheart: me staining, him wiping. We talked about all kinds of things like how to pronounce the stain color…

If you know the answer, hit us up in the comments. We might take a poll or something. I’m thinking Ja-co-bee-an. He says Jaco-bean. Maybe we’re both wrong?

No matter how you pronounce it, we waited 24 hours after the stain, then sealed them with 3 coats of poly-acrylic.
To answer a few questions that I know someone will email me (because we’ve been through this before):
Yes, we use local pine, from a local source. We don’t go to the big box hardware store – think mom and pop small shop. We buy Georgia pine because it’s the closest we have to home. And, it’s cheaper, coming in at around 75 cents a sq ft.
No, we don’t let it acclimate. We go buy it, bring it home and start planking floors. That’s why we choose local wood, it’s already acclimated to our area.
Yes, there will be screw holes showing. We like ’em like that. It adds to the farmhouse feel, don’t ya think?
No, we don’t have cupping issues. We’ve had these floors for 3 years in our kitchen without any cupping issues at all.
Yes, we screw them straight to the sub-floors. (And for the first time, we didn’t even have to replace them in this room.)
No, I don’t know how they affect resale value. This is our forever home, so we never think about it.
YES! I will answer any other questions about the floors (or anything else) – just leave them in the comments!
*I have partnered with HomeRight for this post. All projects & opinions are my own crazy ideas.*

I LURV THIS!!!! Fantastic, and yes the screws do make it seem more farmy. I can’t wait to see the whole thing…Hurry UP!! LOL j/k
Thanks, Stacey! Yep, I like the farmy vibe 😉
Hi. I was just wondering if you have any ideas for installing this over a cement floor? I was going to put down a layer of underlay, but not a sub floor..
Hi Nicole,
You would definitely need to put something down over the cement. Good luck to you 🙂
We used 4×8 sheets of 1/4″ plywood in pine. We cut our sheets to 8″ wide and left them 8 ft. long. We put these over our cement floors with glue made for putting down wood floors. This was done in the kids’ playroom with an attached bathroom. My kids get these floors wet all the time and we have had no issues. I forget what the name of the glue was, but these floors are not going anywhere. It’s been a little over a year now. I like that if one gets messed up beyond repair, we can just pull it up and glue down another;) For the topcoat, I used a clear cement sealer. Oh, and before we stained or sealed, we drew an huge octopus on the floor first since it was kind of the theme in that room. I love these floors and am considering doing my entire house now, even though we paid thousands of dollars for LVP. I just love them that much and regret the wood tone I chose
At any rate, just wanted to let you know, putting 1/4″ plywood over cement is certainly doable. 😉 good luck!
Hello. Couldnt figure out where to leave a comment so i am just replying under your name. Anyway, i am going to redu a few rooms with puppy accident carpet, time to go. So i was considering plywood planking but came across your post and have price the 2 and this seems cheaper with less work than ripping the plywood. So to my ? I see you used screwz, i planned on using my nail gun and was wondering what you thought about that. I know you like the look of the screws but as far as holding up. Also i plan on putting glue on the bottom of the planks as well, did you glue and screw or just screw ? Sanding, palm sander ? To what grit, did you sand after the stain? After each top coat, what top coat did you use? I know, i know way to many ?. Thanks for your advise
Hey David,
No worries, never too many ?’s 🙂 We did use screws only, no glue. A nail gun might work, but can be somewhat unpredictable & screws give you full control. I used a palm sander, did not sand after staining and I sealed the floor with Helmspar satin poly, we used 3 coats for durability and I recommend letting them dry completely between coats. Good luck!
I too don’t know where to post a comment. Are there any issues with liquid be spilled and caught up inbetween the planks? Or worse a puppy accident- will poly prevent liquids from getting inbetween planks and ultimately seeping underneath the planks?
Yes I too was wondering g how it will hold up to spills and pet accidents?
It has held up great! No stains and easy to clean!
It is just very important to make sure your boards are tight together and if not that you have filled any gaps or holes with stainable putty. Then you must be sure to do 4 to 5 coats of poly as these are your floors and you don’t want to cheat on them you will regret it.
Hi, using screws with wide threads all the way up to the head of the screw is best to prevent squeaks and loosing of planks. If you use a nail gun, try to avoid using smooth shank nails since they tend to back out of wood over time. The better nail to use are galvanized nails since their texture grips the wood better.
We did this too! and love it! I did not stain the floor I left it natural. The wood has started to patina. Thanks for the idea. We are going on 1 1/2 years.
Sounds beautiful Bonnie!
I love that you are so nutty about all your projects. It is always fun to read your blogs. Enjoy those cocktails. Us southern girls must haves!!!
Kasey
Thanks Kasey!! You got that right 🙂
I would like to do this in a partially temp controlled workshop I have. There is a window unit with a/c and heat that I use whenever I am working but I don’t run it if I won’t be in the building. Would the inconsistency in the temp create trouble for me using this idea? Or humidity?
Hmmmm, you know I am not sure Mindy, ours is obviously in a temp controlled environment. I imagine it would be ok but again, I don’t know for sure.
Humidity can cause the wood to swell and if the planks are not given spacing to expand, it may cause edges to buckle.
Would you mind posting photos? I’m considering this path for an attic music studio/rehearsal space. I’d love to see how it wears without stain.
Thanks!
I love this.. I think the screw holes give it a lot of character. Since you have had this for a while in another room.. is it easy to care for/clean? Thanks.. love it!
Oh it’s simple – just tell the kids to clean them! I kid, kinda…
It really it easy, I just sweep them like normal and use a wet swiffer most times, but clean them with Murphy’s oil soap about once a month.
I’ve been following your blog for awhile now, Gina. I love your floors. We have a mobile home, too, and we think we’re going to try this also. You’ve probably already said so, but could you tell me how much of an expansion gap you left?
We left about 1/8 of an inch around all of the walls, but the boards themselves are side by side together as closely as possible.
Thanks for stopping by!
My hubby & I just went to look at floors at our local home improvement place last night and I am pretty much horrified by the cost. 75 cents a square foot sounds WAY better than anything I saw. Big props to you for doing what you like & what is authentic despite some naysayers.
Girl, I hear ya! We looked high and low a few years ago and did the kitchen just because it was so cheap. I had no idea I’d love them so much! Check out your little local lumber stores to find the best prices.
This looks great. I didn’t know you could use regular wood on a floor, but it looks wonderful.
it does look fantastic!!!
Cheryl @ The Creative Me and My McG
It’s definitely Ja-co-be-an 🙂
And it looks lovely – have done mine in a very similar stain, Alice @ Mims Make Lists x
This is such a clever idea! That little peek looks amazing so far…can’t wait to see the whole room!! XO,
Christy
I love your floors! My husband and I did the same thing in our kitchen, except we used 1x4s. They were screwed to the subfloor and then we covered the screw holes with chunks of dowel. (Which I don’t recommend doing – it’s gorgeous but it took FOREVER to finish.) We didn’t stain ours, just polyurethaned it.
I love it, but it does get pretty beat up by the kitchen chairs. (Maybe because it’s a different type of pine available in the Northern part of the US?) I think it would be perfect for rooms with lower traffic though, and am considering going your route and staining it a dark color in another room of the house.
So yeah. You’re not the only crazy people that have done this type of flooring!
Beth,
Please post photos if possible! I would love to see the natural wear look.
Thanks!
This is a great idea. The floors looked really good. I think I would use a pre-stain sealer if I were to do this and maybe two coats of stain. You have such good ideas!
Oh, girl, you are SO funny. I love reading your commentary on your projects. And what a project this is! I’m so proud for you–your home already looks wonderful, and month by month this year it’s getting even better! LOVE those floors!
P.S. So far as I know, it’s Juh-CO-bee-uhn. I may be wrong, but I think that’s right!
Yep, I am pretty sure it is Juh-CO-bee-uhn, too. Great idea on the floors!
Gina your floors look AMAZING!! And I love the fact that you can see the tops of the screws, they are perfect, and I love them. Cannot wait to try this someday 🙂
Wow! Your floors look amazing. You did a fantastic job
Judy
We have an active 60 lb dog and were wondering how the pine holds up to pet nails… love your floors and would like to try them 🙂
Not well to dog nails. We did our kitchen and den in yellow pine 18 years ago and my three dogs have given it character. So if you are going to be upset with marring. Don’t choose pine. Otherwise beautiful floors for a fraction of the cost.
The floors are gorgeous!!! I love that you used locally sourced wood.
I can’t wait to see a more panned out view! They look gorgeous from what I can see!
Gina … My husband and I live in a 2001 Manufactured home, as well. I am wanting to rip up all of the carpet and install new floors. Was thinking about wood laminate, but the kind I want is rather pricey. May just try your method. I love the look and you did an outstanding job!!!
The floors look amazing, thanks for trying the StainStick for staining.
HomeRight
LOVE your floors! The exposed screws give it so much more character =) And thank heavens for the Stain Stick! I hadn’t heard of that tool yet.
What a great idea!! :)I want to try this someday for my own home!
I just found this blog on bloglovin.
following now.
Blessing,
Delvalina
When you are installing these floors and are approaching an exterior door, how do you enable the door to open, since most flooring materials are much thinner than 1″? We don’t live in a mobile home, but our exterior doors are metal, so shortening the door isn’t an option.
Maybe you could just put tile down in the entryway, about a 3’x3′ or 4’x4′ area, then use a nice quarter round to edge around the wood where it meets the tile.
A 1″ board isn’t actually an inch thick…more like 3/4″ I think. Maybe you could sand it at a slightly slope at the doorway too. Just brainstorming. Most outside thresholds are also slightly raised so should also minimize the problem.
Thanks Mary 🙂
I was wondering if, after the last few years, the poly acrylic is still holding up? Are you happy with it? And can it hold up to regular mopping? I have a big dog and messy family lol. How come you didn’t use polyurethane for floors? It is beautiful and you guys did a wonderful job!
Thanks so much Kristie,
They are still looking great…better actually, we love how they look with age. Oh, and I have messy family and a dog too, lol 🙂
I love the floors. We live in a farmhouse built in 1900 and our floors look just the same. So, I’d have to say yes- it does add to the farmhouse feel. The only thing I don’t like about ours is that our screw holes are actually nail holes and the nails have a habit of popping up on occasion. Not always so good for bare feet. But I do enjoy the look of the holes.
When the nails pop up, you could switch them to screws. You already have the pilot holes!
Gorgeous floors! Love the stain color, too. You and your hubby do great work!
Gorgeous floors! Love the stain color, too. You and your hubby do great work!
Love your blog! Adding it to my blog roll of “Upwardly Mobile Blogs” in my quest to renovate a mobile home into a lovely little cottage!
Blessings, Theresa @ Cottage Violets
I’m here from your pin on Pinterest….LOVE this floor….I’ve always wanted to try this but have been scared with all the talk of letting the wood acclimate and the cupping problem. Glad to hear that this is not the case. And I love the screw holes showing. This is the exact floor that I want. Love the stain stick too….makes it look like the job would be so much faster! Thanks so much for sharing your project!
Jamie | andersonandgrant.blogspot.com
OMG! I LOVE these floors! I was thinking I would do something similar in my house when I buy as I really don’t like carpet… I really like this. Thank you, and the best part is you used my favorite stain 😉 I’ve never really thought about how I pronounce the name though, I think I would go with ja-co-bee-an
I really like this project
Holy cow!! These look amazing Gina!!
I’m so glad I had the chance to meet you at Haven 🙂 and I love all you’re doing with your home!
Ashley
I love this idea and the price is even better! Since you just screwed the planks into the subfloors and didn’t use underlayment, do you have issues with them being loud?
Hi Cassie,
No, not that I’ve ever noticed. However our house is only one level, so it might be noisier if you did them upstairs? No real difference between it and the “traditional” flooring in our house, which does have underlayment.
Thanks for stopping by!
I was wondering if you would be able to use an underlayment with this type of flooring? I’d love to do this but I’d like to put an insulated underlayment under it.
We did pine plank flooring in our house when we built it 21 years ago. Years of wear and tear have left them looking naturally worn and people often ask if they are “reclaimed” floors, which we take as a compliment. I’ve thought about refinishing them, staining them darker, but the thought of the time and the work (of moving everything out) freaks me out. So I just remember what other people have said about our floors and try to stay content. We have gradually added pine plank floors to other rooms as well, including our stairs, and have painted them ivory. I love the look! The latest room was our master bedroom on the second floor (we removed 20 year old carpet as well) and I haven’t noticed much of a difference in noise. We do glue and screw the boards down and then fill the holes with wood plugs be fore we paint. The farmhouse feel comes through with those too! Thanks for sharing your photos and tips. Your dark stain is inspiring me to redo our floors….”oh, honey…!” 🙂
Risa, I want to paint my so to be plank floors also. What kind of paint did you use? Are yours pine planks?
Semi gloss paint? Any top coat?
thanks
I want to paint my so to be plank floors also. What kind of paint did you use? Are yours pine planks?
Semi gloss paint? Any top coat?
thanks
We did the same thing to our house…an 1894 farmhouse. We screwed lumberyard pine, 12″ wide planks to the subfloor and stained and polyed. (we used a water based poly since we finished during the winter and I was deathly afraid of the fumes of an oil based) We have a 30 pound dog and she has scratched up the floor quite a bit in her high traffic areas. I wonder if we had used the oil based poly if it would have not shown the scratches as much, or if it is just because of the soft pine? I guess I’ll never know, but don’t have any intent of refinishing them anytime soon. I think it just gives it more character!
I just fell in love with you and your home. I am planning a house now and am trying to sell my dad on doing our floors like this, fiancee is sold but dad isn’t. Plus you said “No, I don’t know how they affect resale value. This is our forever home, so we never think about it.” It is nice to know someone isn’t remodeling for resale or decorating for resale but is doing it for what works for them!
Very important question…do these floors snag your socks?! I’ve seen this treatment done on other blogs and I LOVE the way it looks, but I’m really worried about the sock-snagging potential. 😉
Not a sock snagged yet 🙂
That question made me smile. 🙂
I love, love, love these floors! They look awesome and definitely give the whole barnwood, farm type feel! Just one question, I have an 86lb lab and even though I keep them her toenails trimmed, they do hit when she walks or runs through the house! Just wondered how these floors hold up to pet toenails? Thanks for sharing!
Did you sand or buff before staining?
Also we have Lino all over and I was thinking of installing overtop. It’s very old and will be very labor intensive to remove. Any thoughts on this?
I sanded the boards individually before we put them down so they were ready to stain when finished. I’m not sure about laying over lino, but Mr. SCC says it’s definitely possible.
Hello! I LOVE your floors!! I am so happy to have come across your post because I’m figuring out how to use my old fence wood (1×6″, 3/4″) for my kitchen floor!! I really like the look of the screws, too. I’m going to try not to sand, because I don’t want to lose the grayed look, but ohhhh, I love your floors!
Ironically, I have enough gorgeous cork flooring to do the whole 12×12′ kitchen. Never even opened the boxes. I guess if I end up with too many splinters or something, I can always put it down. Anyone in the market for cork…? [LOL]
I live in Tennessee and was interrested in buying some of this lumber, could you let me know where you purchased the wood?
How would you install this on cement floors?
I probably wouldn’t do it on cement. If it’s in good shape, why not just paint it?
Would you mind explaining why you wouldn’t do it on cement? My husband and I really want to try this but it would be on cement. Thank you!
You could, but you’ll have to put down a vapor barrier (like you’d put under click wood type floors). It’s basically the same process, just a lot harder because of drilling into the concrete to get the screws to hold.
They make a concrete stain that you can make to look like tile by using thin masking tape to tape off where the grout lines would be. Stain over it (very carefully), let dry, pull up the tape, voila. Instant tile. Finish with a few coats of polyurethane. Just by using the tape & different colors of stain you could make all kinds of designs.
I think you can lay sheets of plywood over the cement floor to attach planks to.
There was a question a while ago about tapering down the fact that the boards are one inch high and in the case of the person who made the question their steel doors were less. Please advise
Hi Dave,
I really don’t have an answer, because I have no idea. My only suggestion would be to use a tiled area right inside the door for an entry, so the door can open, then use trim to transition the tile to the thickness of the wood.
Hope this helps!
We have this in our home too. I did my Living Room over 20 years ago and they still look great! Did the rest of the house a couple of years ago. We did not screw ours down, we used wood glue and square nails. Love the look.
Did you glue the planks to the flooring underneath? What kind of flooring was underneath?
Hi Tina, No, we just screwed them down to the plywood subfloors.
How do you clean the floors?
We just use a little soapy water or natural wood floor cleaner. You can use anything for wood floors 🙂
gorgeous!
This may be a dumb question, but why not stain the boards before installing them? I’m all about cutting down on as much bending over as possible!
Hi Gina! I am wondering exactly what kind of polyacrylic you coated the floors with (if you mentioned this before, sorry!). My husband and I just installed the raw planks and I’m terrified about the impending stain-poly steps. Eek!
Hi Ceci,
We used water based Polycrylic on my bedroom floors, but we did Helmspar for the kitchen because it works better in areas with water.
Hope this helps!
Gina
You used Helmspar instead of poly-acrylic ? What company sells this product ? I’m from Ontario, Canada and want to finish our camp that has all pine flooring.
You mentioned that you used a again stick applicator? Is it the only tool needed or is it required to wipe after.
One last inquiry…could I use this applicator to white wash a floor? Thinking of doing one of the bedroom.
No from Northern Ontario
Hi Marthe,
I get most of my products from Home Depot or Lowes. I do not know where you can get them in Canada, sorry. The stain stick is not necessary but it sure made the job a lot easier and quicker! As for white washing, I am not sure as I have only tried it with the stain and I don’t want to give you bad information. Good luck 🙂
Lovely tutorial! I have been wanting to do my own floors for a long time. What I love about this method is that you can go room by room which makes it very budget friendly. Plus, if I start with my son’s room and screw it up, no one will ever know. 😉 . I do have a couple of questions though–Did you place the planks right together or did you add a small space? Also, after 3+ years, do you experience any squeaky boards? In addition to the screws did you use any flooring adhesive?
BTW–Totally doing a plank wall in our master. Love the simplicity of your designs!
We put them right together, and didn’t use adhesive. No squeaky boards yet 🙂
Thanks for reading!
You have done a great job and this floor looks really awesome. I will definitely try to do such activity by myself in next flooring renovation.
Hi 🙂 I stumbled upon this from Pinterest! I am SO interested in doing this! My home was built in the 50’s and all 3 bedrooms have original pine flooring. I have learned how to refinish a floor on my own. It is a hard and quite expensive process, but the end result looks amazing!! I have this very napped carpet in my kitchen that I want to get rid of. I have used water based Poly on my furniture but I am going to assume that an oil based poly would be better for the kitchen. Is that right when you said “Helmspar”?
Do you have any issues with dust/dirt getting into the screw holes? Building a new home next year and love the look!
I make sure to put extra poly on those so it won’t catch dirt in the cracks. I do vacuum it regularly as well as sweeping to help catch any leftover bits.
What type of screws did you use to screw down the boards? I’m defintiely going to do this in my old farmhouse.
We use 2 inch drywall screws. They’re black so they blend with our dark floors and have a sharper tip than wood screws.
Such a wonderful job! Did you have to do anything to the sides of the wood? In other words how did you get them to fit so closely together without gaps?
I love my pine floors, but they do not stand up to heavy pet nails. Out dog is 90 lbs. & you can tell where he spends his time.
We used 1×4 pine in the living.room and dining.room in our new log cabin. We got tons.of it at
Builders supply going out of business Auction for nearly nothing and it sat in said house until we were ready.for flooring and I had to talk dh into using it. I love it. Computer chair was rough on it but I put down a rug and you can’t tell it.
I’m a fairly new homeowner (6yrs in) and have started to make things my own. I just did windows, siding and the roof and now is the time for the inside. Wanted to start with my kitchen. Saw this on Pinterest and had to check it out! I have the rolled linoleum already and it has to go! Definitely will be doing this in my kitchen. Hope it can stand up to a 100lb German Shephard!! Haha
You haven’t any idea how timely this post was for me. We had been discussing doing this very thing in our vintage 1840 to 1920 cabin turned farmhouse in Tuscumbia, AL. It is a MESS, and we are doing so much of the work ourselves. Thank you again for your information!
Oh yes, and I will be following! ‘-)
I will be tearing down an old garage in the spring (and by me I mean me). After reading this I will be redoing my cottagefloors with the pine from the wall after planing them. Thank you!
Hello….I just moved into a Mobile home…pulled up all the carpets & have been shopping around for some hard wood flooring. I love the look of your floor….did you put down any blocker or sound proof material before placing the wood planks? I am gonna do this in my 13×13 dining area…Thanks
Loving it and am super impressed with you guys! 🙂 one quick question (maybe for the mr….): do you think this would work with underpayment? Thanks so much in advance, Kristin
Hi im english and it is pronouced jack o bee un its after
the jacobean period where dark wood was the fashion 🙂
HI!
i am interested to know where you live, thinking about this idea and you mentioned you didn’t have many problems with cupping of the wood etc. The harsher climates affect wood more dramatically so just trying to get an idea of what your climate is.
Love the idea, I think my husband will be totally opposed so I am doing a lot of research first…
Thanks
We live in Tennessee (and on a creek) so the summers are super humid. Hope this helps!
Doesn’t the pine scratch? I used to have pine furniture (I know, totally different) but I could scratch it by just pressing my finger nail into it.
We’ve never had an issues, but big dogs would definitely make that possible!
Hi Gina,
Great job! You are truly an inspiration! I too live in a Manufactured Home and it has taken me 15 years to wrap my head around it…my own issues…but with The Lord’s help I am now seeing past our 2 1/2 acres of weeds, gravel driveway, etc…and am creating the home of our dreams. In middle of DIY projects in every room…I’m a bit impulsive lol That’s just because I start something and then my hands get tied waiting on my husband to do something and I move onto something else…it’s a vicious circle since he is a procrastinator. We make some DIY team lol I need to start to learn to use the big power tools…then I wouldn’t have to wait on him. Anyhow…my reason for writing you…besides the fact that I wanted to say thank you for your inspiration…but I’m curious about the floors. I’m trying to talk my husband into doing DIY wood floors either using 1×6 pine boards or plywood cut into planks…he is apprehensive where I am willing to jump in and figure out as we go…don’t know what The Lord was thinking when he brought us together…He had a plan. I want to start in the kitchen since that is my current and first project. He is concerned about water and traffic…we have a teenage daughter and a 10 year old still at home and 2 Siberian huskies, 2 small dogs all inside. I noticed you have 2 children and a cat…any dogs? Water spills? How have they held up? Have you had to re-stain any? I would appreciate any help and advice.
Thank you,
Lisa
Floors look outstanding! Dumb question here though! Did you start in the center and do the whole chalk line thing, or just start against a wall? My whole issue with re-doing floors is, I do not measure well, so I do not get the center chalk line thing.
Thanks,
kim
We started on one wall in the corner and worked our way across. I know that’s not the “right” way to do it… but we never do things the right way to begin with 😉
I wish I’d looked into something like this when we built our home. We couldn’t afford anything but laminate and it’s awful, awful stuff. I call it floor paneling. We’re already thinking about ripping it up and doing something else and this looks like it would fit our budget.
Your floors look great! Its exactly what I’m looking to do.Would you be willing to share your source of the wood?I can’t find anything under 1.50a square foot.
Check your little local hardware/wood shops – that’s where we get ours (Brinks Lumber Company is the name for my local peeps!)
I would love to do this in out house we are remodeling, we have a concrete slab how could we adhere them to the floor since you couldn’t screw them in? Also how do you mop them?
I’m not sure 🙁 You could probably put plywood on the floor and then attach them to that – but it would up the cost significantly. For cleaning, we use Murphy’s Oil Soap to mop them with a damp mop and it works great.
The flooring looks great. I have a question about the sub floor. I have a space that has cement/tile flooring, and I want to put a wood floor on top. Will it work to just lay a plywood floor over the tiles (glue it down) then proceed with the wood flooring on top; keep in mind I live in the middle east, where the temps get quite hot in the summer. Any advice/experience you can share would be very helpful.
Regards,
Russell
Russell, I’ve forever wanted wood floors, though we are on a concrete surface. The option we chose was a floating, engineered wood floor . They have beautiful options in many wood species and colors. We choose maple in a honey almond color. I love them! They are easy to clean, and we have a Goldendoodle and they hold up perfectly to her nails. My understanding is it is not possible to put solid wood like Gina has over concrete. If we’d been on a subfloor I would have chosen the route Gina has. They are beautiful! Organic. And can be resanded, refreshed over the years. And any marks with wear only add character over time. Ours are hand scraped so they already have the appearance of wear and uneven surface of wood el natural.
Did you tongue and groove these?
Cheers
No, we didn’t, but you definitely could!
I was wondering about how this floor holds up to wet spills. It is so beautiful. I actually have about 20+ sf of it laid down in my bedroom already, but I chickened out partway through the project.
Mine has held up beautifully to everything we’ve thrown at it. Stuff gets spilled on our kitchen floors a lot and we’ve never had any issues.
i love this idea! you could also predrill out the screw holes and put in wooden plugs. it would take time but would look great.
Yeah, that’s a great idea! We kinda love the rustic feel of the screw heads, but it certainly would look more finished.
Do you have animals?? I have 6 dogs so I wonder about durability of the flooring with them. Definitely want to do this in my home!
Your post is such an inspiration. I would love to do the same to my floors as our carpet is beyond help.
Our sub floors are concrete and I’m not sure how to put the wood down. I love the look of the screws
showing but I know they won’t go through the floor. I thought of using short screws just to get the
same look but how would we attach the wood to the floor? I would appreciate any ideas you might
have.
Hey! My wife and I just bought a mobile home and I am planning to do the flooring like this. I was wonder how it is as far as being insulated. I’m in pa so the winters can be cold. Thanks!
I’m not an expert, so I can’t say for sure, but I’d think an extra 3/4 inch of wood would help, right?
How did you get the stain to look so weathered in the pic. It’s like it didn’t get taken up in some of the grain. I love it!!
ah! that’s just wear from years of use, looks pretty cool to us
Hello,
Floor looks good. I love pine, which is what I will be using when doing my floors. It looked like the boards were just straight boards, no tongue and groove or half lap. Any problems with expanding and contacting?
Thanks,
Wyatt
4 years strong and still no issues for us
Hi,
I’m trying to do this in a wrecked mobile home. The particle board floors need a fair bit of patching – with
large areas that have suffered water damage and 15″ vent holes by tenants who were using the place for
a grow-house ;-( I’m working on getting the areas filled now, with a bit of sill/exterior wall stud repair as well.
One friend said to put 3/4 plywood over the whole thing and then do the flooring (pine boards) adding much expense and that extra height as well… I’d like to go for the soft spots and then go over the particle board with pine boards. Do you think it matters if I lay the boards in the same direction as the framing joists (like a railroad track) – which is what I’d like to do to de-emphasize the long, narrow feel? Otherwise, maybe for strength, I should lay the boards perpendicular to the framing joists?
I noticed in the photo where Mr. SCC is screwing the planks down, that you have what looks to be a particleboard subfloor/underlayment. I was told that it would not hold a nail. We intended to use square cut masonry nails for an antique look on our 1X8 pine floors, and I can’t get over how expensive they are! We have already taken up half of the particleboard in our 244 sq ft living room/dining room, but I would like to not have to for the rest, and make it multi-level. How well do you think older particleboard will hold a nail 2 1/2 inches long under a 1×8?
It will if you use ring shank nails! That’s what I’d use if I were going to nail them down – however screws are easier all the way around.
Love this idea!!! We are looking at “inexpensive” ways for flooring for our garage, but we have a cement floor . Would we need to put down another layer of sheeting or something before we screw in the wood?
I am curious if I could do this on cement . Slab House 1st floor . How would it be kept in place and would I need to put an under laymen. It is not tongue and groove is it ? I could use cut off nail heads for looks. What do you think ?
Thank you for any info you can give . Beautiful job by the way . : )
Dave, check out engineered wood flooring. Not a good idea to put solid wood like this directly over concrete. Too much moisture is in the concrete. It may be a nightmare and waste of $ and time.
We love your floors and are considering doing this in our home. I am reading everything and all the questions and answers, but haven’t seen our question as yet. Why not stain the boards before putting them down, wouldn’t that be easier? Or is there a reason to do this after they are down.
I just prefer to do it when they’re down because we don’t have a space to do it inside neatly. If you had a basement, then you could totally go that route, but doing it once installed is actually faster in the long run.
I love the floors. I have ripped out all the old carpet, put down linoleum, ripped that out, put down laminate and now I am going to do this and it will be forever!!! I am thinking about covering the screws with wood putty. Also instead of 2′ starters use 1′, 2′ and 3′ starters. Has anyone done it like that?
http://i.word.com/idictionary/jacobean
I really love this. I have been looking at people who do it with plywood too. We are considering going this route for our bedroom. Do you glue them? Or just screw them down?
For everyone asking about doing this on concrete…my childhood home is a basement house with all concrete floors. My brother bought the house from my dad and his first project was replacing the hideous carpet in the living room with wood. He bought tongue and groove planks, pre-stained, and installed it right over the concrete. He left a small gap all the way around the perimeter and topped that off with quarter-round to hide the gap. The floor ‘floats’ over the concrete without any adhesive of any kind. The end result is beautiful and by getting the materials at Lumbar Liquidators he ended up doing it for under a dollar per square foot. It’s been several years since he did this, 2010, and it has held up beautifully even with two grandbabies and several dogs. Hope this helps someone.
I was wondering if you used a quarter round for the edges that are 1/8″ away from the walls? Or what did you do for the gap?
We installed base boards on top which are 3/4 in thick.
This would be great in our home. We built a log home from scratch (cutting the trees down, peeling the logs, etc., etc., etc.) but it is on a concrete slab. Not sure if you could glue the boards down or not. Any suggestions? Any help would be greatly appreciated. Thanks
Lay a plywood subfloor on top and then put the floors on top of it – I’ve had other readers do that and it works great. Just make sure to put a layer of protection between the concrete and plywood to avoid moisture problems.
Thank you
My apologies if these are repeat questions!
1) How did you determine spacing between boards (or did you not at all?) Do you feel this affected the integrity of the floors in a negative or positive way? Looking back, if you could’ve gone back and altered the amount of space between boards, would you have?
2) Did you use an adhesive as well to attach the boards to the sub floor or did you use screws alone? If not, would you use or recommend the use of an adhesive next time? Do you recommend nails as an option?
3) Do the floors make any sounds or movement (not necessarily a bad thing!-I think all the more charm!:) when walked across?
Thanks so much!!:)
We only had a quarter of on inch around the edge,we have done many floors the same way because we like the method we use.
We did not use adhesive we used screws for the purpose if we needed to fix some kind of damage screws are easier to take out as for nails alot of people use nails but again we prefer screws. In all the rooms we’ve done we only have one board that has a light squeak.
What was the cost with stain wood and screws in sf?
It was about $75 a sf excluding labor.
I live in N. GA. What mom-pop did your wood come from? Or did you source it in the city/state you live in? I know where one lumber yard is in G. GA, but haven’t checked with them on my trips down to see what they offer to the local public.
How did your vents do? Maybe you could put a pic of the vent hole?
We just measured it and cut around where it went with a jigsaw.
Just found your site and love the floor. My problem is I can’t find 1 x 6 x 8 #2 yellow pine for less that $12.00/board…any suggestions? I live in east Texas.
You need to look at little mom and pop,local,small town stores.
Hi Gina,
You may have already answered this question but I too live in Georgia and am wondering what local store you bought from at the low price of 75 cents per sq ft.
Thanks!
Carissa
I live in Tennessee but mine were supplied by Georgia Pine. You will have to look in small towns at the local mom & pop stores.
I love your floors!!! Great job! Quick question, I have ugly white tiles in my kitchen and living room, can I put the wood on top of the tile? I appreciate your advice and help.
Wow, you are the first person I have found that talked about doing this. Thank you. I bought a manufactured home in Montana for < $25k. I had to pay cash. I had to buy because I am extremely sensitive to some chemicals. First thing I had the carpets riped out. New ones are toxic. Old ones have toxic cleaning products. They had to be gone before I moved in. I had to cover the floors cheap and fast so put down plastic sheeting and plywood. Ok for now.
I was thinking I would just get what ever inexpensive "wood" flooring I could get and put that it. But, I really want a gray stain color. Can't find any I like. I love how you did. I have one question. I think it would be easier for me to finish the planks before putting them down. Do you (both) have any thoughts on this? Do you think gray floors is crazy? With other shades of gray stained wood trim? 50 shades of gray? Mine is more for resale. I am trying to not go with my quirky ideas.
I will be checking out the rest of your blog as I have to do the entire place also. You don't get a lot for < $25k.
ps. I'm a Union carpenter now disabled by chemicals in cleaning products.
Love this idea and strongly considering it for my home. Did you use it in any bathrooms and if so how did it work?
We used it in our half bath – no shower in there but it works great! We’ve had it in our kitchen for years and still love it there, too!
I have a million and one questions about redoing the floors like this. I know you said you used 1″ x 6″ pine planks. Is it solid pine planks or pine plywood turned into planks? Did you purchase these in plank form or did you have to rip them into planks before installing? When you sanded the planks, did you slightly round the top corner edges? I’ve been reading a lot of websites/blogs about using plywood cut into planks as flooring. I’m trying to figure out what color stain to use, and I like how your floors look in the photos, but I’d assume pine planks would take the stain differently than a pine plywood. We have plywood subfloor and original oak hardwood floor. We’re wondering if we can install the planks directly over the original oak hardwood? This might sound insane to some people, but we’ve already sanded and refinished them once since we bought the 1950’s home in 2008. Since we moved in, a support beam in basement snapped and our entire upstairs floor dropped by 3/4″…creating a lot of splinters, cracking, and spaces between the wood. We also prefer wider planks. Two other question about the staining of your floors. Does the yellow pine color shine through? I’m not a big fan of that part, but I don’t see the yellow in your photos. I know pine can be tricky with staining. Can you see the natural wood on the edges of the planks in the cracks? Thanks in advance for your patience of reading this very long train of questions and answering them ;)!
They’re solid wood 1×6 pine, straight from the lumber store (like you’d build furniture, etc. with.) I’ve seen a lot of people do the plywood floors, we just prefer the look and feel of #2 pine better. You could install it over other wood, but will have to trim doors, etc. to accommodate the change in floor height. You cannot see the edges on ours because I paid close attention while staining to make sure it was well covered. Hope this helps!
Hello! I’m from Argentina and I do not understand if you used the product is a sort of wax or other product. Greetings! The floor was great!
I love this flooring so much that i thought i’d try it on one of our upstairs rooms but the panking isn’t very sturdy and so would this make the floor very creaky and unstable how should i prevent this?Should i use thicker wood?
Love your pine floors AND the screw holes I agree with you, there’s a ton of charm and farmhouse style when there are imperfections. I have “cabin grade” oak in our home. The installer said “your entire floor is comprised of the parts that the manufacturer would usually throw away”. It has knots, and worm holes and mineral stains and I LOVE IT but what I love the most is keeping about 1300 square feet of oak OUT of the landfill.
is there any sealant between the planks?
I seal them by making sure the cracks are well covered with poly. We’ve had to take out a board or two (to remove HVAC vents when we had it reinstalled last year) and they still held up great.
Was the pine Kiln Dried?
Do you have gaps between them now from shrinking and if so what size and what did you do to fill them in or did you not?
Did you condition the wood before staining it?
If you had to do it over again would you change anything?
They look amazing, good work
Uhhhh not sure about kiln dried. There’s no major gaps that bother me. I didn’t condition the wood, just sanded before installing then swept and stained. I still do this flooring in rooms as we work through our house and really do nothing different. All these years later I still love them. 🙂
thank you so much for your step by step information on installing pine plank floors. I have been searching to find someone that installed plank floors that are not tongue and groove, just regular pine plank. Thank You sooooo much!!
hello my name is Tom and I am rebuilding my 600 square foot cottage that was damaged in hurricane sandy.
I love your floors and I’m excited because last week I went into Home Depot and I found 1 by 6 by 2 foot planks for 65 cents apiece. right now I’m going back and forth on what types of screws I should put in my floor. I think I can solve the problem by saying that I love the way your floor looks and what type of screws do you use and then I could be done with it and move on with my project.
We used wood screws 🙂
Wow, such a cool idea… Way to think outside the box. One question, did you glue the planks down aswell? I’m just concerned about squeaking… I flip homes for a living so any idea of how to save but still give a quality product to my buyers is always needed… Nice work guys!
Thanks! No, we didn’t screw them down and we only have one board that squeaks – but it’s because one of the screws broke and I need to replace it. The rest of the whole house is squeak free 🙂
I love this, and thanks for continuing to take the time to answer questions! Wide floor plans have always had that sturdy farmhouse feel, to me.
just stumble upon your flooring project hope your still enjoying it. It looks great very creative idea and what a super job you did.
What type of poly sealer do you use? on your other post you wrote Helmspar..cant find that anywhere?? BTW LOVE LOVE LOVE the floors and im starting this project in a few days!
I’ve been looking (and looking and looking!) at your pine floors and absolutely LOVE them! We want to do this in our home….anything to get rid of the carpeting. We have 3 dogs but I think doing this method will 1) save money 2) give the house a less formal feeling and 3) we can stain or whitewash it the color we want.
With so many of your readers saying they too have done this, most of my concerns have been answered. I do wonder though about having to use pine from places like Lowes because we don’t have any places that sell locally harvested wood. (I’m in the Upper Midwest….it’s mostly flat lands here.)
I’m SO inspired to do this to our house! Thanks for all the info and even for all the comments 🙂
What would you do if you had a slab floor?
Honestly? I’m not really sure! I’d research how to put regular wood floors on a slab and then adjust the method.
We just bought a house that was built in 1930. The flooring for a 12×13 room costed us $700. I would rather refinish the old wood floor but there are hundreds of screws. Is it possible to save this floor and my savings? I am so concerned with the screw holes. …
I love this!!!!!! now I just need to convince hubby lol….one question do you think it would be hard to stagger the board so their ends don’t match on each row??? I know this comment is coming years after your post but thank you!!!!
Hey there! We staggered them by starting one row with a 4 ft piece and the next with an 8 ft – then 4, then 8 = staggered joints. Hope this helps!
As we have a foundation slab and we been pricing and discussing flooring so I hear ya on that…this would be awesome idea. Pine is a soft wood and it has held up well after many years of normal wear? (Awesome if so) another question I had is aince we have a concrete (slab) would we be able to adhere it to the concrete or need a “spacer” between the wood and concrete?? Thanks in advance.
Hey Amanda,
Yes, they still look great after years of wear. There is a little more wear in high traffic areas, but they look better aged (in my opinion). If I were you, I’d put down plywood to the concrete, then apply the boards on top. I think spacers might make them bow a little over time.
Hope this helps!
Love the look! How long did it take from start to finish to complete this project?
It took about three days – one to lay and stain – the second day in the morning we put on the first coat of poly, a few hours later did the second coat and the third before bed. We let it dry about 24 hours before reloading the room.
I may have missed it but did you start in the center of the room and work your way out?
We started on one wall and worked our way across the room. You could do it either way, though 🙂
Hi Gina, what do you think about 1×8 or larger boards?
I wouldn’t do above a 1×6 for fear of cupping, but others have said they did and love them.
Beautiful Floors! Not sure if this question was asked/answered yet… Did you sand the planks before installing them? Did you sand between stain and/or poly coats?
I sanded before, but didn’t sand in between. I have done that on furniture before if the grain felt lifted, but we never really seem to have an issue with the floors for some reason. Good to keep in mind, though!
Hey! So, um, I really like this and the kinda thinkin outta the box use of alternative materials…. anyway, roughly, what is the price per sq foot for using these pine planks? How have they held up with “normal” wear and tear?
Thanks mucho for replies
UHH. So Sowwy! never-mind. AHEM,
followed the link to the OTHER wood floor post and found the $$ info. SWEET!
How long did it take for the poly to dry? Our house is so small we literally can’t avoid walking in any room so we can’t spare any downtime if you know what I mean. Thanks.
We let it dry 48 hours before walking on it – but in some rooms we had to strategically do it in 2 parts so we had tiny pathways to get to other areas. hope that makes sense!
Love the floors and everything aqua 🙂 We also live in a mobile home and nothing is easy to work on in these things but this is our forever home too so we are changing things as we go. Thank you for sharing. We will be trying this.
I’m building a cabin in northern Montana and was thinking of doing this exact same thing. Everyone was telling me Pine was to soft but I think the scuffs will add character. I’m also going for the rustic cabin look and the stain is spot on what I want as well. Any tips and suggestions for me. Thanks in advance.
Joe
I love the floors and your site. I am thinking about doing this in my mobile home. Did you have to level your subfloors? Mine have some dips and hills and I have only seen using asphalt shingles for leveling the subfloor. Do you have any other suggestions? Thank you!
OMG. Thank you SO VERY much! This is exactly what I’ve been looking for and straight forward.
Beautiful Floor but How would you install this on cement floors?
It’s a much more difficult process! If your cement floors are in good shape, have you considered painting them? If your set on the wood floors you could do it, but you’ll have to put down a vapor barrier (like you’d put under click wood type floors). It’s basically the same process, just a lot harder because of drilling into the concrete to get the screws to hold. Thanks for stopping by!
I would like to know how far apart, and which screws were used! I live these floors, so going to do mine!
Hey Terry, We used 2 inch drywall screws. They’re black so they blend with our dark floors and have a sharper tip than wood screws. Spacing is really up to you 🙂 Good luck!
How do I rectify water damaged wood under old water radiators.
Hey Christine,
I don’t know what to tell you, I have never experienced this problem. You might try a google search for more ideas. Thanks!
I really think the darker color is easier to maintain. My buttercup yellow linoleum is so hard to keep clean. Esp. with kids and pets. Good choice.
How would you go about getting the planks to stick to the floor without screws? We have a concrete slab so screwes arent an option.
Hey Sean, You could do this over concrete , but you’ll have to put down a vapor barrier (like you’d put under click wood type floors). It’s basically the same process, just a lot harder because of drilling into the concrete to get the screws to hold. Then you would do the wood process after. If the concrete floors are in good shape you can paint them and they look awesome!
I came for the flooring tutorial but stayed to weigh in on pronunciation of Jacobean. You’re right! (Bet hearing that makes it okay for me to comment years later, right? ;)) Similar to Victorian, Edwardian, etc., Jacobean is an era/style. Love the floor ideas and enjoyed reading your take on the project.
Thanks for weighing in Tiffany:) Also, glad you liked the tutorial!
Ӎy spouse аnd I absoⅼutely love yopur blog
and find the majority оf ylur post’ѕ tօ bе prexisely ѡhat I’m looking fⲟr.
Wοuld yoou ooffer guest writers tto wriute ontent ɑvailable for үoս?
Ι wouldn’t mind producing a post or elaborating on most οf the subjects yyou ѡrite
regɑrding here. Aցain, awesome site!
We did pine flooring about 15 years ago. It has been a long time now to “reclaim” this flooring now. And we preferred to oak parquet flooring . I thought it to be the daunting task of taking off the old floorboard. We bought the same floorboards and started adding them to our kitchen and bedroom as well to the other rooms. We did all the work starting from taking off the old floorboard to add newer floorboard. Waoooo.. I just love the look. Also, this gave me a lot of time to spent with family & friends & we had fun. Your tips & snapshots helped us a lot. I would suggest them to others too. Thank You for being such wonderful.
Thanks so much Lisa! Good for you all, a lot of work, but so worth it!
Did you have to pre drill the wood before you screwed into it to prevent splitting?
Yes Leslie, we did pre drill, there is a full tutorial on my blog, here is a link, http://www.theshabbycreekcottage.com/diy-farmhouse-floors.html
good luck!!
Did you use wood screws or drywall screws? Both are mentioned, and was it 2′ & 4′, or 4′ & 8′ boards? Both of those are mentioned also. I am wanting to do this but need correct info. before beginning. Also, did you have problems with warped boards? I bought a sample piece and it warped quite a bit-would that cause problems or end up getting straightened out when! screweddown? LOVE this look!
Hi Jennifer,
Here is a link to my original post for our kitchen floors where I explained a lot, http://www.theshabbycreekcottage.com/diy-farmhouse-floors.html
We had no issues with warping and used wood screws. I hope that helps, good luck!
Hi…love the floors, they look great.
Question…what about installing on concrete floors? Would love to do in my basement. How would you screw in? Think it’s even possible??
Nancy
Hi Nancy,
My husband suggests putting a vapor barrier on concrete, then a wood subfloor over it, then attach the flooring to that. You can use special screws to put the subfloor down. I hope that helps, good luck!!
I did this in a bedroom with 1×10 pine about 12 years ago, and it’s still my favorite floor in the house. It’s worn beautifully. Sure, it has mild dents, but if I wanted it to look and act like hardwood I would have used hardwood. It still looks great, and I have no regrets.
Used trim-head screws through the face of the boards to fasten down. No gaps, no problems. Finished with one coat of 50% polyurethane/50% thinner to get that first coat to penetrate deeply into wood, then 2nd coat of satin polyurethane. Added third coat about a year later. No stain.
Did you leave any space between boards for expansion? Or just on the perimeter?
No , we did not leave any room between the boards.
What did you do for transitioning on the door frame or into another room
Hi Diana,
We didn’t need to transition as we carried them through out 🙂 Good luck!
I LOVE this!! I did this in one of my bathrooms about three years ago and loved it! My husband thought I was crazy, because he is more into the refined look. But I loved the way this came out, and he did too after it was completed. No cupping at all. I did it a little differently though, sealed the pine first and then applied three coats of polyurethane outside to each board individually, after sanding. I didn’t want to try and figure out where to put my large hairy dog while I tried to do it inside…LOL I put that rose-colored resin paper down first to keep the boards from squeaking. I also varied the width of the boards to add interest. I’m going to do my kitchen and hallway next and finally living room, going to get rid of that carpet. I’m so glad I finally saw a post where someone has done just what I’ve done! I love the screws showing, gives it more character. Thanks! Signing up for your blog!
So awesome Sarah!! It sounds beautiful, please post a picture to my blog, I know we would all love to see it 🙂
These look great and I think I will try it myself. One question: Is there a reason you cut the 8′ boards down to 4′ lengths? Thank you!
Thanks Rosa! We cut them because we liked the look better. You can leave them 8′ it’s totally a personal preference 🙂
I have a question how do you figure how many boards you will need for each room thanks beautiful floors
Hey Brandie,
It depends on what size boards you go with. You need to measure your room and then lay it out. There may be programs that can help you or ask your friendly associate where you are buying the wood from. We just estimated. Good luck!
HI again!
I just posted on your flooring explanation page (?) and came over here from the link.
I cannot STAND that stain stick! Where has it been all my life!!!!!!!! (!!) I’m so glad to have read this, because I just have to have one. 🙂
I did finishing nails on my floors, in diagonally into the floor and boards next to each other. I’m contemplating drilling a tiny countersink and putting in some little plugs for an even more rustic look. I’ve not finished mine yet, so I have lots of options. BTW: Ja’-coh-bee-anne. Look up the Jacobean era in English history.
One of the nice things about pine, is that even though it’s soft and does dent easily, the dents “puff” out with water. If your floor is unfinished or worn so there’s little to no sealer on it, just squirt water onto any dents and the wood fibers will puff out in minutes. If you’re really anal and have the energy, you can use a needle to break a finish on a dent, let water sink into the wood fibers for the same effect.
I think people are brainwashed with modern flooring. THINK, right? What did people use before manufactured hardwood? (Isn’t that an oxymoron?) And this fake “hand scraped” stuff? I have that type of flooring in other rooms. $7200’s worth from a different life and before I knew better/what I like. It’s beautiful dark oak, but it still has cracks, and is so regular, it doesn’t speak to me at all. My kitchen? With all the pine cracks, grain, blue bug kill, etc? I’m trying to figure out how to justify pulling out the commercial stuff.
Once again, beautiful job.
And I like your hair.
Thank you so much Christine….you go girl!!!
Hi Gina,
I love this idea and have plans to begin this project soon. Why do you cut the boards to 4′? Why not leave some of the straightest boards 8′? Is it just for aesthetics or for functional purposes?
Thank you,
Lori
Thank you for your blog. It’s very helpful. Keep it up!
Thanks Cheryl 🙂
Hello. I just recently moved into a new home and ripped up carpet on the second floor to uncover southern pine beneath. I didnt know the difference between oak (in my old house) and pine and decided to use a similar stain in my new home as I had before (75% special walnut / 25% jacobean). I expected a smooth finish and was surprised and disappointed to see the tiger stripes and huge variety of colors coming from the wood. Did you know this would happen when you stained your pine dark and does it look nice with furniture above it? I am tempted to resand them back and finish them in their natural color. Help, would love some insight! Thx.
Hey Robyn,
Wow, lucky you with finding the pine beneath your carpet! We used straight Jacobean and we love it!! I’m not sure what to tell you, it’s a personal choice. Like I said we love ours but we like the farmhouse not perfect look. Go with what is in your heart…decorating is all about what makes you happy 🙂 Good luck!
I did this in our house 10 years ago.still looks good today.itoday.i used pine 1×6 t&g boxcar siding.i also put it on the ceiling instead of sheetrock.also the installer in the pic looks like my identical twin.and i mean identical.even the tatoo on tbe right arm.wow it freaked my wife out.lol
LOL Terry 🙂 That installer would be my husband 🙂 Wow , you put it on the ceiling too? I bet that is beautiful! Pics please 🙂
Wow, this is a great post! I’ve been trying to renovate my kitchen for a long time, now! My wife and I want to make our kitchen look great again at the cheapest price possible. We’re looking into having a company that does hardwood floor resurfacing in Norcross, GA, where we’re from. How much better do you think it would be to just do it ourselves versus having someone else do it? We want to save money, but if it’s going to be really time-intensive then we’re not sure.
Thanks!
Thanks so much! It is really a personal decision, you can save a ton of money doing it yourself but it is a rather big project. We do everything ourselves that we possibly can but as I said it is a personal choice. Good luck with whatever you decide 🙂
Hi there, gotta a question for you. I bought salvaged wood — 4″ wide rustic white pine with no tongue and groove. I plan to put them down on the subfloor using steel cut nails to give it a vintage look. Then I’ll sand with a buff sander and put a coat of poly on top. Do I need to worry about putting a small space between planks (say the width of a nail) to account for humidity expansion and contraction? Any other advice when it comes to successfully installing this wood?
Hey Thad,
We did not leave any additional space and have no issues and it’s been years! It sounds like you have a great plan and boy I bet they’ll be beautiful!! I’d love to see pics when you are done, good luck!
Jacobean: A period in English history named for King James 1 of England, who succeeded Queen Elizabeth 1. The architectural style was characterized by cladded wood, inside and out. Jacobean drama was connected in style to Elizabethan drama (best known through Shakespeare), but it was much darker, cynical, and filled with bloody tragedies.
Pronunciation: Jack oh bee’ an.
Thank you Dolores!!
I have to remove all my underlayment (it is yucky particle board that has moisture damage) so I will be down to the tongue and groove subfloor. I was thinking that I will need to install a moisture barrier and 3/4″ plywood before I install the plank flooring – is that correct? I love the look of your floors and thank you for sharing your experience, and being willing to give feedback! 🙂 – Cecilia
Oh no!! I think you are doing exactly what you need to do Cecilia! You will be so happy with in when you finish that you won’t even remember all of the yucky before stuff 🙂 Good luck to you!
With it being pine which is soft, does the floor damage easily or does the poly- acrylic prevent that?
Hi Ryan,
We have had ours for years and have no damage. The Poly does the trick! Good luck if you are going to install them, we love ours and they look better over time 🙂
Hello.
I see that someone asked about resale value-I did the same floors but on a slab/glue down method and stained with a walnut stain. I put my home on the market and my house had a contract the same day-they are hardwood floors-engineered because of the use of plywood. Everyone loved them..also did granite tile on counter tops and property listed with mention of granite counter tops and value in appraisal the same as a slab.GO FOURTH AND DIY!!
That is awesome, congrats! You too 🙂
My wife and I are remodeling our home and now have some great new ideas. Thanks for the tips!
Thank you so much for posting your floors! We bought a pretty beat up manufactured home on half an acre and were looking for a perfect idea for flooring that could stand up to dogs and I came across yours (I googled “rustic beach cottage farmhouse floors” believe it or not). We weren’t jazzed about most of the offerings at Lowes, etc not to mention the price of those. We’re halfway done and LOVE these and everyone who has seen them has been impressed. I never would have thought of these otherwise. The thing I really like about them is if you make a mistake it’s not all a wash; very easy to make adjustments. We used rough cut and they were about 1×7″x12 ft and cost under $6 a board, very affordable. Also you can buy a little at a time and do them. The Jacobean (I say “ja-ko-be-an”) is such a great color, not much maintenance (because it’s dark!).
Thanks so much Michelle, I am so glad it was helpful to you!! Good luck 🙂
Hello all
wondering how far apart did you put your screws? And has the wood shrunk at all in the time you have had it down? Also what is your weather like there?
We placed a screw on each side of the plank, you can see in the pictures. We haven’t had any problems with the wood shrinking and it’s been years! We have all seasons here in Tennessee, hot, cold, humid and everything in between 🙂 Good luck to you!!
I’ve been wanting to tear out the pee-stained carpet for a few months! (dog, not me!) I’m doing this!! I’ve installed flooring in two bedrooms and a hallway, but this seems funner and cheaper!! Wish me luck!
Good for you Mike! Good luck, you will love them!
did you have any gaps between the boards; can they be placed too tightly that could cause cupping?? I love this idea–people at the big box stores tell me that I shouldn’t use regular pine but your floors look great. Thanks for the push
Hi Jacqueline, thanks so much we really love them too and no gaps, no cupping. Good luck with yours!!
Hey, Gina. Painting a floor seems intriguing from a cosmetic appeal perspective, but how much protection does it provide from scratches from everyday use?
Hey Kim, we stained the floor and have had no problems, they look better as they age.
Hey Gina, professional woodworker here, just thought I’d put in my 2 cents. You guys rocked it. People get too hung up on the method and resale values. If you go to sell and a buyer hates it, they can find another house. These boards have character. Each and every one has a story to tell. Each knot, each groove, each scratch, that’s your story. When we build things from wood we put a part of ourselves in them. You get to walk on that every day. Take pride in your story. But, if a board does start to cup or bow, take it out, hand plane it down, and make a shelf; and in turn, another chapter.
Thanks so much Brad, I couldn’t agree more!
Wow! I like it! I am going to do the same thing but I am planning on milling my own lumber. I will make it a lot thinner due to a shortage of good material. I live on 20 acres of thick woods but a lot of the trees are knotted up and may not be very good in the long run. I have a lot of trees cut into rounds and I was thinking about cutting down the rounds and installing circular boards with trees rings. It’ll be tough to keep them together but I have a couple ideas on that. I will update you if you like. Love the floors!! I am a hard core DIY’er myself. I love thinking outside the box.
Wow, that sounds amazing Josh, I would love to see it when you finish, good luck!!
Beautiful floors! I plan to do this in my new home and have a couple questions for you. What type/size/brand of nails did you use? What size of bit was used? Did you put on the stain and leave it, or wipe it down after a few minutes? Did you plan out the nails to where they would hit the floor joists or just nailed anywhere (because of the subfloor)?
Thank you again for the post!
Thanks Amber, here is a link to a more detailed post on our floors that should help answer your questions, https://www.theshabbycreekcottage.com/making-your-own-flooring-with-pine.html
How does the pine hold up to furniture weight? Does it dent or pit?
We’ve had no problems, had them for years and they look better with age 🙂
I have budget problem. But I want to install woodflooring in Utah, my home. So I have decided to install it without hiring the professional. I was looking for the instruction and the experience from the people who are not the professional. Congratulations to you for this job. Now it’s my turn, wish me a good luck. You are the instructor to me.
Thanks Kate, best of luck to you 🙂
Hi, I know this is way past the original post, but I’ve read through every comment and haven’t seen my question. We have an old farmhouse, 1900’s, but the kitchen was a much later add on. The sub floors have been severely damaged by water and need to come out. The joists are fine. Do you think it would work to put a moisture barrier right over the joists, and then use 2×6 planks screwed right into them? I was thinking it would make the floor stronger without having to do a whole new subfloor first. I love what you did with yours! Found you from Pinterest.
Hi Victoria, Thanks so much 🙂 You really do need subfloors for insulation – plus there will be minute cracks in the boards that form over time as the boards age & dry more. Good luck with them, we love ours and they look better with age!
Can you use a nail gun instead of using screws?
You could David, we just liked the Rustic look of the screws 🙂
Hi, I’m in South Georgia and wondered about the humidity climate down here if you knew how they hold up? Also I have tile in some areas, I should bust that up then check that subfloor out and put new down if needed huh? We’ve been in our new house for only a year. It’s our forever home. My husband is getting ready to retire from the Army after 21 years so I’m preparing him and I some much needed together time 🙂 I think those floors are beautiful!!!
Please thank him (and you) for his service Brooke! We have a lot of humidity in Tennessee too and they have held up great! I think the humidity actually helps the floors 🙂 Good luck on retirement and your projects!
How meticulous is it to apply the poly? Is it possible to do sections where a room connects a foyer? We plan to do the entire first floor but still need access to second floor during the process.
Hey just curious, is it easier to stain and seal with the boards in place on the floor than it would be to stain and seal them individually before screwing them down?
Hey Xander, we thought it would be easier to do once they were down, especially using the stain stick 🙂 Good luck!
I love wooden floors so much! They are stylish, durable and have different styles. We have wooden floor almost everywhere, except bathroom. As everyone knows, the dry air or high humidity level in the house can damage wood. What to do to protect your wooden floor and furniture? Just buy a humidifier to increase the humidity level in your home if the air is too dry. Or, keep an eye on the humidity level if it is too high (more than 65%). Also, it will be rreally great to use green cleaning products instead of chemical cleaning products. You wil keep in safe not only your floor and furniture, but all your family, cause such cleaning isn’t harmful even for kids and pets.
Hope, my advices are helpful 🙂
How fresh was your wood? Was it kiln dried or still green?
We have access to a fresh load of 1×6 but it’s not dried, but super cheap.
It was dried, we got it from Lowes. Good luck!
I thought you said you got it at a mom and pop type local place? How are the floors holding up after all the years? This looks like something I may do in my attic space.
They are holding up great, they look better with age!
Love the floors. Just a an idea for your last room thought you might try laying the boards at a 45 degree angle to the length of the room or perhaps a v pattern. You haven’t experienced cupping problems which is a plus. Lots of factors influence wood cupping one of which is choice of the board and it’s placement. In choosing your boards check them for curling. Look at the end grain and if the board clearly curls along it’s length choose another. Before nailing a board in place inspect the end grain. If the lines are curved place the board so that the humps are on top. If the humps are on the bottom this encourages cupping. My grandfather always painted and stained both sides of the boards on his projects he said it reduced warping due to moisture. Can’t wait to see your next project.
Thanks so much Bunny!
That Stainstick looks amazing! Thanks for sharing this Gina. I installed wood floors just over a year ago and I’ve loved it. I even had a little extra for my pet rabbit to play on. I would love some maintenance tips too if you have any. The only tip I would have for that would be to get them cleaned regularly. I saw online that you should have them professionally cleaned four to six times a year. I’ve been using Chinook Chem-Dry for my wood floor cleaning, and I’ve absolutely loved them and their prices.
Thanks so much Stephen, we just use soap and water for ours 🙂
Can you stain links BEFORE screwing them in place?!
You could Julia, it is personal preference 🙂 Good luck!
You may have answered this question and I am not patient enough to look, but where did you source your yellow pine for $4 / pc
I buy mine at a local mom & pop lumber store near me