
You’ve written a great blog post. It’s EPIC! You know that it’s going to get pinned. to. death. But then….. crickets. Hmmm…. what went wrong? It may be as simple as not having a graphic that begs to be pinned. Was it that you didn’t think to make one – or most likely you didn’t have the “expensive” programs to make it with…. Guess what? You don’t need them! You can make great Pin-worthy graphics with my 2 favorite free editing programs: Paint & Picasa.
 Start with the graphic that you want to use, and open it up with your Paint program.
 Unless you make a point to take a photo that has enough blank space to add wording, then you need to create a translucent box to put your words on. Making it translucent will help make your words pop while your photo can still be seen.
 First, you need to pick the rectangle box on the shapes menu. Then look just to the right of it, you need to change the “Outline” and “Fill” options.
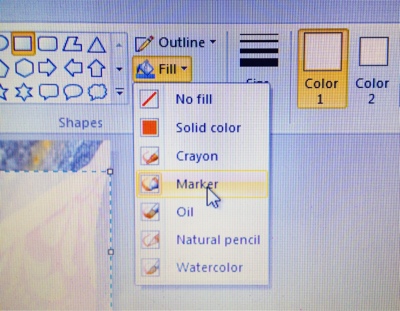 OK – don’t on hate the next images – I took them with my iPhone because I could not get screen shots of the drop down menus… boooo!
Under both the “Outline” and “Fill” drop down menus, you want to choose “Marker.” This will give it a translucent look.
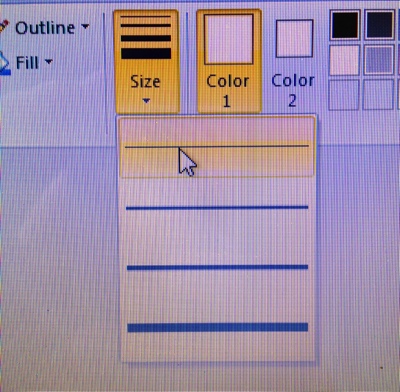
In the line box, choose the thinnest option (the one at the top) – Then set both your color options for the same color. (I used white.)
 Then just click and drag to make the box where you want it on the graphic. YAY! You’ve made the box – now save the image, and open it in Picasa.
 Once you have it open, then choose the “Text” option from the editing page.
 Then choose your color, font, etc. and click right onto the image to add your text. Don’t forget you can use the dropper tool where you pick the color to choose a color directly from the photo!
 You can play around with all the options…. like bold, italic, underline, centering, align left, align right, etc.
 Don’t be afraid to make multiple boxes so you can align part of the text one way and part of the text another.
 Once you have the words exactly where you want them, then save your graphic & you’re done! I know there are online programs that will let you do the same thing – but why go through the trouble of uploading the photo, etc. – when you can do it all on your computer for free?


Okay….call me weird…or uninformed. But what?? Why is this more pin-able than any other image?? I am lost here. DUH. lol
i think maybe because it clarifies what the picture is while somebody is looking at it on pinterest. i like to know if a link is to a full tutorial, just a room decorated, or just maybe a picture of something random that has nothing to do with it. and it can also be a great way to direct traffic back to your blog.
Yes, Gabrielle is right! If you have a photo with words on top of it, then it tells exactly what the post is about just from the image – especially if the pinner doesn’t include a description of the post.
They’re not crucial, but they do help to get more traffic to your blog through Pinterest 🙂
and thanks for sharing, gina, i just love your blog!
– gabby
http://thenewcatos.blogspot.com/
No, thank you for reading! Love your new ottoman, by the way!
This is a great idea! I have noticed that “titled” pics are much more pinnable. Otherwise, you’re not sure what you’re looking at on Pinterest. Thanks for the informative post!
Gina….thank you so much. I’m a newer blogger and always wonder how everyone gets such awesome pictures. I love this tutorial!
I’ve not used Paint, but I love my Picasa. I just add text via that. What does Paint add? Just curious! Thanks for the ideas.
Hi Kimberly,
It just adds that little something extra with the box. Sometimes a photo is just too busy to add text straight onto it, so the box will help make the typography pop a little.
Thanks for stopping by!
Thanks Gina for sharing your knowledge, I need all the help I can get to learn how to achieve the effects all you experienced bloggers use. I’m still struggling with Picasa ! but I’m hoping your step by step explanation using paint will help me. I’ve never known what to do with that option. So I’m looking forward to trying it, when I get time from all the summer guests arriving this w/e to spend there summer holidays in our gites.
I use paint and picasa all the time! 🙂 I’m all about those free programs.
great tips and tute gina!
gail
I have been wanting to do the box on my photos but have been too busy to look up the easiest way to do it so thank you very much for this very helpful post. You just saved me ALOT of time.
I have looked and looked on the web, trying to figure out how to add this transparent box to my photos. Thank you SO MUCH for sharing!
Thanks a million! I had no idea how to do this. I’m not a techie person at all and this really helps. Your tutorial is perfect!
Pat
Thanks for posting this and I have it linked to my photo editing post for bloggers too today!
Nice tutorial and tip. Easy enough to use paint. I use photoshop to do the same but it is a lot more difficult a program to use and not free like paint. I’ll try it in paint.
If you want easy screenshots in w hich you can control what is selected, Jing is a free download. One can select any portion of the display and save it in various formats. I love it and use it all the time.
Great tips!
I use ipiccy, I just found out yesterday that it could do this. It is a great free website. It is a lot like picnik. I am still learning how to make more pinable pictures. Thanks for the info.
Sharon
Thank You for some great advice.
I’m such a dork. I’ve been wondering what program (other than PhotoShop) people use to create boxes over top of their photos. I use Picasa for text and editing, but never realized I could create a rectangle in Paint. Duh. Thank you for enlightening us!
This was amazingly helpful. I had no idea how to make a shaded box to put my text in – thank you so much!!
This is one of the most helpful pieces of information ever! I have been trying to add text to my blog photos and could not, for the life of me, find a program to draw a simple faded rectangle without having to send my photo to my work laptop and add a layer in Photoshop or get stuck with Picmonkey. As simple as Paint is, sometimes it just blows my mind. I can’t believe it has had that capability all along. I had no idea!! Thank you SO MUCH for this helpful tutorial.
(P.S. I found you via Pinterest. 🙂