I know, I know… I’m a little behind on the trend. Everybody has already posted how to make a book page wreath all over blogworld, but I’m in a creative slump, so I thought I’d just do something – anything – just to get my juices flowing again. Couple the creative block with the fact that I really, REALLY wanted to make one of these, and it was a good way to push myself to do something new (and it was pretty relaxing, too!)

I started with a book of Shakespeare plays. I found mine at a thrift store for 50 cents a while ago. I watched a movie while I rolled the pages up one by one to make it easier when I went to put them on the wreath “form.” It took about 1/3 of the book.

Next, I cut out a circle from a large piece of a box – just two circular objects (a container lid for the outside, a bowl for the inside), then cut the circles with a box knife to create my “form.”

I wrapped a piece of seam binding around, left a loop for hanging, then glued it down around the cardboard circle. Next, I placed cones made from the full size book page to make 4 quadrants (north, south, east, west). I made the cones, did a dab of hot glue to make them stick together, then hot glued them onto the cardboard.

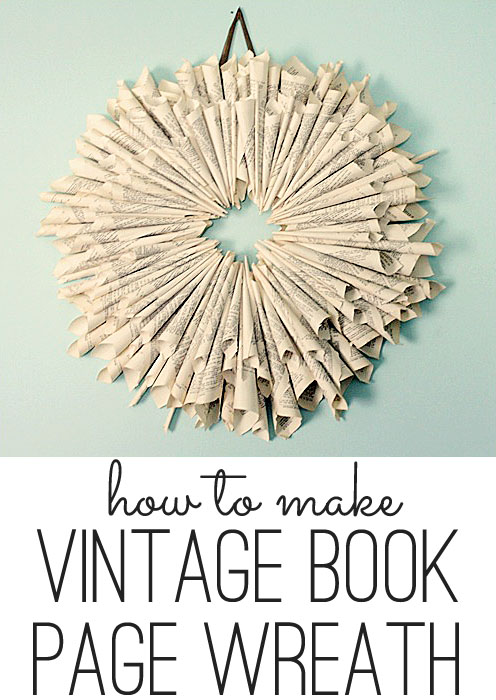
First I did a whole round of the large pages, making it really full with different variations of the cones – skinny, fat, medium.

Then I folded and cut the pages in half to make smaller cones. I made a big whack of them, then filled in with another layer, right on top of the full size pages.

The more layers, the better. Now, I have to admit, the layering is where patience is handy. It took me 3 hours of gluing cones together to get it this full, but my wreath is huge, nearly 3 ft. across, it makes a big impact!

You also need to work from all different angles. I sat a while, stood a while, picked it up, looked at it from all different angles to keep it all uniform & stuff. But after a LOT of rolling, gluing, rolling, gluing, rolling, gluing…..

I have to admit that I really love it! There’s a ton of different methods on some great blogs out there to make one that’s uniform & perfect, but I like mine kinda free-form & organically shaped. It has a uniformity to the layers, but the sizes of the cones are each unique, as is the way I piece it together. All that hot glue later, it’s a really sturdy, beautiful piece… and it helped me overcome my creative slump, I think…
I love, love, love the book wreath! Super cute! Thanks for hosting the party. 🙂
Hi Gina, great wreath, I haven’t tried one either, just linked up my hand painted chandy. thanks for hosting, xo Debra
Love it!! You are the best!
Thanks for hosting my friend!
~Liz
I know book page wreaths have been done all over the place, but I still love them everytime. I love all the different versions and have made 3 myself. Love how yours turned out. (By the way, these are the thing that sells the fastest in my booth, so you may want to whip up some more.)
LOVE the wreath- if I can bring myself to rip pages from a book, I am all over it!
Thanks for hosting!
Kerry at housetalkn.blogspot.com
Many thrift stores sell 10 for $1 or sometimes cheaper. You could but paperbacks to use for the smaller cones!
I love your wreath. It is different from most I have seen. You aren’t the last to make one… I’m still in the planning stages.
Love the book page wreath! Thanks for sharing and for hosting this linkup party each week.
Hi Gina! I love your wreath! Thanks for the party! t. xxooxo
Love your wreath, Gina! What a fun, easy, cheap project – that makes a huge impact in a room! Hope you’re feeling creative again, girlie! 🙂
xoxo laurie
Beautiful wreath Gina. I’m not much of a crafter but I think I might be able to handle this! Thanks so much for hosting.
I love this wreath, and think how gorgeous it would be for Christmas Decorating. I’ve just found your blog and think its great.
Thanks for hosting your party.
~Emily
The French Hutch
Great wreath! Thanks for the tutorial and for hosting Gina!!
Love it!! 🙂
Love it! All your DIY projects are super cool!
Joining your linky party for the first time….love the wreath too!
Blessings,
Tami
I don’t do crafty blogs so not linking up BUT loved this craft wonder if I could find a cheap book of sheet music how cool would that look!!
I’m more of an idea than action kind of lady
Just make copies of sheet music, I copied both sides and the cones turned out great…I also had some fabric with musical notes and made copies of the fabric again copying both sides. You can also make copies from a hymnal, the choice is yours, from favorite hymns to Christmas music. Hope this helps!! Happy crafting! Maybe you could find music books in used book stores.
Thanks Gloria!! Awesome advice 🙂
I love your wreath! I need to make something to hang above the fireplace!
Book wreaths never get old! I love yours 🙂 Thanks for hosting!
Nothing like a beautiful book wreath to get you out of your creative block! I really love it. Been wanting to take a crack at one of these for awhile, and yours has nudged me into action. Thanks for sharing!
Hiya!
I made a wreath, too!
I love all the creative ideas here….ugh…when will I get to my laundry?
I pray you are having a wonderfully blessed day!
Love,
me
errr, i have an awful typo when i submitted my link:-( anyway, love the book wreath!!!! i am linking up cupcake liners today.
Your book wreath looks great! I like that it’s not perfect and you varied the sizes of the rolls 🙂
LOVIN the book page wreath, Gina. an oldie but goodie for sure! thanks for hosting! xoxo, Kelli & Kristi
It looks great! I always love these too. AND – I thought your tutorial was great and was thinking I’d finally make one…until you mentioned that your patience came in handy…uh oh! i have none! 🙂 I’ll have to consider how bad I want one. LOL. Thanks for the party!
oh my goodness, what a fun wreath! LOVE IT> Thanks for hosting!
That wreath is super cute!!
Love those wreaths – I;ve yet to make one thanks for the directions and for hosting.
Rhonda
Hi Gina. Your wreath looks lovely! Thank you soo much for hosting. The weekend is almost here, hope you have a great one! : )
~ Catie
I love your take on the wreath! Makes me want to hop on the blog wagon and do one too. Thanks for hosting!
Hi Gina! The wreath looks great! Are you out of hot glue sticks yet? I’m glad to see I’m not the only one using cardboard as a wreath base. But I’m on a self-imposed spending freeze, bummer. I hope this breaks up your creative slump. And thanks for the link party =)
Now I better go write my cardboard post! Have a good day!
You’re not alone, Gina! Every single time I see one of those wreaths, I want to make one. But it will have to wait…too many OTHER projects in the works. Thanks for the tutorial and for hosting.
Blessings,
Liz @ the Brambleberry Cottage
http://thebrambleberrycottage.blogspot.com/
I LOVE IT! My husband is a sports writer- I’m going to give this a go with newspapers!
Thank you so much for sharing it and your photos are fantastic, btw!
Kerry at housetalkn.blogspot.com
What a great idea. I thinking Cartoon pages. Have to get neighbors to keep theirs for me.
Wrong email left now corrected.
Your book wreath version is so pretty, Gina! 🙂 Thanks for linking it up with me this weekend…I Featured you yesterday. 🙂
I love all things that aren’t perfect. I loved the idea of a bookpage wreath, but yours is the first that I’d actually want to make AND hang in my home. Thanks!
Krista
http://www.kristasewinspired.com
Love the wreath! I featured it on my blog today. Very cute!
http://bigplanslittlevictories.blogspot.com/2012/04/friday-fad-antique-newsprint.html
Very cute! Our little pet bunny has been eating the covers off some of our books, so this is will be a great way for us to put the pages to some use.
Hi
Definitely going to try this version. I made one with the paper roses which was lovely, but lots of cutting and rose forming and gluing and time. This looks simpler and has a big look! Congrats.
Cute! I think I will do this for a Christmas wreath with an old book of carols from the thrift store.
Found one of these wreaths in my BHG. It was painted, so am going to try that. Have ton of old craft magazines, this will b a good use. Thanks for your site, I definately will use it again. lways have sone kind of project in the making. Knit, crochet, sew, ut remembered yeats ago ,aking angels out of old readers digest. Like this better.Thanks
Gina, I love the book wreath and plan to try it with a layer of an old bible that had missing pages and some old songbook pages for the middle layer. Also noticed that your name is Luker! That’s my maiden name. Would love to connect. Send me an email.
Hi Gina! I am from Chile and by the way your wreath is a great idea! I´ll show you my results as soon as I finish it.
Good day!
This is so pretty!! It will be a great winter project for my granddaughter and me. She can help make cones and place them. It will be fun. Thanks for the great project!!
Aww, thanks Bobbie, what a wonderful project for you two 🙂