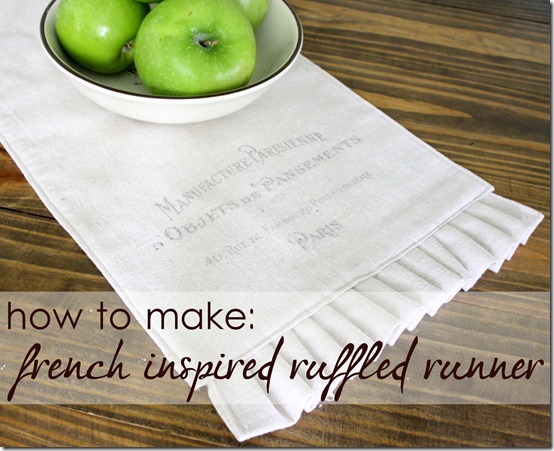
Happy Friday to ya! Obviously spring has put a fire under me, because I’m back on track and ready to roll. Well ready to sew. Anywho…. Let’s make a french inspired ruffled table runner, shall we?

It’s been a little while since I’ve shared a sewing tutorial, so it’s about time, eh? Wanna do a little French inspired ruffled runner? Well alrighty then! You’ll need some osnaburg fabric, plus basics like scissors, a yard stick, a sewing machine and thread. Can’t really sew without thread, can we? Oh! And you’re gonna need some freezer paper… but that’s for part 2. First let’s make the runner.

For this project I used 2 1/2 yards of osnaburg that I washed and dried before cutting. This takes care of any shrinking. First I ripped 3 pieces. One at 23 inches wide, and two at 6 inches wide. The 6 inchers will become the ruffles. Just set them aside, we’ll get to those in a minute. I snipped and ripped the fabric. This fabric rips really well – it doesn’t go all wonky on ya. If you’d rather do it properly, then cut it nice and neat, m’kay?

After you cut (or rip) your pieces, take the “center” of the runner (that’s the 23 inch wide piece) and iron down the ends. Just an inch or so will do. You just want some room to create a hidden hem. Don’t sew it – just iron it.

Now it’s show time… I mean sew time! Fold your runner in half, so you’ll have a long, piece. You want the “ironed hem” facing out. Run a stitch all the way down the side. YAY! You made a longggg skinny tube.

Now flip it to the other side, and run a seam right inside the fold. Sounds crazy to sew a fold, but stay with me… it’s all good.

After you have a long tube with a seam on each side, you will turn it out and iron those seams flat. You want the seam right in the middle, of your crease. Now it’s starting to look a little more runner like.

Go back to your sewing machine and run another line down each side, close to the seam you just ironed out. this will keep everything together and fabulous.


Don’t have a ruffle foot attachment? No worries – you won’t need one! We’ll have this done before you can get it on your machine, anyways. Take the pieces for your ruffles and iron a little hem line just like for the runner middle.

 Run a stitch right on ONE edge of the “hemmed” end. Do one end of each piece.
 Next I did a little tuck and stitch motion. Start with the end you hemmed. I just created a little fold by hand, then run a few stitches. Fold, stitch, fold, stitch. Do both of your ruffle pieces this way. Ruffle all the way to the end.
 To get your perfect measurement, just measure it against the width of your runner, then go over one ruffle.

 Tuck that 1/4 inch extra inside to create a little hem, then run a stitch to sew it down.

I’ve made a ruffled table runner before, but I love the addition of the lettering! I might have to try adding it to mine. As always, thanks for the inspiration!
I love this Gina! Thank you for the great tutorial and for the easy image transfer tutorial!!
Susan
Homeroad
Gina, thanks for the instruction. Although not a sewer, I think I must try this one.
Best wisher and lots of continued success with your beautiful blog.
Heidi
Great instructions! The table runner would be perfect for my dining room table, another project to add to the list! Love the freezer paper transfer method also, gonna try that one out on another project I have going. Just a little mention, Oasenburg should be spelled osnaburg, people might have trouble finding it spelled the other way. Thanks for sharing your projects, I always look forward to seeing what you are doing!
Thanks, Shannon! I can’t believe I spelled that wrong… guess I didn’t have enough coffee in me this morning 🙂 All fixed now!
Such a nice job, Gina. What a nice gesture to give a tutorial on it! xo Diana
I went over to the Graphic Fairy site and I wanted to comment but she has those wonky word verification, so I couldnt.
so, thanks to both of you..
yours looks great~!
I love this runner Gina! Beautiful!
xo,
Shannon
(www.akadesign.ca)
Very well done ~ can’t wait to make one! Thank you for sharing this tutorial with all of us bloggers! Isn’t the Graphic Fairy great! Nothing but good stuff!
Hi, Gina. I want to try this! Will the ink/lettering hold up in the wash? Or would you recommend doing something after the transfer to make sure it stays on there for good?
Most of the time it will wash fine on the gentle cycle but I cant guarantee it will.
I wish some of your pictures would be further bad so you can see the fabric positions. The instructions are a little confusing and with pictures, it would be a lot better. The close-ups really don’t show must on how you did things on the table runner. You sometimes have to think what a beginner needs to see so they can do the project.
Thanks Dennis, I will definitely keep that in mind for future projects, it’s a great point!
Do you sell the French country runner? Or can you make it into a tea towel for the stove. This is exactly what I’ve been looking for but far from craft not do I sew.
I don’t sell them anymore, I used to have an Etsy shop and made a million of these but that was a loooong time ago and I now just provide the post for those that want to make one themselves. It is super easy, give it a try 🙂