Welcome to Slipcover Week – an eight part series to show you step by little step on how to make slipcovers. Yesterday we learned all about the supplies you’ll need and how to make piping. This post is where we’re going to start working on cutting fabric, starting with the cushions. Thanks to Online Fabric Store for providing the beautiful fabric I used for this post!
There’s a million ways you can cut your fabric, but this is how I cut mine to make the most of every single bit of it. Below is a little graphic to show you how I cut it off of the roll.
Contrary to every single tutorial out there, I do not wash my fabric before sewing. I know… I know. I cut it straight off the bolt. But here’s the big secret: NEVER EVER EVER wash it in hot water. I ONLY wash slip covers in cold water and put them onto my furniture when they’re wet. As they dry it forms to the fabric and fits like a dream. (Please don’t send me non-fabric-washing hate mail. This tutorial is how I personally do them – so I’m spilling all of my dirty little secrets here.)
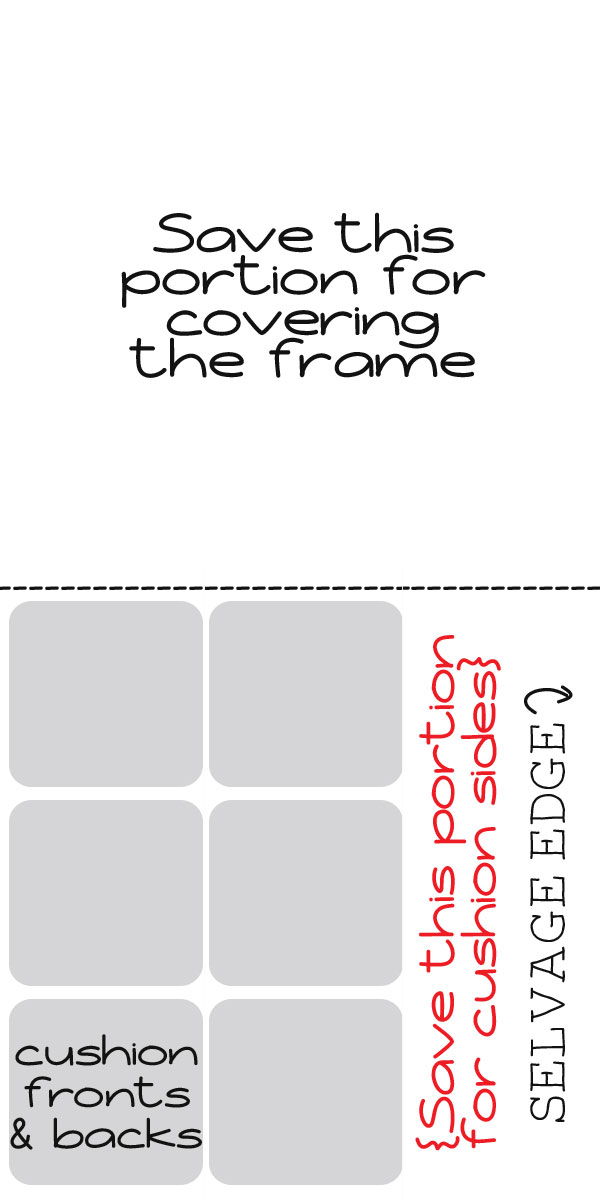
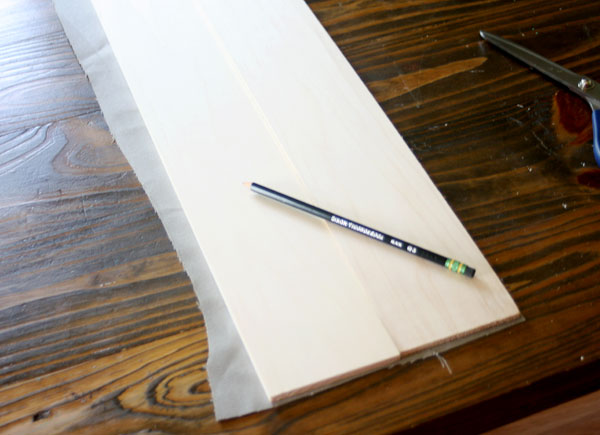
Starting on the end where the fabric comes off the bolt, first I cut my cushions, carefully lining up the fabric to get the most out of it that I can.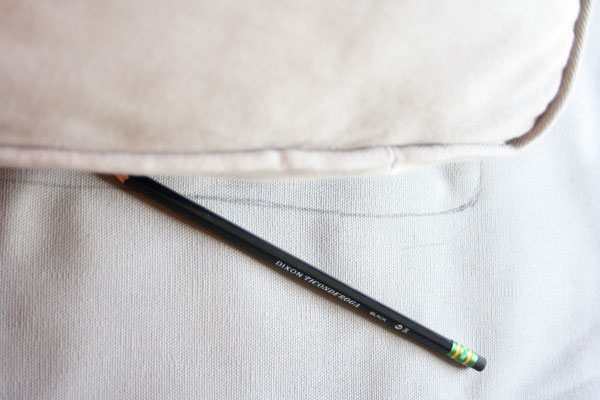
I trace the cushions out with a pencil, leaving 1/2 an inch around the edges for seams. More than that and you’ll have a mess. Half an inch is plenty of seam allowance. Trace them all out and cut along your lines. Wonky parts with arms, etc. will be a little harder, but trace them out just like square cushions, following along the lines of the original cushions.
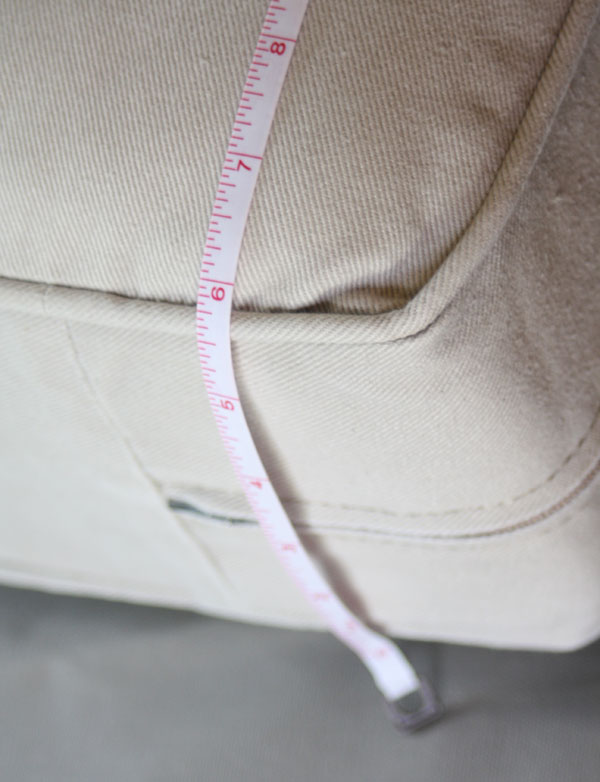
With the side scraps, you’re going to cut out the edge pieces for the cushions. Measure the depth of your cushion, then add 1 inch.
Here’s my secret trick: My cushions were 6 inches thick. Two of these 1/2 inch thick, 4 inch wide boards from Lowe’s (which are actually 3.5 inches wide) add up together to make seven inches. Instead of measuring 7 inches from the side a million times, I used two of them side by side to get my 7 inch strip to go around my cushions. You could achieve the same result by measuring whatever size you need and cutting a template from cardboard (the 2/$1 kind for school), then use it to trace out your side pieces.
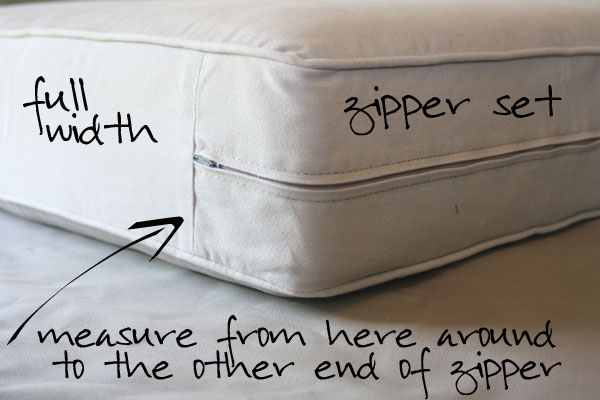
To get your zipper measurements, run your flexible tape around the length of the original zipper (or where you want it to be). These parts will be 1/2 the width of the rest of the cushion surround.

Line up the zipper portions on the selvage edge, so you can get a clean edge next to the zipper.
To get the rest of the cushions, use the full width (2 boards width – or 7 inches in my case.)
Once you get to the end of where you cut off your cushions, move over to the other side of the fabric (where you cut the piping) so you preserve as much of the selvage edge as possible for the skirt and base of the couch.
Want to see all the slipcover posts? Here ya go!
Part Five: Beginning the Frame
Part Seven: Finishing the Frame
Part Eight: Final Tips & Tricks
Gina;
This is exciting to see, but I am such a beginner and I was wondering if I missed the post about figuring out how much fabric you need.
Thanks for this series. I have already pinned it.
Maureen
Hi Maureen,
You can see tips on that in the last post here: https://www.theshabbycreekcottage.com/2013/09/make-slipcovers-part-8-tips-tricks-giveaway.html
I must be sooooo dumb. These directions are just not sinking in. It all sounds so confusing and HARD!
You’re not dumb! Email me, I’ll walk you through your questions 🙂
I’m not sure what I need to do, this is my first attempt to make a slipcover, however my cushions have the piping across the front of the cushion only and its right thru the middle instead of on the edge, will this bump show thru when I put the piping arount the edges on the cushion cover like you have done. Do I need to take the cushion and just use the foam. Thanks so much Lynda
Measuring is the main key to slipcovers. Use a quilters cutting board and a rotary cutter. Measure the cushions with a measuring tape. Add an inch. Lay the fabric on your cutting board and with a quilters ruler and rotary cutter cut your pieces. The tools cut your straight lines for you. Especially important for your cushions. The rest of the pieces are pinned to your chair. Straight lines are not as important.
Gina, HI, first timer on the site, and it is driving me crazy that you do not have links for the rest of your series in your individual posts!!! I might be picky but it would sure speed up my trying to learn how to reupholster my sofa…
Great idea! I’m working on fixing it now – Thanks!
I have an IKEA couch where the cushions are not removable. Any suggestions for measuring and making one?
I’m really sorry but I don’t have any ideas for that.
Great tutorial, but it keeps skipping to the end of the post to the leave a reply section. Extremely annoying to the extent that I cannot finish.
There are incomplete instructions on the part3 section of ‘getting your zipper measurements’.
1. Do I add 1/2″ seam to the zipper halves?
2. Do I add 1/2″ seam to the non-zipper aides so that all will fit correctly to the top/bottom of cushion covers without being to small or large?
3. I’ve measured my zipper portions, so then do I cut the fabric to THAT measurement PLUS 1/2″?
You basically need 1/2 inch seam allowance at every seam because you need room on either side for sewing.
Hi, Just found this tutorial as I am attempting to make covers and wondered if I can still ask you questions! Do you bother overlocking the seams as my machine doesn’t have an overlocker.
No I don’t Carole 🙂
Regarding piping: The chair that I plan to cover already has piping. Wouldn’t it be awkward to have piping over piping?
If it’s thin piping it’s fine 🙂
Gina, your series is excellent. However, much of the instructions is overlaid with advertisements, and it happens on every tutorial. I’ve tried everything to get rid of them, but the pop right back and occlude the text. Can you please try to correct? The most annoying ones are Ethan Allen! They just don’t want us to slipcover, I guess!!
So sorry Martha, I will look into it!
How do you figure out how much fabric to buy?