Metal arrow signs are so trendy these days, but even at discount home decor sales & stores they can still be a pretty penny. I wanted one, but there’s no way I was going to pay retail. Plus, I didn’t want cheesy words, I just wanted the shape of the sign. So I DIY’ed it. Isn’t that always my solution? Yeah, but guess what? You can make one, too. And, you don’t have to make an arrow – you can make practically any shape you’d ever want with these easy steps.
![]()
![]()
Start with corrugated metal roofing. It’s less than $20 a sheet at Lowe’s* and you can make several out of a single sheet (so gather up your buddies and see who all wants a sign.) You’ll also need a straight edge (I used a scrap of 1×6 pine), a tape measure, a pencil and a permanent marker.
Mark out whatever shape you’d like – but to get my arrow I used the straight edge to mark a 10 inch width on the straight parts, then measured in on the point at top and bottom and used the straight edge again to get everything lined up. After that, I free handed the curves of the turn. Once I had it all done in pencil, I went over it with marker to make it easier for cutting.
![]()
If you mess up, it’s all good – alcohol will take off the marker. And when you’re done cutting (see below) you can use it again on the edges before hanging.
PLEASE BE CAREFUL HANDLING THE METAL – IT WILL CUT YOU. Like seriously. Use gloves!!!
![]()
See, I just traced it out. And then I realized I couldn’t find my metal cutting shears, so I went to see my father in law (because he rocks!) To cut it out you’ll need those plus a sharp utility knife.
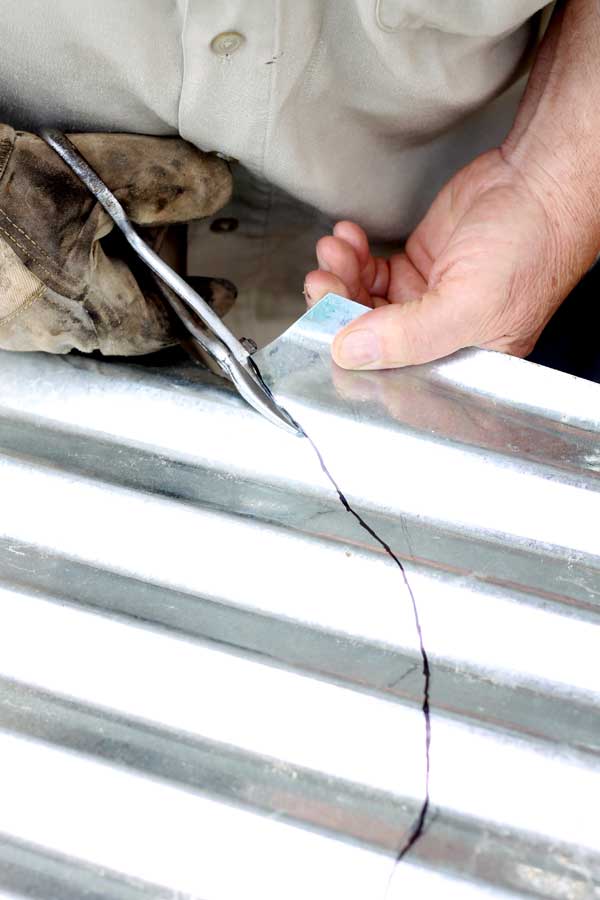
For the curved bits and on the wavy parts of the metal, use the metal shears. Please wear gloves. PLEASE.

On the straight parts, we figured out it was better to use a knife. You’ll have to score it 3 or 4 times (at least) to finally get through the metal, but it’s much cleaner and easier than the shears. Be patient, grasshopper.
![]() Once it’s all cut out, then lightly sand the edges with fine grit sand paper (or a sanding sponge) and you’re good to go. Love that rustic finish? Learn how to age galvanized metal roofing in this post.
Once it’s all cut out, then lightly sand the edges with fine grit sand paper (or a sanding sponge) and you’re good to go. Love that rustic finish? Learn how to age galvanized metal roofing in this post.
 Want more fun DIY ideas? Be sure to check out the Lowe’s Creative Ideas Magazine!
*Thanks to Lowe’s for partnering with me on this post. All ideas, words, photos & opinions are 100% my own.*

I love it!!!
Hi, I’m a “newbie” to blogging, having just started my web-site. I just found you on Facebook, Instagram, and now your blog. You have such wonderful, creative ideas. I really love your mobile home “stuff”, as I’m seriously considering getting into one! Great to meet you!
ok – you could seriously sell a ton of these. get right on that so I can buy one! ha.
Yeah… umm…. Haha! I bet you could find someone to make it though 🙂
How fun is this. Love it.
I love it! I do not enjoy cutting metal at all, but might have to pull the tin snips out and try this!
This is fabulous!! : ) Pinned!
Great! Thanks for the tutorial! I have several leftover pieces of tin that will be perfect for this!
If you go to a Harbor freight store( online/brickandmortor) you can get an electric metal cutter for about 20.00 or less. cuts like a dream. kind of have to get the hang of cutting the ribs on the metal roofing , but what a great tool and time saver! still sharp when done, so be careful, but cuts fast and nice!
you had me at quirky! I love your blog and will be making several of these, although I absolutely adore Harbor freight and will be checking into that electric cutter first!
So glad you stopped by Pat 🙂
Your Aw right girl!
Thanks Kelly 🙂