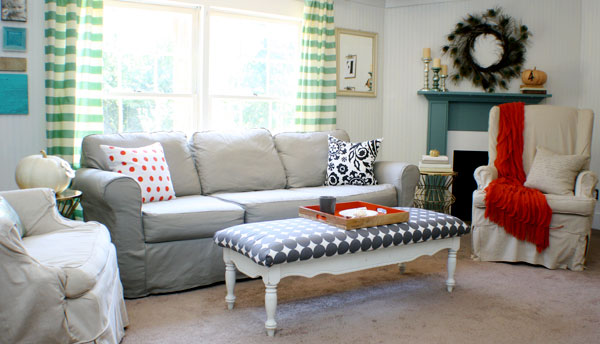
Guess what? All this week I’ve been sharing how to make slipcovers – and now you can see mine all finished. It took me a total of about 25 hours of hands on work to make my slipcover and about $100 in supplies (most of which were provided by Online Fabric Store.)
Are you just joining in? You can learn how to make slipcovers – start from the beginning:
Now let’s get to some of the questions you’ve been asking this week….
How much fabric do I need for my slipcover? Well it depends on what you’re covering. The chart below from Little Green Notebook is technically for upholstery, so I would add an additional 25% or so for slip covering. My slipcover took 15 yards with very little left over (enough for a couple of pillows or so.)

My number one tip is to give yourself time. I’ve done a few slip covers, so I worked a little faster than most. Don’t pressure yourself, just go at your own pace. It’s not a race – it’s a project to enhance your home.
If there is a slipcover available that actually fits your piece of furniture (there isn’t for mine), then consider buying one. For around $200 you can buy most slip covers and it is well worth the price to not spend two weeks and $100 to make it yourself.
Looking for a piece to slip cover to save money instead of buying new? Look for detachable cushions, clean lines, and sturdy pieces. There’s nothing worse than making a slipcover for a chair that falls apart three weeks later.
If you’ve read through the entire series and still have questions, please leave them in the comments.
But, before you run off – I’m teaming up with Online Fabric Store to supply one of my readers with a $100 gift card. That’s like enough to make your own slip cover for free!!
To enter, visit Online Fabric Store and leave a comment telling me your favorite fabric!
That’s it! How easy is that?
And, if you’re ready to get started now – Online Fabric Store is giving my readers a special discount. $5 off $50 (and you get free shipping on orders over $50 – that’s a win/win.) Just use code: SHABBYCREEK5 to claim your discount. Code ends October 4th.
Giveaway ends Friday, October 4th at midnight central time. Winner will be contacted via email. US residents 18 & older only, void where prohibited.
Good luck!
*Online Fabric Store provided me with supplies to make this project – all ideas and opinions are 100% my own.*
I’m in a dotty mood, so I think I’d get some Premier Prints Polka Dot White/Storm Twill.
I love the pattern and colors in the Suzani Summerland Natural. So many to choose from! 🙂
I like your suggestion, driftwood grey!
I have been begging my husband to let me reupholster our sofas… Waverly Damask Duet Robins Egg Fabric would be my choice it I was selected. 🙂 Thanks for this opportunity!
I am beginning my sewing journey and sewing a slipcover is on my “to learn” list. Thank you so much for posting a step-by-step how-to. It will definitely be a reference in the future. I like the Waverly Full Circle fabric.
I like the Jumper Oatmeal. Would love to make slipcovers for my sofas since my puppy has used the bottom corners as teething toys!
Ugh it’s too hard to choose! But if I were choosing for the chair that I want to slipcover, I think I’d pick Robert Allen’s duck in Slate.
I love paisley prints, so I’m loving the Portfolio Arta Stone fabric!
Ooh. I can’t decide between the grey duck or the natural! Hmmm.
Wow. I did not know they carried more than fabric. What a cool site. Love P. KAUFFMAN Gypsey watermelon. Thanks for this tutorial!
I found your great slipcover series thru Pinterest. Super helpful!
When I went looking at Online Fabric Store I found Richloom Gloria Jubilee which I think would look great in our family room.
Your slipcovers are fabulous! You deserve a trophy!
Great giveaway!!! My favorite is Covington Bosporus Flax!!! I just covered a chair in it-and I even ordered it from them!! Part one of the makeover is here:
http://www.rachelsnest.com/2013/09/cane-chair-makeover-part-1.html
Thanks for the chance to win!!!
that was a great detailed tutorial! and what an awesome giveaway! hope i’m lucky 😉
-blessings, misti
I love all of the HGTV fabrics, especially HGTV Flower Tower Turquoise 🙂
Thank you so much for this fabulous tutorial! I have wanted to make covers for a long time but was scared to waste fabric and time. I will definitely give it a try now that I have a much better idea of what to do.
I also enjoyed browsing the online fabric store. As a recovering fabric addict, I must be careful visiting their site. Too many great choices, however I think I would go with Swavelle/Mill Creek Finger Licking Good.
Great tutorial!! I love Retreat Blue Citrine!
Love to sew, and need some new window treatments. My favorite fabric is Premier Prints Barber Powder Blue Twill!
Portfolio Blitz Hemp would look great on my dining room chairs!
Premier Prints Osbourne in powder blue.:)
Thank you for a great tutorial on slipcovers. I keep thinking I will attempt this and this might be my inspiration. I love the Waverly toile fabrics.
There are so many beautiful fabrics to choose from but I think my favorite is Ophelia Blossom by P. Kaufman.
I love the quilting fabrics especially Amy Butler fabric.
There are so may I like but I managed to narrow it down to two. The Waverly Bits n Pieces Seaglass Fabric and the Richloom Sparrow Orchard Fabric. Both are just gorgeous.
Wow! Perfect timing, I’ve been looking at fabric for my bedroom redo. Love the Ralph Lauren Ice House Stripe, all of the Zig-Zag (chevron) prints. Too much to choose from,haha! Thanks for the giveaway and for the inspiration.
I love the Singing Tree Peacock, Bird Watcher Meadow and the Dandeloin. Those are my favorites!
Thank you so much for this series. I have a chair, 2 half sofas & an ottoman I need to cover & it has totally frightened me. So now I am ready to tackle them! Thank you so much for the link to OFS! I know it seems dull but I really think I am going to order Beige Irish Linen Burlap to cover the pieces. My style is very shabby/primitive & it will fit!
Gosh, what’s not to love about Online Fabrics. Love that they carry designer lines, as well as fabrics for clothing, quilting and home dec. All my needs in one place!
Wowzer!!!! I can hardly pick fabric in a quilt store…I’m guilty…I want it all!!!! I love online fabrics. I have a few fabrics pinned but Gypsy Watermelon is my favorite. I love Waverly and Amy Butler…see I want it all!!!! Thanks Gina!!!
Thanks for the giveaway, Gina! I like the Waverly Somerset Botanical Sun N Shade Mist Fabric.
LOVE LOVE LOVE Portfolio Threads “Laguna”. Never even heard of this fabric website until you mentioned it.. Thanks for all of the tips. I’ve actually made slipcovers before, but you’ve taught me some new tricks and motivated me to tackle some much needed couch slipcovers that I’ve been dreading!
I have loved reading through your slipcover tutorials! Very well done!
Here’s the fabric I would buy if I won your giveaway!! Ivory Hemp Fabric
Thank you!
PS. I read your blog daily, you have become a routine part of my morning coffee routine (as well as Miss Mustard Seed, of course!!)
Kaufman Arboretum Cloud. So pretty!
They have some great denims colors. I have been thinking of doing my couch for three years! I like this color Chrome Gray Topsider Bull Denim Fabric.
I really like the Ivory Hemp they carry! My couch is a microfiber green! I thought of using drop cloths for it, but now I’m not sure. It’s a big decision for me. Thanks for sharing this with us! I’ve learned so much from you!
THE SINGING TREE PEACOCK !!!!!!!!!!!!!!!!!!!!!!!!!!!!!!!!!!!! BEAUTIFUL
Robert Allen radiant velvet Mediterranean.
I’ve had a lot of success using OFS and Covington’s ticking for slipcovers. I have two Ikea Jenny Lund chairs in the master that need new dresses. Thanks for reminding me about OFS!
I like your pick and #10 Natural Cotton Duck Fabric – 60″
I love the Richloom Ampersand Cobalt Fabric! It would be perfect for an armchair!
I love the mint green terry cloth material
My current fave fabric is Waverly’s pom pom paisley. The festive print and bright colors would look awesome in my upstairs living room!
Premiere prints polka dot white storm love for pillows and maybe my daughters headboard I want to make.
Oh great, another fabric website to lose myself in while I browse for hours and hours! Loooove the Waverly Destination Graphite, very bold and cool!
Loose Leaf Citron would be perfect for curtains in my updated guest room! Love the variety and so much to choose from.
I love the Suzani Summerland Natural fabric.
I have been wanting to redo my sofas for a while but couldn’t find anything I really like. I just saw the Waverly Full Circle Rope Fabric and fell in love with it. I think it would be perfect.
Curl up Citrine by HGTV or maybe just a plain white duckcloth.!
-Trish
Loving this one!
http://www.onlinefabricstore.net/decor/outdoor-fabric-and-supplies/outdoor-fabric-by-manufacturer/waverly-sun-n-shade-chippendale-fretwork-mineral-fabric-.htm
Waverly makes waves latte
My bedroom is brown/blue and this fabric would match perfectly!
I am loving the Waverly Essence Onyx!
I love the Michael Miller Doodle Damask Gray…so simple and pretty!
Thank you again for this tutorial! I’m in a very cottage-y mood lately, so my pick would either be the natural bull denim, or the Covington natural denim ticking (which says to dry clean…) Anyway, I’d probably go crazy with $100 to make my choice in!!
Thanks again!
Love the HGTV curl up citrine!
Chevron quartz
My favorite fabric is Braemore Gorgeous Pearl Fabric. I have a chair covered in this fabric and really love it.
I love the Premier Prints Zig Zag Peacock Blue Denton Fabric…. Total sucker for chevron right now! 🙂
I like the retro rides car fabric. But there’s so many that I really like!!
Thank you for this giveaway. My favorite fabrics is the summerland collection. I have some in my baby’s nursery.
I am really wanting to buy some oilcloth for a few projects and the selection is amazing. I want the oilcloth “chalk cloth” but not sure what to do with that. I also love the chilis and apple prints!
I absolutely love the “Black Tehuana Oilcloth Fabric”. The colors are gorgeous and work very well on my outdoor furniture. Good Luck to everyone but I truly hope I win this, loads of projects to cover!!! 🙂
beacon hill cheetah velvet moonstone is what i am looking for!
Love the Towers Village Blue and Natural! Thanks for the opportunity.
I like Michael Miller Tweet Pie in aqua. So cute and great colors.
I really like the idea of making a slipcover out of Premier Prints Dyed Solid Kelp Fabric. This tutorial simplifies the process and is motivating and helpful.
Thanks
I love the Fabric.com site. My order was for a lovely/ indoor outdoor fabric: Ash Hill Garden. I have a bamboo dining set with a glass table top. These little birdies make my heart sing and will supply much needed zing to my dining chairs.
I love Sunbrella white. Lasts forever and tosses off dirt,
I know right? It is amazing stuff Patricia 🙂
Hi! Thank you for your explanation. I need to know which is the width of the fabrics for the calculation of the quantity in the different models of armchairs in the photo.
Hey Barb, I am not sure I understand what you are asking? Can you let me know a little more about what you are looking for 🙂