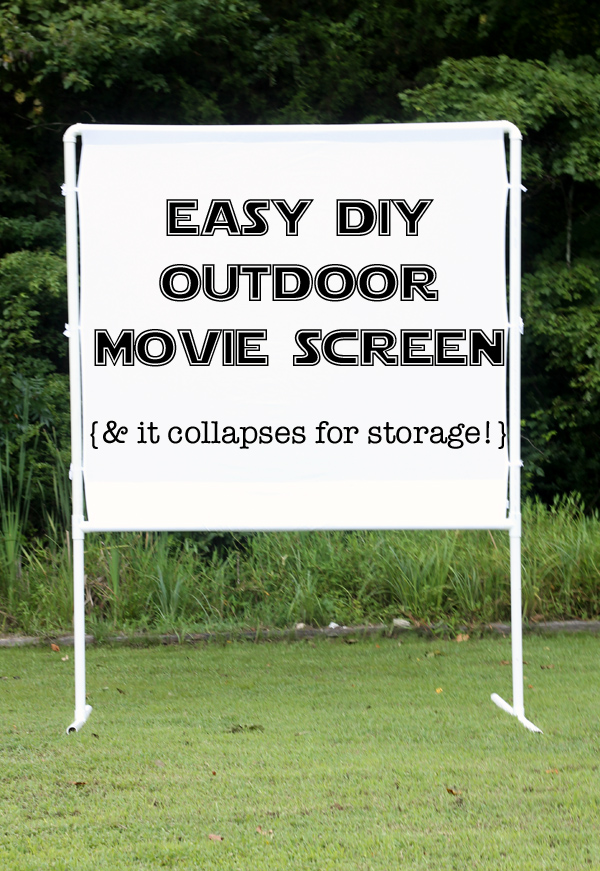
Going to the drive-in movie is always such a blast – but our closest one is quite a bit away. So we decided that we wanted to bring the fun home – so not only could we watch one whenever we want, but we can also invite over friends and family to join in on the fun. Want to make your own DIY outdoor movie screen? This project is super simple – and the best part is that it all comes apart for storage in minutes. The entire screen cost around $50, so this plus the projector may have been one of the best Father’s Day gifts we’ve ever thought of.
For this project, you’ll need:
- 4 – ten ft long pieces of 1 1/2 inch pvc pipe
- 2 – 45% elbows (that fit 1 1/2 inch pipe)
- 4 – T fittings (that fit 1 1/2 inch pipe)
- 8 – 10 inch spikes (found in nail section)
- 1 full size white sheet
- 6 pieces of 3/4 grosgrain ribbon, 18 inches long each
You’ll also need:
- sewing machine
- compound miter saw (or handsaw to cut pipe)
Start by cutting the PVC pipe in these measurements:
- Cut the first two pieces so you get a 7 ft piece and then a 3 ft piece
- Cut the second two so you have a 6 ft piece and two 2 ft pieces
NOTE: If you use less than 1 1/2 inch it will not be very stable. I tried multiple types, but this kind will hold the weight and be stable enough to hold up well over and over again.
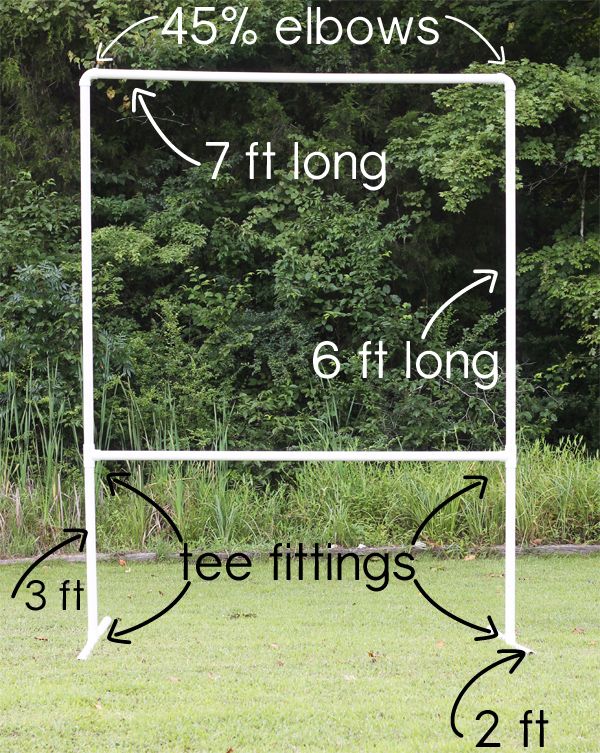
Using the graphic above, assemble the frame. The 7 ft pieces go at the top and bottom, the 3 ft pieces are the legs, the 2 ft pieces are the “feet” that holds it all up.
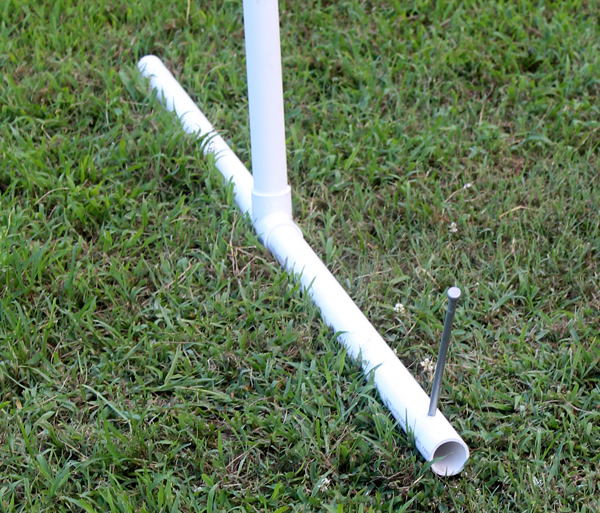
We drilled holes in the pipe at an angle towards the center to help the stakes get enough stability to hold up. Before you drive it into the ground, be sure to sew your sheet.
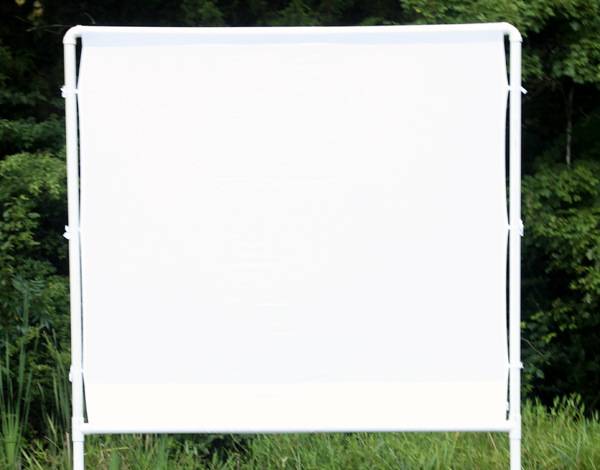 The sheet is the screen part, and it’s fairly easy to install. I used the top hem and turned it down one fold, then ran a stitch close to the edge to make a pocket for the top of the frame. I put it onto the frame, then measured where it needed to be hemmed on the bottom, then took it back off the frame and ran another pocket for the bottom. Sewing it just a tiny bit small means the screen will stretch out nicely and help against wrinkles. Before putting it back on the frame, I sewed the ribbon on the sides at the top, bottom and middle, by folding the ribbon in half and stitching it down to create tabs to tie it to the sides of the frame.
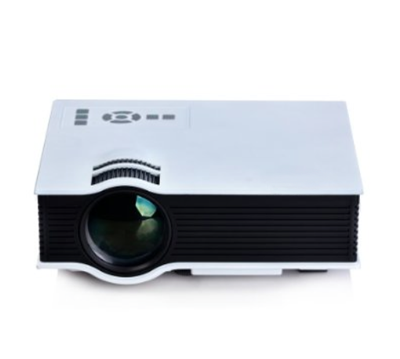
As for the projector, we looked at several before deciding on this Movie Projector we found on Amazon (that’s an affiliate link). It’s not the ultimate, best quality, but at around $100 it’s the perfect choice for movie nights at home. We’ve used it several times and I’d pick it all over again. It hooks up to a DVD player (we use our PlayStation). It can also be hooked up to other gaming consoles for larger than life video games.
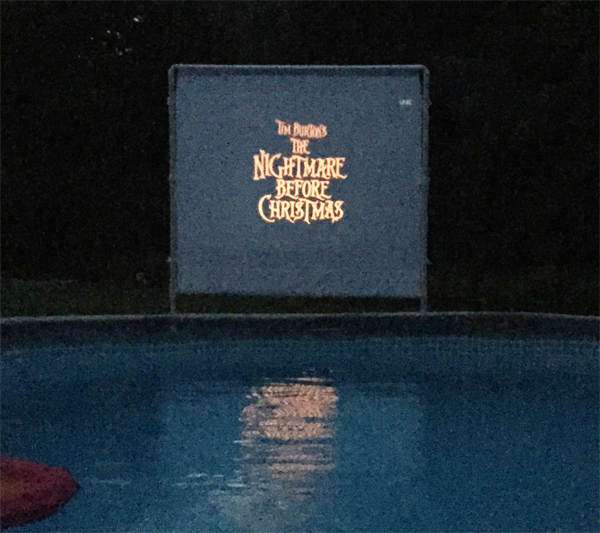
It’s kind of hard to take good photos at night, but I did capture the first time we used it as a dive in movie (watching my fave Disney movie) – and it was just the hubby and me 🙂

My husband and I have been dying to try this! Thanks for the easy tutorial!
This is a great idea. I have been wanting to do this forever. Thanks for the easy directions.
quick question….approximately how much did you spend on the materials for the screen? It sounds fairly cheap, I just need an estimate before I attempt to make one myself. Also, thank you for posting this diy, it’s very helpful!
Make sure to buy a sheet that isn’t too thick, so you can put the projector behind the sheet. It makes things more magical!
Just looking at some things… Those elbow fittings, should be 90 degrees not 45. Correct? also how did you make a Full Size Sheet work? A full is 4.5 x 6.25 feet and the screen is built at 6×7 feet. Then you are even shortening the sheet when you fold and sew. I just want to get my ducks in a row before I make it happen
You are correct – it was a mistake on my part.
Quick question.. Could you explain the process of how it collapses? Thank you.
Quick question.. What is the collapsing process like?
Super easy! We can take it apart in about 2 minutes.
Just don’t glue it together
I love this idea. Quick question. With the projector, how did you do the sound for the movie?
We hook up an external speaker with an aux cord.
Great idea. Is it hard to to disassemble? Do the pieces get stuck together? Or fall apart over time with the connections becoming loose? Want to do this for a slightly different use – to hang my banner behind my booth at indoor craft shows, etc. Def. need something that breaks down easily. Thank you.
Nope, it’s quick and easy to assemble and disassemble, too!
Can someone tell me what size you ended up using? I’m making it tonight. Already bought all the supplies. I bought a full size sheet…. I also bought 45 angle did that work as well?
Hi Regina,
I used a full size sheet so if you look at the list of materials need you should be good to go, it sounds like you have everything you need 🙂 Good luck!
An earlier comment had a sheet size problem. The 6×7 or 72inx84in frame doesn’t match the dementions of a full size sheet measurements which are 54″ x 75″. A king size sheet is 76″x 80″. The dimensions of the king sheet make sense with the sewing and tab dimensions you list. Could this be the answer to the confusion? You would add tabs to the 80″ sides and fold and sew tabs to the 76″ sides.
*Fold and sew pockets on shorter sides which will become top and bottom of screen. Also you would need to use 90 degree elbows to achieve right angles for top of screen frame (45 is ). I am also using rebar posts to elevate and stabilize the screen next to my pool. The pvc fits right over them. Great idea!!!! Dive in movie night❤
No you have to have 90 degree angle on top bar. That matches the 90 degree angle of the tees on the bottom bar
Is there an alternative to sewing the top and bottom of the sheet?
Not really Zach, I guess you could try the “no sew” tape that you iron but it might not be as stable.
what about doing grommets then zip-tying the sheet to the frame that way?
That is a great option AJ!
I would think you could also use a fitted sheet to go around the outside of the frame. Just a thought, LOL.
Possibly, I never tried it, let me know if you do how it turns out 🙂
Why not try to use industrial strength Velcro, I think I might try that. Because I don’t have a sewing machine anymore.
Another thing to tick off my to do list for the cottage this year. Thanks for posting this project. Looks easy peasy!
Nice work! Al
Thanks Al, go for it, super easy and lots of fun afterwards!
Ok…put this together this week. Without glueing a couple key spots, it wouldn’t stay together. Also, the 45 degree joint at the top is off. When assembled it is very big…for my purposes, I shortened it and glued the horizontal bars to the joints. It is still a bit unstable, on its own. But with the sheet in place and either nails or a big of sand on each leg – it should hold up. Thanks for the tutorial!
Good job Patti! It sounds like you made it happen 🙂
Do you have problems with a sheet being too transparent? Wondering if outdoor fabric would work and be thicker. Anyone try this?
Hi Natalie, we have not had any problems but I’m sure you would be fine with a heavier fabric too 🙂
I should have used common sense… instead of blindly following a tutorial. But I assumed it would be correct. Those are 90 degree angles, so obviously you need to use 90 degree elbows – not 45 degree elbows!! READ the comments people. Don’t do what I did and have to drive half hour from your campsite to the nearest hardware store to buy the *correct* materials… LOL