• Blog
  • Home
  • Soft Life Society
  • Privacy Policy
    • Facebook
    • Instagram
    • Pinterest
    • Twitter

The Shabby Creek Cottage

the art of making life magical

  • illumine magazine
  • classes
  • join the newsletter

Salt Dyed Easter Eggs

Why is dying Easter eggs so messy? I understand it’s dye… and that’s messy enough on it’s own. But coloring Easter eggs is one of the best memories as a child. So this year, instead of pouring little bowls of water everywhere for my grandsons to make a mess with – we’re dying them with salt. It’s so much easier – and bonus, the color is so much deeper. 

How to dye Easter eggs with salt - this looks so easy!

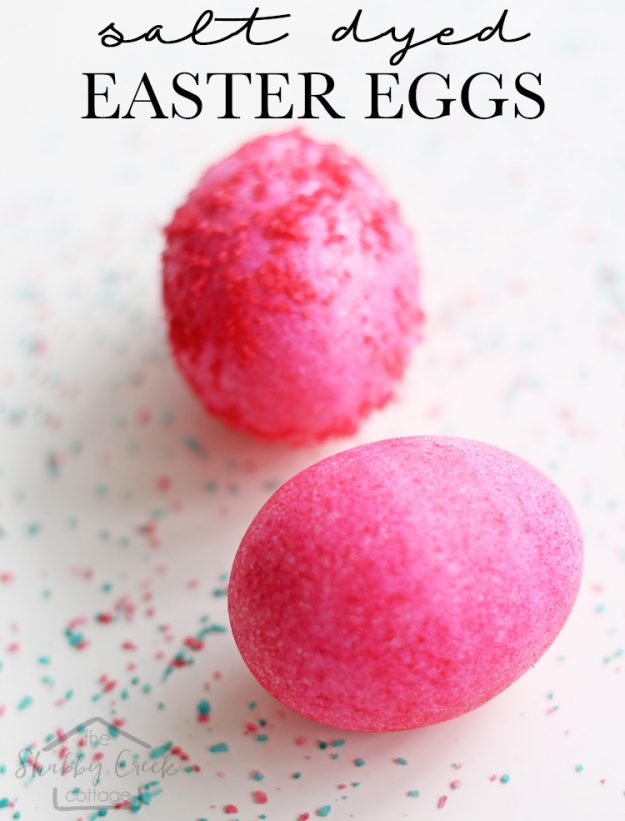
SALT DYED EASTER EGGS

  1. Put about a cup of kosher salt (I eye-balled it) into a zip top bag. A freezer bag is thicker, hence I felt it worked better. 
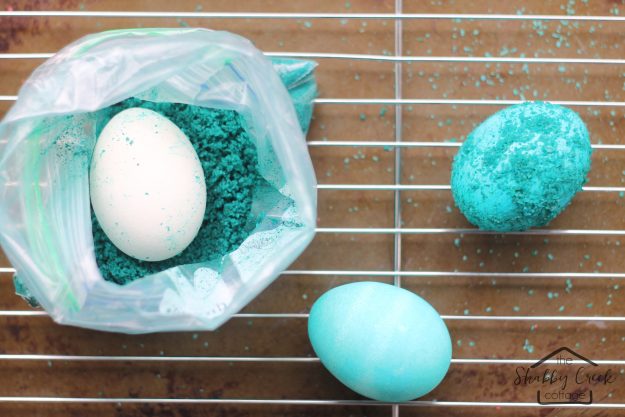
  2. Add in about a tablespoon of liquid food coloring. See those turquoise eggs below? Those were made with GREEN food coloring. So beware that you’re probably not going to be able to control colors like you can with liquid. (Side note: The first time I tried this, all I had was green food coloring. Happy accident… it turned out turquoise!)
  3. Zip up the bag and smush around all of the food coloring into the sand so it’s all combined well. 
  4. Place in a white boiled egg, then zip the bag back up. 
  5. Roll the egg around in the colored salt, making sure to coat the entire egg.
  6. Pull the egg out to the bag, making sure to leave salt still stuck on it.
  7. Carefully place it on a cooling rack to dry. Let COMPLETELY dry.
  8. Brush off the salt.
  9. Here’s where you have options… you can leave it as is (the pink ones are that way) – OR you can rinse them under cold water for just a sec to wash off the salt. The dye will remain, but it will slightly tone down the brightness. Try some both ways. You can always redye them for a deeper color if you’d like.
  10. Make sure to close the bag once you’re done and the dye will last for a few days.

BONUS: Use a tray to catch the colored salt and let it dry, then use them to make my favorite margaritas ๐Ÿ˜‰ 

Salt dyed Easter eggs - these are SO pretty!

Want to see how easy they are? I shared this over on my Facebook page:

Filed Under: Easter, holiday ideas

About Gina Luker

Hey there, I'm Gina Luker. I'm an artist, author and founder of The Soft Life Society. I am proudly a wild, witchy woman on a mission to make life magical. Alongside my husband Mitch, we are remodeling a 200 year old home we call The Enchanted Manor. I'm obsessed with estate sale shopping, Instagram, Practical Magic, disco balls, margaritas and doing whatever makes me insanely happy in any given moment.

« No-Bake Banana Pudding Cheesecake
21 Insanely Easy Ways to do Disney World on the Cheap »

Comments

  1. Gaeyl says

    March 26, 2017 at 6:21 pm

    Love the salt dyed eggs. Thanks for sharing

    Reply
    • Gina Luker says

      March 27, 2017 at 8:00 am

      Glad you like it!!

      Reply
  2. Carlee says

    March 26, 2017 at 7:52 pm

    My little dude is sooooo anxious to dye eggs and this looks like a really fun way to do it!

    Reply
    • Gina Luker says

      March 27, 2017 at 8:00 am

      Have fun Carlee ๐Ÿ™‚

      Reply
  3. Jody says

    March 27, 2017 at 10:51 pm

    I can’t wait to try this. Thanks!

    Reply
  4. JILL NELSON says

    March 28, 2017 at 2:21 pm

    Can you give us an idea of how long they take to dry? Sounds like a better way to dye eggs with kids…if they don’t have to wait toooo long for them to dry!

    Reply
    • Gina Luker says

      March 28, 2017 at 4:29 pm

      I think mine took around 30 minutes? It doesn’t take too long ๐Ÿ™‚

      Reply
  5. Dennie says

    March 29, 2017 at 5:57 am

    This is so awesome. Thank you for posting!

    Reply
    • Gina Luker says

      March 29, 2017 at 10:54 am

      Thanks Dennie ๐Ÿ™‚

      Reply
  6. margaret st.clair says

    March 19, 2019 at 12:45 pm

    I have done the same thing with uncooked rice, they turn out pretty. put in bag add color and mix add egg and shake bag gently to coat. They look like they are speckled.

    Reply
    • Gina Luker says

      March 20, 2019 at 11:10 am

      Wow, very cool Margaret, thanks for sharing ๐Ÿ™‚

      Reply

Leave a Reply Cancel reply

Your email address will not be published. Required fields are marked *

Recipe Rating


Hey there, Iโ€™m Gina!

I believe in the magic of soft living, finding joy in every day moments, and building a magical life from the inside out. Iโ€™ve spent the last 15+ years sharing my story online – through creativity, healing, and a little rebellious sparkle.

Iโ€™m a writer, dreamer, and witchy woman who believes your everyday life should feel enchanting.

Most days youโ€™ll find me with paint on my hands, dirt under my nails, and a journal full of big dreams. Iโ€™m so glad youโ€™re here.

Privacy Policy & Disclosure Statement

Searching For Something?

Copyright © 2026 · Divine theme by Restored 316

Copyright © 2026 The Shabby Creek Cottage Log in