When I’m doing a room makeover, the first thing that usually crosses my mind is to paint furniture. I mean, if you’ve got decent quality goods, why not reuse them? Unless you are so fed up with the overall style of your furniture that you absolutely hate it, giving everything a fresh coat of paint is usually a good solution. If budget makeovers are your kind of gig, then deciding to paint furniture should be a given.
So then, why don’t more people do it? Because it’s scary stuff. I mean, what if it chips? Or flakes? Or bubbles up? Yes, all of that can totally happen, but the chances are significantly less of you making a mistake if you take the time to do the job right. Because I’ve painted more furniture than you can shake a stick at, I’m going to share some tips on how I do it the quick and easy way.
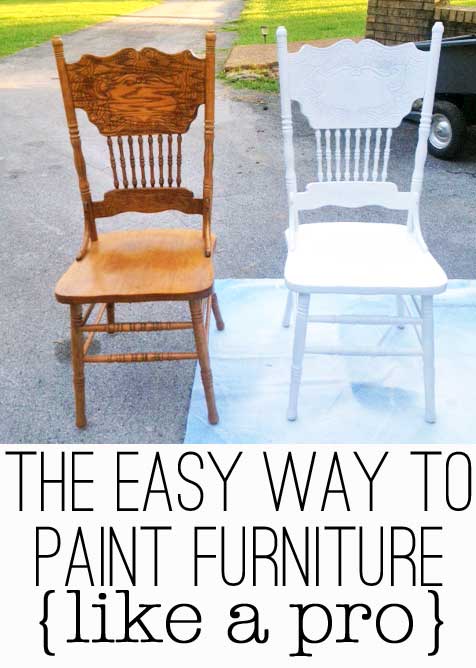 First, of course, you’ll need a piece of furniture. I painted a dining room set, a table and six chairs – and get this – I did it in one day. Yep.

First we started by wiping down every inch of the furniture really well with liquid deglosser (also known as liquid sandpaper.) Additionally we hand sanded the table top with fine grit sand paper, just to be sure it had good grip because that’s what gets the most use.
After we wiped it down with that, we went back with a solution of a few drops of dish liquid in a gallon of water to clean off any residue.
Once all of the furniture was dry, we gave it all a coat of Sherwin Williams Multi-Purpose primer. I love this stuff – it works great for furniture – plus we were painting the furniture white so it was a base coat to get us started.
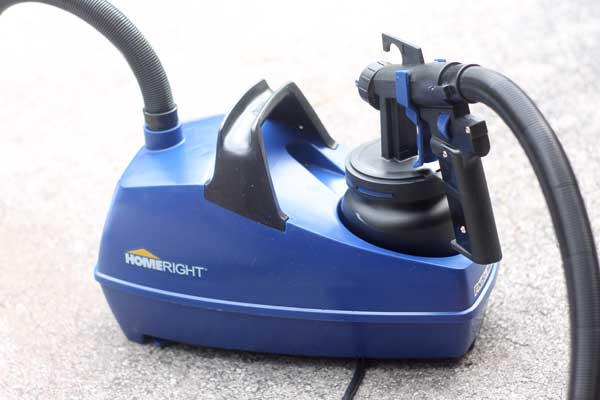
To apply both the primer and the paint, I used a HomeRight Finish Max Pro – this sucker is the bomb dot com. I usually use the HomeRight Finish Max Fine Finish Sprayer, but my buddies there sent me this new version to try and I love it. Either one works beautifully – you really can’t go wrong with either option. The key is to use a good sprayer that will coat the furniture well. The pro version is about double the price of the fine finish – so unless you plan on going pro then the cheaper of the two will still work perfectly. {BTW – those are affiliate links}

I started by painting the bottoms, then turned the chairs up right and painted the tops. Changing up the angles means you get more chances to hit every little inch.
I let them dry a bit before turning to get the next angle in, it was much easier that way. Doing it all assembly line style meant that the first one was dry to the touch by the time I finished the last one.
After a couple of hours of letting the primer cure, it was time to paint. I topped it off with a coat of Sherwin Williams Pro Classic paint in Extra White, using the different angles just like I did for the primer.
When it was all painted, I let it sit several days before handling to ensure the paint was dry. Before heavy usage, you should let latex paint cure 30 days to give it time to harden properly.
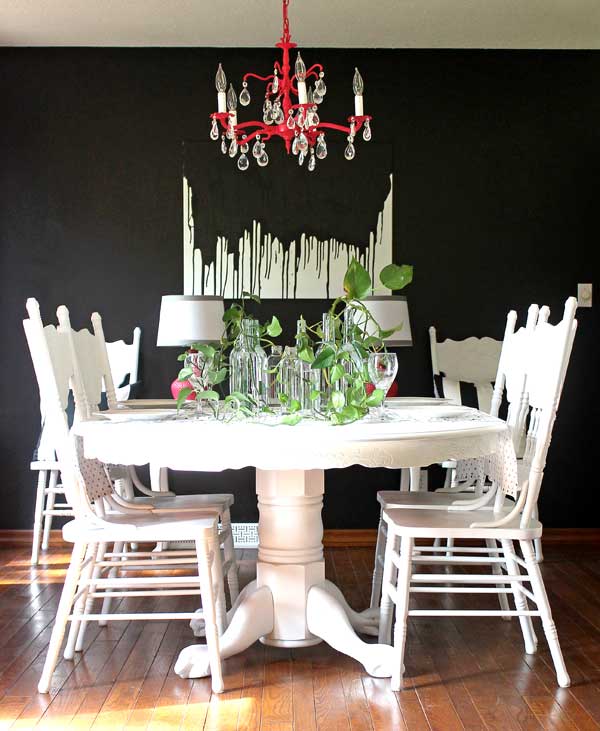
The last thing I did was put a couple of coats of polyacrylic on top of the table, just to give it extra protection. Using acrylic means that it won’t yellow over time like polyurethane will – so it’s best to use with white.
And that’s how to paint furniture like a pro! If you follow all the steps, even though it seems longer, it’s much faster than painting with a brush and you’ll get much better results to last a long, long time.

This painting method is absolutely genius!
I’ll definitely be telling my friend about this – they have some very ugly looking furniture that will benefit from a new paint job!
This set turned out so beautifully. Great tips for how to give a professional look.
I’m pretty fussy about painting furniture, and I am here to say you’ve given us a good tutorial. Thanks. I’m tweeting the link.
I used a fine mist sprayer years ago and found that the nozzle kept clogging up. I finally threw it
out. Is this brand better about that? Great tutorial by the way! LG
Wow! it’s looks so beautiful and dramatic against the dark wall. Love it!!!!
I love this! I have chairs that looks very similar to these, and I wondered how to get a good paint job on them. I didn’t even think of a paint sprayer. Thanks for the tut. 🙂
Love what you’ve done!
Just one suggestion: take a look at the label on the liquid sandpaper product. Usually it’s a mix of trisodium phosphate and water. Now, go to the hardware and read the label on a box of trisodium, usually sold with the cleaning products. You will notice the directions say not to make the concentration too strong or it will degloss paint. Of course, it will also remove the skin on your hands if you don’t wear rubber gloves, too.
That’s what I use (because I’m cheap): extra strong trisodium and water solution instead of liquid sandpaper.
How did I figure this out? Well, a long time ago, I washed a set of steps to the basement that I’d painted a couple of months before with a glossy enamel, treads, risers, sides, the works. Took the shine right off of them forever.
Worth trying on a small project.
What a great way to paint table and chairs. I will get started on mine right away.Thanks for your tuturial.
This is a really good idea and it looks great! I have just painted some dining chairs with a brush and have found it to be blotchy and patchy in some areas especially on the detailing. It was my first attempt, so maybe I will get better 🙂 I definitely think I would use spray paint in the future with larger pieces. I have never seen a liquid de-glosser before, I will keep my eye out for that too next time I am at the hardware store!
Best wishes!
Do you have a post on how to to the extremely cool design on the wall in the background?
How long does the polyacrylic need to dry before transporting or using the table?
Did you wait the 30 days before applying the polyacrylic? (and with a paint sprayer?)
I’m still trying to decide between these two paint sprayer options… Any other feedback/insight about your experience with them? THANKS SO MUCH! 🙂
I personally wait about a week before the poly, then let it all cure 30 days before every day use. Hope this helps!
Did you spray the acrylic on too? I’m looking at getting a sprayer as I have a whole bedroom set I need refinished.
I use a brush for the acrylic – it’s faster and easier 🙂
Does it leave brush strokes?
No you don’t use a brush it is done with a sprayer.
P!ease clarify, do you use the sprayer to apply polycrylic or do use a brush for the polycrylic?
Hi Lorena, the brush for the polycrylic is better to use. Good luck!
does this method of painting furniture with a sprayer work with chalk paint?
Yes! I’m doing a post on that next week 🙂
Hi!! Wondering which brand of clear sealer do u love the best? I used a Valspar clear satin acrylic and it yellowed on my white chairs 🙁 thanks!
I use Minwax Polyacrylic – it’s my go-to 🙂
Greetings Gina,
Thanks for all the good tips. I can’t wait to paint an old Windsor chair. My husband says a paint sprayer works better with oil-based paint, but that is a pain to use. What kind of paint did you use on your project: latex or oil-based?
Ann Baird
I always use latex because I agree – oil based paints are a pain 🙂
Gins, Thanks for sharing your painting methods- I am excited sbout giving spraying a try. Did you have to thin the ptimer and paint? Also, did you strain the primer and paint? If you could expound on these aspects, it may give me the confidence to try spraying! Thank you again.
If you use the Finish Max, there’s an instruction booklet in there that will walk you through it. I didn’t use a strainer but I do water it down to about the consistency of buttermilk. Hope this helps!
Love the white I want to do it too , but I have a China hutch that is small to do too . Just afraid of doing it and messing it up.
I have 3 pieces of furniture that I am hoping to paint but they all have a little bit of peeling around corners or some edges. Two are wood with an old paint finish of some kind and the third is an older laminate piece. My plan is to sand those areas with a high grit sand paper until they are smooth. Do you think that would be enough? Or should I use some kind of glue or sealer as well?
Gina, Thanks for a great post. I am trying my hand at painting furniture and love the Finish Max.
This is the first time I’m learning about polyacrylic so thank you! Do prefer one brand over another?
Just any decent brand Marianne 🙂
This looks amazing! It’s such a bold look with the darker wall and this bright white furniture. I love love love white furniture.
Do you remember where you picked up this set from? I’ve seen these literally everywhere. My mom had these same chairs when I was a child, my Granny has them, I’ve seen them in random tv shows, and now on blog posts. All of America has had this table set at some point lol. So maybe I can get one for my new house ☺️
Thanks Princess, I love white furniture too, it’s so crisp and clean 🙂 You can find this style of table and chairs pretty much everywhere, you may even find a nice set at a thrift store yard sale ready to be painted!
Hi! I loke how your furniture turned out. I’m about to start painting a couple of chairs myself so I’ve been searching easy ways to do it. I’ve found that several people have used this paint sprayer, how do you get the company to send it out to you for you to test? And do you have to buy it if you like it? TIA
Hey Olivia, the paint sprayers make painting super easy and way faster! You would have to buy one though, they don’t let you try them out first. I was working with the company that is why they sent me one. It is up to you to decide if you’ll be doing enough painting to justify the cost of the sprayer. Good luck with your chairs!
Would I be able to use same technique on knotty pine walls?
I’ve not tried it on walls, I would suggest trying it on a similar scrap piece of Knotty pine just to test it.
Could I use this same method for kitchen cabinets. They are oak and I would like them painted white.
You can Liz, it is a big project though! I would search up some painted cabinet tutorials on Pinterest and Youtube, there are tons of them. I have seen some beautiful cabinet makeovers. Good luck 🙂
Hi-
Can you tell me more about the deglossing process? Do you paint it on and let it sit and then wipe it off? Is it messy like when you strip paint ? MY chairs are oak, so I am just trying to get the shine off, but want to be prepared. Also, do you wash the chairs after you degloss them?
Hi Moira,
It is super easy and not messy at all! You wipe it on, follow the directions for how long to let it sit and simply wipe it off. After we wiped it down with that, we went back with a solution of a few drops of dish liquid in a gallon of water to clean off any residue. Good luck and have fun!
Hi Gina! Can you believe you are still getting questions from this 2014 post?! Your painting process is very thorough and definitely done like a pro! Couple of questions though!
1) I’m going to attempt painting already painted chairs. Would you suggest sanding the paint off, then using the degreeser?
2) I’m not going to purchase the paint sprayer (husband gave it a veto) so would you suggest the same primer and paint for brushing?
3) Should we put the acrylic on the chairs too since they will be high usage to prevent wear?
Thanks so much in advance and thanks for this post!!
Hi Tara,
Thanks so much 🙂 You only need to sand if there are rough spots, chipping, ect. Yes the same paint for either method of painting and the poly/acrylic is a good idea. I hope that helps, good luck!
Have your tried this particular sprayer with chalk paint at all? Would love to know how it performs.
Carly xx
You can, you have to add water to make it thinner or it will clog up the sprayer 🙂
I have a finish max sprayer that clogs a lot. Thinking it might be because if the paint I used. Thinking about using the SW pro classic latex line for a crib. Have you had any paint chipping? Thanks
I haven’t had any issues with chipping. If you are using a chalk paint or something thick you may need to water it down a bit so it doesn’t clog and also make sure you clean it immediately after you are done using it 🙂
Hey! Did you add a top layer, protective layer to the chairs? I know the table got a layer but what about the chairs? Thanks
Nope, just the table top 🙂