• Blog
  • Home
  • How to Start a Blog
  • Privacy Policy
    • Facebook
    • Google+
    • Instagram
    • Pinterest
    • Twitter

The Shabby Creek Cottage

Hundreds of ideas for creative ways to eat, make & decorate!

  • Chalk Couture SHOP
  • eat
    • Dessert
    • Drink
    • Dinner
    • Side Dishes
  • make
    • crafts…
    • diy projects
    • cleaning and organizing
    • holiday
      • Christmas
      • Easter
      • Halloween
      • 4th of July
      • Valentine’s Day
    • freebies
  • decorate
  • subscribe

Wood Crate Rolling Cart

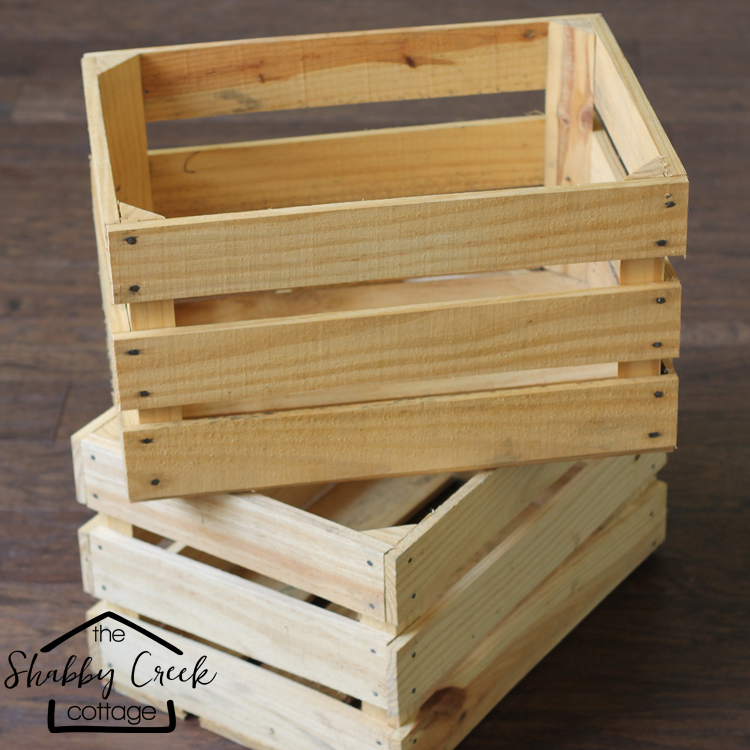
Have a wood crate or two hanging around your house? Then you can make this project in only a few minutes. I think start to finish the whole thing took around 20 minutes – so that’s about the fastest furniture piece I’ve ever built! I found these at our local produce market for dirt cheap, and I’ve seen similar ones at flea markets, etc. With only a few minutes and a few supplies, you can make your own wood crate rolling cart.

Next time I see wood crates at the flea market, I'm definitely grabbing a couple to make this little wood crate rolling cart.

DIY Wood Crate Rolling Cart

*this post contains affiliate links – which means I make a tiny portion of any sales purchased with no additional cost to you – thanks for supporting my blog*

Next time I see wood crates at the flea market, I'm definitely grabbing a couple to make this little wood crate rolling cart.

Supplies:

  • 2 – wood crates <these are very similar from amazon
  • 4 – 2 inch ball casters  (with screws)
  • 4 – 1 inch wood screws
  • drill with drill bit & screw driver bit

Next time I see wood crates at the flea market, I'm definitely grabbing a couple to make this little wood crate rolling cart.

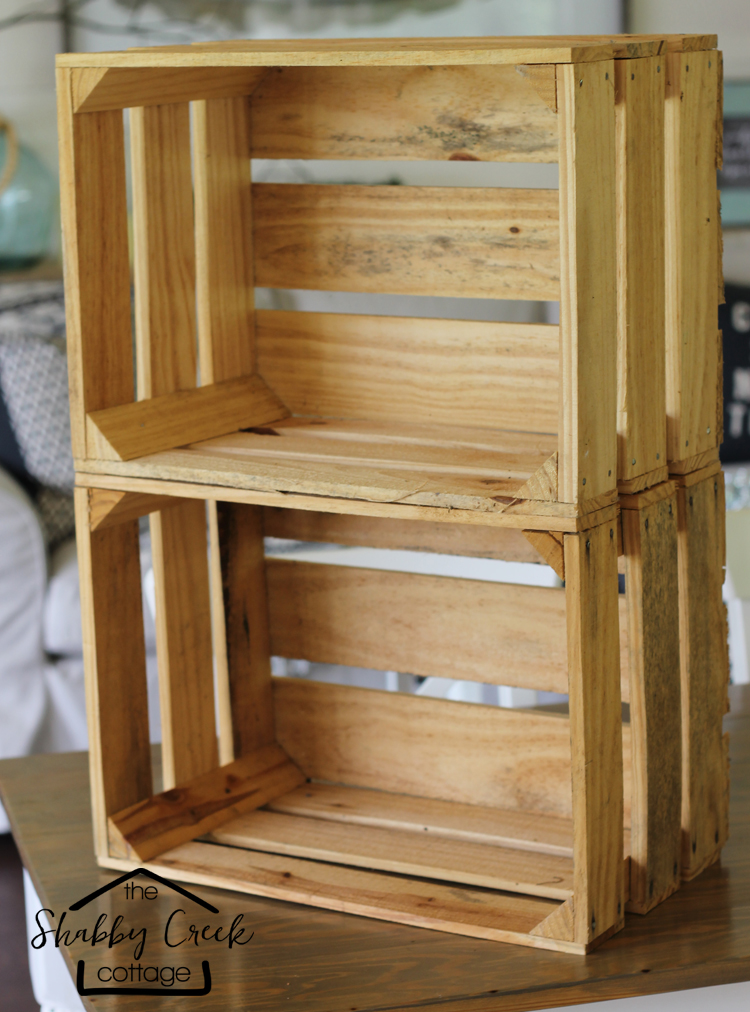
Start by stacking up the two crates one on top of the other. If you prefer one up or down, just know that this is turned upside down to start. Pay close attention to the side you choose to go up so it’s the one you want.

Next time I see wood crates at the flea market, I'm definitely grabbing a couple to make this little wood crate rolling cart.

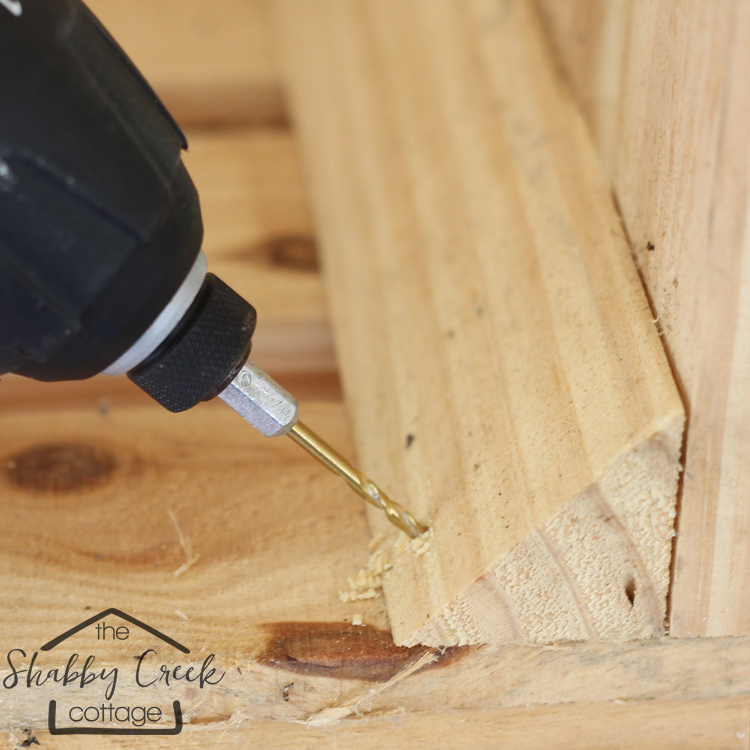
Next, drill into both the front and back corner of each side. This gives it a pilot hole.

Next time I see wood crates at the flea market, I'm definitely grabbing a couple to make this little wood crate rolling cart.

Next, use wood screws to attach the two crates together.

Next time I see wood crates at the flea market, I'm definitely grabbing a couple to make this little wood crate rolling cart.

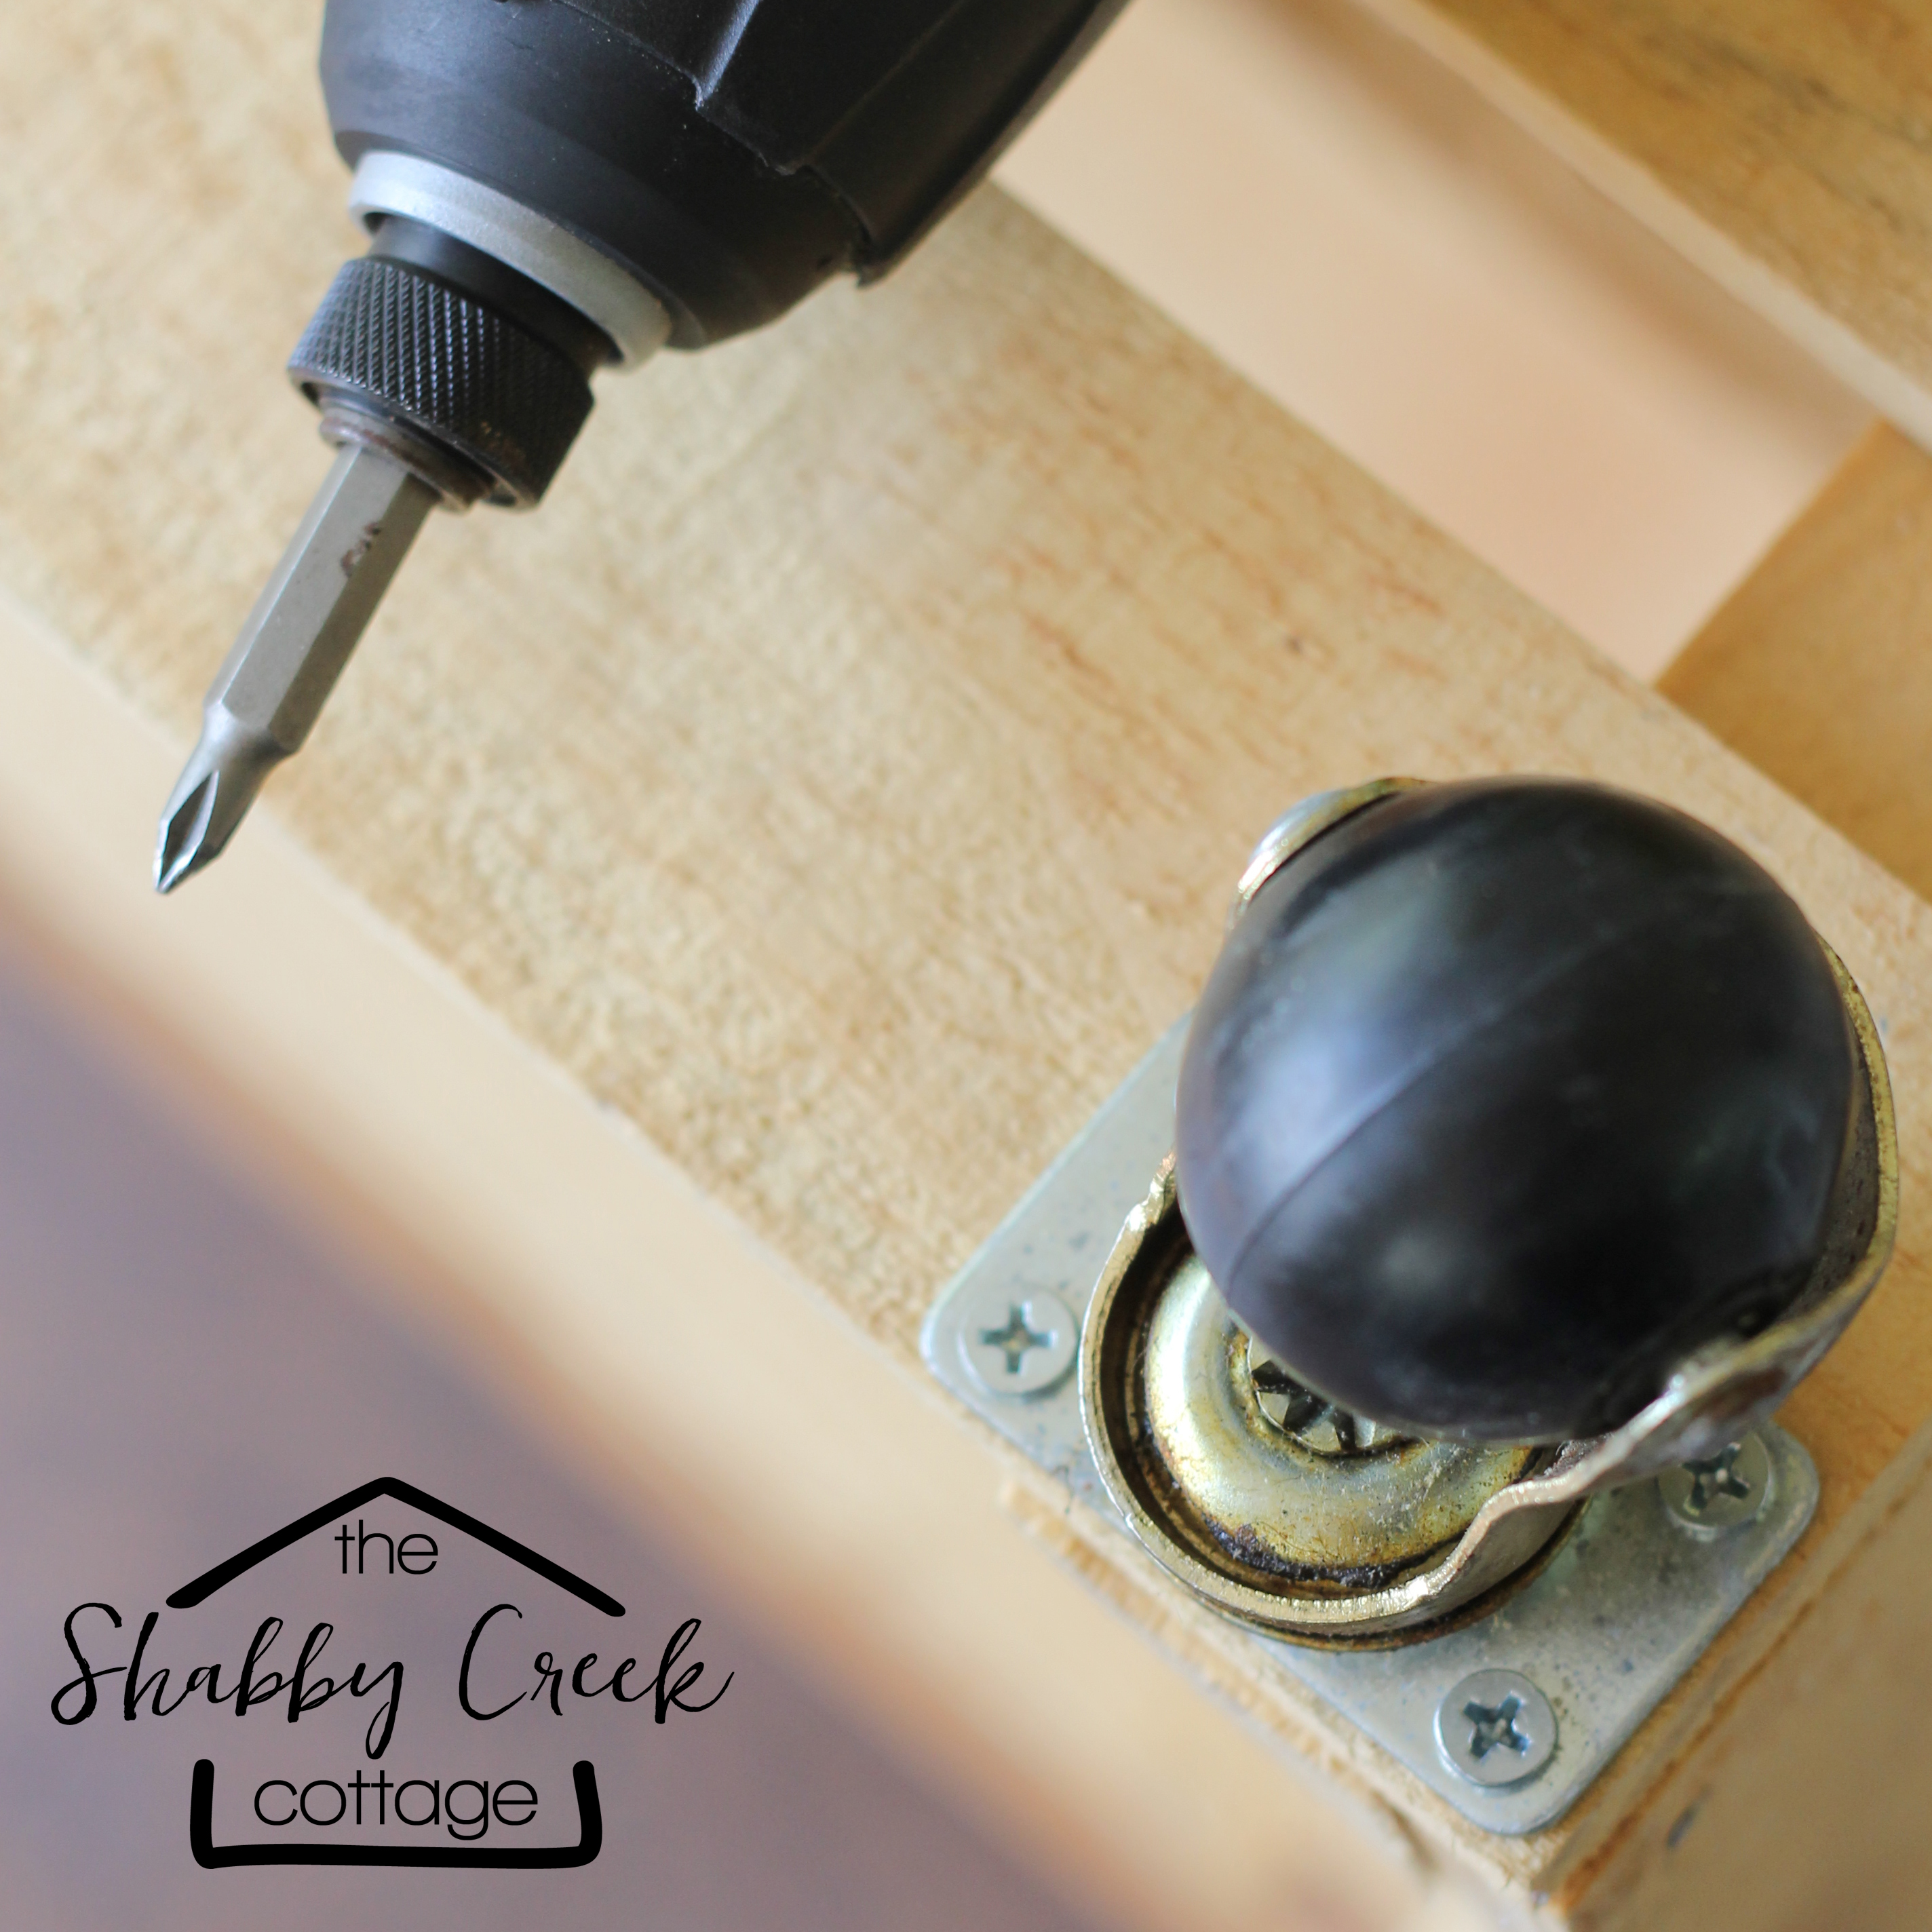
Next place the casters in each corner, then mark the holes. Drill a pilot hole, then attach them with screws. Then flip it over and you’re done! See, I told you making a wood crate rolling cart was easy!

Next time I see wood crates at the flea market, I'm definitely grabbing a couple to make this little wood crate rolling cart.

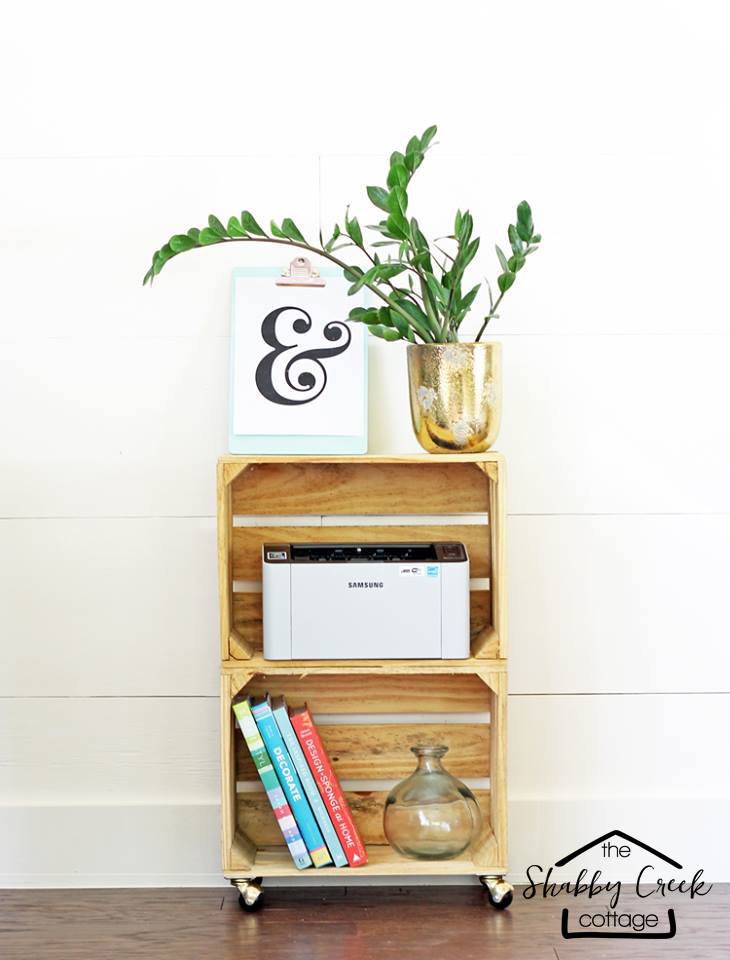
As for mine? It’s going in my new office! It’s the perfect way to reuse a wood crate into something functional that I will use every day as our printer cart. The spaces in the back give plenty of room for cords to feed through, so this will be a daily used cart in our office.


Next time I see wood crates at the flea market, I'm definitely grabbing a couple to make this little wood crate rolling cart.

Have you ever made anything from an old wood crate?

Like this wood crate rolling cart? There’s more ideas in my PROJECT GALLERY

ARE YOU A FARMHOUSE FAN?
Get instant access to this free guide to The Best Sources for a Farmhouse Style Home on a Budget!
YOUR NAME:
YOUR EMAIL:
_____________

Filed Under: DIY

About Gina Luker

Gina Luker is a writer, photographer and lover of all things quirky. She's usually found with a drill in one hand and a cocktail in the other while blogging along the way. She's addicted to coffee, polka dots, rock stars, Instagram, and everything aqua.

« Farmhouse Home Tour: Bless’er House
Stumbling Scientist Halloween Cocktail Recipe »
become a blogger banner

Comments

  1. Cheryl says

    August 26, 2016 at 7:11 pm

    Oh my gosh I am so going to copy this for my kitchen. I love it. Thank you

    Reply
    • Gina Luker says

      August 31, 2016 at 10:03 am

      That’s awesome Cheryl! Good luck 🙂

      Reply
  2. Anita Hurst Wright says

    September 26, 2016 at 1:34 pm

    I love wood crates and this is a great idea. By the way, I love the color in your hair. I wish I was brave enough to do that.

    Reply
    • Gina Luker says

      September 26, 2016 at 1:56 pm

      Aww, thanks so much Anita 🙂 Try with a temporary dye first to see if you like it!

      Reply
  3. Traci says

    December 5, 2016 at 8:27 pm

    Who won the cricut?

    Reply
  4. Rosemary Armesto says

    June 12, 2017 at 3:28 pm

    Wow, what a great blog. You give so many great ideas, where to get them – more info than any other blogger’s site I’ve been to. Thank you so very much, Gina!! You’re the best.

    Reply
    • Gina Luker says

      June 13, 2017 at 8:18 am

      You are so sweet Rosemary!! Thank you 🙂

      Reply
  5. Andrea says

    March 15, 2020 at 11:05 am

    Love this crate idea…I may adjust bottom to accomodate herb garden..then use top for decorative oil containers

    Reply
    • Gina Luker says

      March 16, 2020 at 5:49 pm

      Sounds like a great idea Andrea!

      Reply

Leave a Reply Cancel reply

Your email address will not be published. Required fields are marked *

Recipe Rating


Gina Luker

Privacy Policy & Disclosure Statement

Searching For Something?

The Shabby Creek Cottage is a participant in the Amazon Services LLC Associates Program, an affiliate advertising program designed to provide a means for sites to earn advertising fees by advertising and linking to Amazon.com

[instagram-feed]

Copyright © 2023 · Divine theme by Restored 316

Copyright © 2023 The Shabby Creek Cottage Log in

ARE YOU A FARMHOUSE FAN?
Get instant access to this free guide to The Best Sources for a Farmhouse Style Home on a Budget!
YOUR NAME:
YOUR EMAIL:
_____________