• Blog
  • Home
  • How to Start a Blog
  • Privacy Policy
    • Facebook
    • Google+
    • Instagram
    • Pinterest
    • Twitter

The Shabby Creek Cottage

Hundreds of ideas for creative ways to eat, make & decorate!

  • Chalk Couture SHOP
  • eat
    • Dessert
    • Drink
    • Dinner
    • Side Dishes
  • make
    • crafts…
    • diy projects
    • cleaning and organizing
    • holiday
      • Christmas
      • Easter
      • Halloween
      • 4th of July
      • Valentine’s Day
    • freebies
  • decorate
  • subscribe

The Zipper Pillow Cover Tutorial

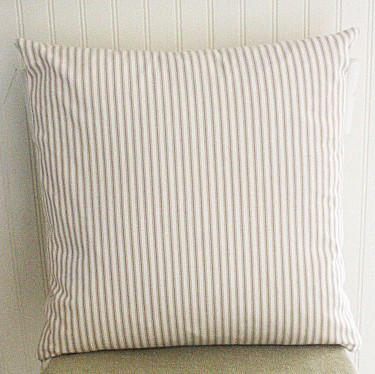
Pillows are the ultimate decorating accessory in my book. They can add comfort, color, pattern, all in one little piece. Pillow covers are actually more my style, because I change my mind more often than tractors go by (which in my neck of the woods is pretty darn often!) And why wouldn’t I? In about 15 minutes, 1/2 yard of fabric and a zipper later, the look of a chair or sofa can be changed – easy peasy.

You’ll need two 17 inch square pieces of fabric and a 20 inch zipper. You’ll also need a zipper foot for your sewing machine (which probably came with your machine.)

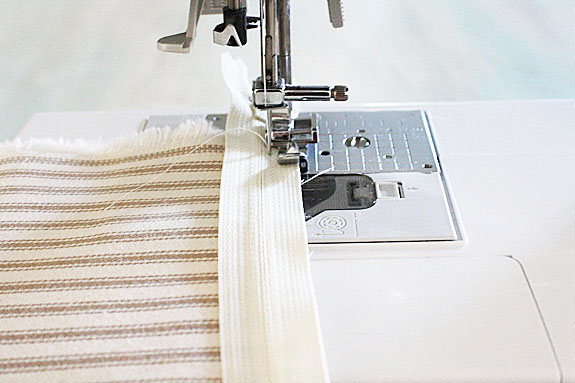
Leaving the zipper closed, place it on the end of the fabric you want on the bottom of the pillow, right sides together (meaning the zipper pull should go towards the printed side of the fabric.) Using your zipper foot so you can get as close to the teeth of the zipper as possible, sew it to the fabric, keeping the edge of the zipper aligned with the edge of the fabric.

Open the zipper up all the way, then align your fabric to the first piece, right sides together, so that the zipper will be even on both sides. Put a straight pin in to hold it in place, then repeat the steps to attach it to the second side. Yay! The hard part is over!

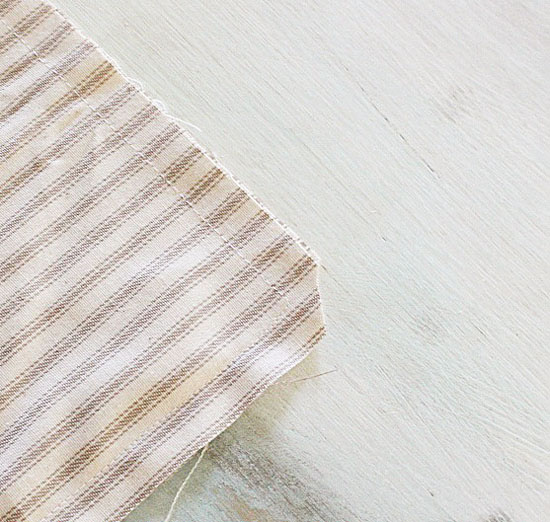
Now zip it half way – do not zip it closed – then line up the fabrics and using the regular foot on your machine, sew around the other three sides of the square with a 1/2 seam allowance. You are going to start by sewing right over the zipper, back stitching to lock it in place.

Snip a little off the corners to make it easier to turn out – then turn it out and iron it.
Add in an insert and you’re good to go! Big change, little time, small budget – gotta love that!
ARE YOU A FARMHOUSE FAN?
Get instant access to this free guide to The Best Sources for a Farmhouse Style Home on a Budget!
YOUR NAME:
YOUR EMAIL:
_____________

Filed Under: DIY

About Gina Luker

Gina Luker is a writer, photographer and lover of all things quirky. She's usually found with a drill in one hand and a cocktail in the other while blogging along the way. She's addicted to coffee, polka dots, rock stars, Instagram, and everything aqua.

« Upcycling a farmhouse style sign
How to slipcover an ottoman »
become a blogger banner

Comments

  1. Beth McC. says

    February 8, 2011 at 3:27 pm

    Thank you for posting this!! I am about to conquer sewing and this really helps!

    Reply
  2. High Street Cottage says

    February 8, 2011 at 4:01 pm

    I have bookmarked this, I’m tryyyyyying to learn to sew, when I get a moment to myself, and really want to make simple easy pillows in the fabrics I like. Thank you, wonderful tutorial. xoxo tami

    Reply
  3. CandaceAshley says

    February 8, 2011 at 5:29 pm

    Very nice tutorial, easy, cheap, perfect!

    Reply
  4. Tara@JustDevineStyle says

    February 8, 2011 at 6:20 pm

    You make it look so easy but I hate zippers! I never have luck with them. Love the mattress ticking fabric you chose.

    Reply
  5. Kristi~The Slipcover Girl says

    February 8, 2011 at 6:31 pm

    stinkin’ adorable! you’re right pillows are soooo easy to make!

    Reply
  6. Karen says

    February 8, 2011 at 9:08 pm

    That was explained rally well. Thanks!

    Reply
  7. Karen says

    February 8, 2011 at 9:09 pm

    Oops meant really not rally

    Reply
  8. Passionate for White says

    February 8, 2011 at 10:00 pm

    That’s it….I’m pulling out my machine and I’m gonna give this a try! Hope I can find the zipper foot 🙂

    Reply
  9. Marilyn Holeman says

    February 9, 2011 at 2:41 am

    Thanks, Gina!!

    Reply
  10. Lana says

    February 9, 2011 at 3:26 am

    You explain things so well Gina! I forgot how easy zippers are to install ~ is that the right word? I see pillow covers in my near future… 🙂

    Reply
  11. Vicki says

    February 9, 2011 at 3:39 am

    Thank you for this! For those of us who have machines but have limited skills, this really helps! I usually just sew on paper but find myself interested in projects just like this. THANK YOU!

    Reply
  12. Melanie says

    February 9, 2011 at 7:34 am

    OH my gosh! I really didn’t know it was that EASY to sew in a zipper, I just might try it!

    Reply
  13. Anita says

    February 9, 2011 at 6:16 pm

    What a great way for a quick change!! So happy I found your blog. Can’t wait to see more!!

    Reply
  14. Maya @ Completely Coastal says

    February 9, 2011 at 6:30 pm

    Pillows can change a room! I think I have to get myself a sewing machine!!! Looking to revamp my living room with new pillows but haven’t found “the ones”…, so maybe I have to make them myself.

    Reply
  15. KK says

    February 10, 2011 at 1:17 am

    I’d love to know where you found the ticking stripe. I’ve been looking for some this color but haven’t had much luck.

    Reply
  16. Humble Homemaker says

    February 10, 2011 at 11:03 pm

    Hi! I am new to following your blog but think it is great. 🙂

    I nominated you for the Versatile Blogger Award. Hop on over to this link to collect your Award Button:

    http://humblehomemaking.blogspot.com/2011/02/versatile-blogger-award.html

    Have an awesome day!

    Reply
  17. Lyra at Ces't la Vie Events says

    February 11, 2011 at 2:38 am

    hello there! your newest follower! I just found your blog and I’m so glad I did. Great tutorials and content!!! I have so many clients who adore the shabby chic decor aesthetic as do I.

    Please stop by and pay me a visit. Id truly appreciate it.

    Thank you!

    C’est La Vie

    Reply
  18. Julie says

    April 25, 2011 at 3:50 pm

    Thank you so much for this tutorial! I have avoided zippered pillow covers after making an attempt 6 years ago using the traditional method and just about going crazy. But I wanted to make a bunch of pillows for my bed and window seat so I found you on a blog search. I have now made 4 and your method is soooo easy and looks just as good as the difficult way (better, because I don’t mess it up now)! I am getting pillow happy now and have plans for 8 or 10 more for window seats, gifts, and outdoor pillows for my porch. Love your blog!
    Julie

    Reply
  19. Dawn Herried says

    September 24, 2013 at 6:28 pm

    In the picture it looks like the zipper hangs over the material?
    Please HELP!

    Reply
    • Gina says

      September 24, 2013 at 7:19 pm

      It doesn’t hang over it, it just lays right next to it so it creates a finished zipper once complete.

      Reply
  20. Babs says

    November 2, 2013 at 6:54 pm

    So looking forward to making this!!!!!!!

    Reply
  21. Sarah says

    December 3, 2013 at 9:52 pm

    Great tutorial, Gina! Did you use a 16 inch or 18 inch pillow insert?

    Reply
  22. Sarah says

    January 19, 2014 at 10:01 pm

    I’m an 85 year old been sewing for 70 years. You sure make zipper placement look easy, great for the beginning seamstresses out there. Thanks we need more like you that are willing to share the things you have learned. it takes time patience and love for sewing to get to perfection and I keep learning. Sarah

    Reply
  23. Edward Wiils says

    September 20, 2017 at 10:37 am

    Thanks for sharing Gina. Have some experience of sewing. Will try to make one. It looks simple and easy to make.

    Reply
    • Gina Luker says

      September 21, 2017 at 2:29 pm

      Thanks Edward, it is super easy, good luck!

      Reply
  24. Emma Maria says

    September 25, 2017 at 9:02 am

    Well explained tutorial. Looking adorable! You’re right pillows are really easy to make. Thanks for sharing.

    Reply
    • Gina Luker says

      September 25, 2017 at 10:28 am

      Thanks so much Emma!

      Reply
  25. Varun Sharma says

    May 16, 2020 at 12:13 am

    I’m about to conquer sewing and this really helps me !

    Reply
    • Gina Luker says

      May 19, 2020 at 6:58 pm

      Oh yea! So glad it was helpful Varun 🙂

      Reply

Trackbacks

  1. DIY moose silhouette pillow — The Pleated Poppy says:
    December 19, 2013 at 2:00 am

    […] was so excited to get this pillow made that i forgot to take any pictures!  here’s a great tutorial for making a zippered […]

    Reply
  2. Easy DIY hello pillow tutorial says:
    February 12, 2014 at 4:19 am

    […] only need two things: a plain pillow cover (if you don’t have one, I have an easy zippered pillow cover tutorial for that, too!) and some Happy Crafters Iron on Vinyl (I used […]

    Reply
  3. Bedroom ideas (from a decorating dork) says:
    March 26, 2014 at 7:16 am

    […] which has held up beautifully for nearly a year now. Add on some new bedding from Target and an easy zippered pillow and a DIY light fixture above – […]

    Reply
  4. how to make a hexagon DIY floor pouf says:
    June 12, 2014 at 10:29 am

    […] to install a zipper on the straight portion only (not the V part). To learn how, jump over to my zipper tutorial. Just make sure the stripes line up perfectly when you’re installing the zipper and […]

    Reply
  5. DIY superhero logo pillows says:
    October 13, 2014 at 4:30 am

    […] sit it aside and make a pillow. I use this method to install a zipper and this is how I install pompom fringe. Put it together and you have a pillow. Or buy a plain one […]

    Reply
  6. well hello pillow cuteness! | says:
    November 27, 2015 at 9:13 pm

    […] you’ll only need two things: a plain pillow cover (if you don’t have one, I have an easy zippered pillow cover tutorial for that, too!) and some Happy Crafters Iron on Vinyl (I used […]

    Reply

Leave a Reply Cancel reply

Your email address will not be published. Required fields are marked *

Recipe Rating


Gina Luker

Privacy Policy & Disclosure Statement

Searching For Something?

The Shabby Creek Cottage is a participant in the Amazon Services LLC Associates Program, an affiliate advertising program designed to provide a means for sites to earn advertising fees by advertising and linking to Amazon.com

[instagram-feed]

Copyright © 2023 · Divine theme by Restored 316

Copyright © 2023 The Shabby Creek Cottage Log in

ARE YOU A FARMHOUSE FAN?
Get instant access to this free guide to The Best Sources for a Farmhouse Style Home on a Budget!
YOUR NAME:
YOUR EMAIL:
_____________