Back in my Etsy days, my flower pillow was one of my all time best sellers. I’ve made so many of these pillows it’s practically insane. It’s pretty simple to make – but it does take a bit of patience. However it really was one of the prettiest things I made to order, and after I stopped selling them people started asking how I made them. So that’s what I’m sharing… how to make the flower pillow.
*this post contains affiliate links*

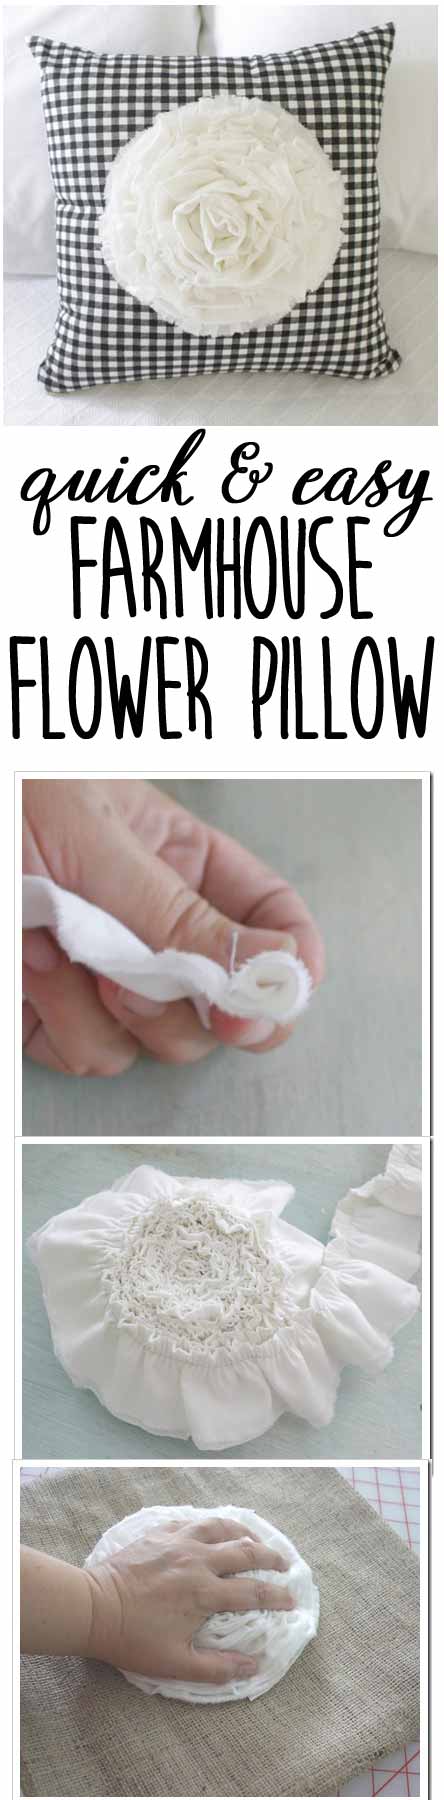
Flower Pillow Tutorial
Supply list:
- muslin fabric
- 1 premade pillow cover (or the fabric + zipper to make one)
- 1 pillow insert
- hot glue + gun
Tools:
- fabric scissors
- sewing machine
- ruffler foot for sewing machine
- a piece of glass (from a frame or an old plate would work)

To start, you need 108 inch wide muslin (or 3 yards of any other fabric). You need three 4-inch strips. Just snip…

…and rip.

Stitch the ends together, so you have one super long (at least 9 ft.) strip.

Now you’re going to use the ruffler foot for a sewing machine… unless you want to ruffle it by hand (and that’s cool, too.)

Fold the strip in half, putting the folded end into the ruffler.

Then ruffle it up! (My ruffler was set to ruffle every stitch, smallest gather, stitch length 4.0).

Once the fabric strips have been ruffled, it’s time to make the flower part of the flower pillow.

Take the end, and begin to roll it up. Not too tight, but good and snug.

After you get a couple of inches rolled, you’re ready to glue.

Using the hot glue gun, put down a dot, right on the seam line, and roll into it. Add another bit of glue every 2-3 inches, keeping it all held together.

You want to keep the folded edge as even as possible. It’s going to turn out a bit towards the end, but the closer together you keep it in the beginning, the better it will look.

Once it’s too big to hold in one hand, flip it upside down and you’re going to start gluing every inch of it. Just run a bead of glue, then lay the ruffle down as you go. It’s much easier at this point because it holds itself up.

Just glue & press the ruffle in until you get to the end. When you get to the end, just let it stop where it is, it’s ok, I promise.

See, the outer edges puff up a bit, but it just makes it prettier in the end.

You have a pillow form ready, right? I’ve found burlap is the easiest. Just make your form, then find a piece of glass (mine came out of an old frame I made into a chalkboard). {Find instructions for a pillow cover here.}

Slide the glass inside the form, putting it under where you want the flower to be.

Now take your flower, and smother the backside of it in hot glue.

Gobs of glue, I tell ya.

Now smush the flower right where you want it on front of the pillow cover (on top of the glass.) Hold it there for a sec to let the hot glue quit oozing.

And now the magic happens….. after all those rounds of ruffles…

It’s done!

Just pop in your pillow form and you’re good to go. And that’s how to make the big fat flower pillow.

Wow! Gorgeous pillow!! Thanks for the tutorial and for hosting!!!
I LOVE your flower pillow … thanks for sharing the tutorial. And thanks for hosting the party!
I book marked this flower…I love it, thank you for hosting, I think I linked up?
Carol
hi Gina – that fabric flower makes a beautiful embellishment. I like how you have those soft edges. Thank you for hostessing and hope you’re having a wonderful week 🙂 diane
Any tips for keeping the burlap “shedding” to a minimum?
I am in love with this pillow……if I could just thread the bobbin.
Wow!! I love that pillow. I’ll have to make a couple for my girls. Thanks for sharing. And thanks for hosting! The new button looks great. ~ Catie
that came out really great! thanks for hosting this party.
Such a GREAT tutorial! I need to make like….well a ton of pillows for my house. This will be one of them.
I really really like how your pillow turned out—thank you for sharing! :o) and I really like the black and white background as well! So clever and so simple! Anddd thank you always for being wonderful and hosting this party! I can’t wait to be inspired!
Jaime
Your pillow is really cute! I made one this week, too! Thanks for hosting!
Adorable pillow! Can’t wait to try that.
And thanks for such a wonderful link party…I’m always inspired by all of the talented bloggers.
Kimberly 🙂
Love the pillow! I will definitely have to make one sometime! Thank you for hosting! I think this is my first time participating, if not, then it’s been a long time. I’ve been away from blogging but trying to get back.
Blessings,
Sandra
Love that big fat rose pillow! Great job, as always.
Hi Gina, Thanks for the tutorial, I love that pillow and now I know how to create my own! I’m happy to link up with you this week, Marcia
Hello Gina,
I have been away caring for my Mom after cancer surgery, but I am back now and so happy to be joining your party.
Love your flower pillow tute…looks so easy!
I have so much Shabby Chic Cottage catching up to do…this may take all day ;->
Happy Thursday
Janet xox
http://theemptynest-janet.blogspot.com/
Love the big fat flower pillow… thanks for hosting!
I love it, thank you for hosting!
affordable medical insurance
Love that pillow, and thanks for the tutorial! Thanks also for hostessing another great linky party!
What a great pillow! I am definitely going to make this for my sunroom. Thanks for hosting!
thanks for hosting! You just can’t go wrong with a big ole flower on a burlap pillow?! Loves!
You’re an angel! Thank you for posting the tutorial.
Nancy
Thanks for hosting such a great party! I love the large photo icons – it’s so much easier to look through everyone’s submission!
Kristen
Turning a House into a Home
OMG I love that pillow!! It’s gorgeous! Want to make me one?! 😉 Are you going to be offering it in your shop?
LOVE that FLOWER! And thanks for the great party!
wow- thanks for the great tutorial- gotta try it!
Karen
Thanks so much for hosting, Gina!!!! Love love love that photo of you smooshing the flower onto the pillow cover…;)
i *love* this pillow! got some burlap the other day to make some pillows; you inspired me to embellish them 🙂 just stumbled upon your blog today and i love it! your newest follower!
It is a great pillow! Thanks for hosting, Gina…
Love it! I linked up.. but couldn’t find a button. Am I missing it?
Pretty pillow, Gina! Thanks for hosting. xo Jami
Hi Gina, Love the pillow and thank you for hosting! Have a great weekend.
xo,
Sherry
Thank you so much for hosting 🙂
i bought a ruffler and actually figured out how to use it ;).how fun now i’m going to make lots and lots of ruffles. thanks Gina