Earlier this year my beloved porch swing died. Although it wasn’t truly a porch swing, since it was on a frame. I digress, it died all the same. Since the frame was still very sturdy, we chose to keep it and were determined to find something to do with it. Originally we had thought of putting the pre-made swings on it, but let’s face it: my girls aren’t so little any more. Instead of doing that, we decided to make big girl/adult versions, so it would be comfortable for the whole family.
Of course, this was my brilliant idea, and my husband was not in the mood to play “let’s brainstorm 100 ideas.” That meant I had to figure it out on my own. And so I did. In case it might turn into a do it myself project (meaning no Mr. SCC), I wanted to figure out how to make it as simple as possible. I wouldn’t be breaking out saws or spending hours on construction. Nope – I wanted it quick and easy, yet durable.


First things first, it all had to be painted. If you’ve ever painted a wood swing frame by hand, I’m betting you’d never do it again. Ask me how I know? Because ours was still raw wood, I wanted to paint it out white. Thank goodness HomeRight sent me a new Paint Sprayer. It can take hours to hand paint a swing frame, but with this baby it took about 15 minutes. Much better, eh?

So I sprayed a couple of coats of exterior paint. There was a little more over spray than I hoped for, but I wasn’t really thinking. I’m sure you could use it inside with the right drop cloth, etc., but I prefer outdoors. It was super easy to use, however an old shoulder injury meant that I couldn’t reach above my head.
This is the part where I sucker Mr. SCC into helping. He can’t resist a damsel in distress. haha!

While I had the sprayer going, I sprayed off the seats of the swings, then let them dry for a few hours before actually turning them into swings. After they were dry it was time to assemble the simple wooden swing seat.
Let’s talk wood: I used 2 x 12s, cut 24 inches long.Actually the super nice fella at Lowe’s cut them for me. (Remember that whole, “I don’t wanna cut wood” thing – that was my work around.) Because I had another project in the works using a long piece of 2 x 12, I had him cut that piece first, then the seats from the scrap. Waste not, want not!
Speaking of knots…

I had determined that a knot system using rope would be the easiest way to go. So Mr. SCC drilled a hole in each corner of the seat (yeah… he helped me after all.) We used a 1/2 inch drill bit because we were using 7/16 inch rope.

Now let’s talk rope: I went through a lot of options before deciding on this one. I chose braided nylon rope, because twisted stretches over time. Braided will stretch a little bit, but not much. It holds up much better over time.
Back to the swing: He threaded the rope through one hole and tied a knot on the bottom of the rope, pulling hard to secure it tightly.
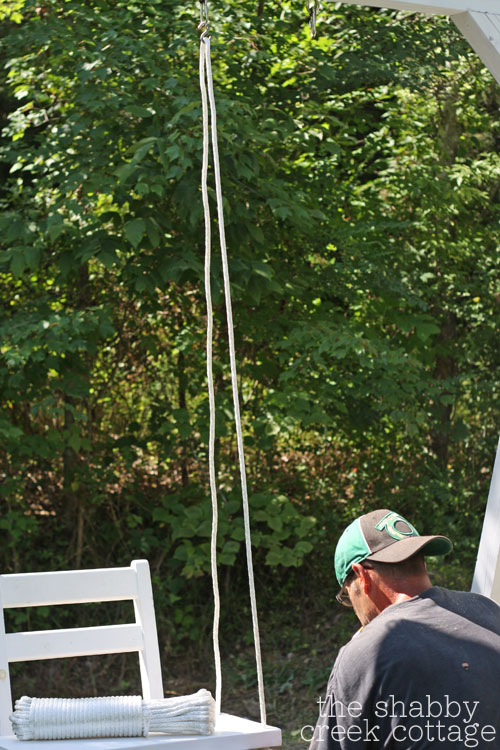
Using a chair as a seat holder, he brought the rope up through hook on top, draped it back down, added 6 inches past the bottom of the seat, then cut it.
Because of how our swing frame is built, the hooks were not at the same height on both sides, so we did each side individually. If yours are, then you can measure out equal portions of rope.

He tied a knot a foot or so above the swing seat to bring the rope together, then again just before the hook to keep it nice and secure.And that’s it!

Including the painting, the whole project took less than an hour of hands on time. It went super quick and we love the way they turned out.

We’re not the only ones, the girls do, too! Hours have already been logged swinging away. And just so ya know, they’re even sturdy enough to hold me 🙂
*Thanks to HomeRight for partnering with me on this post. All ideas & opinions are 100% mine.*
____________________


^o^ It’s so cute..
Ιt reminds me..lovely moments of my childhood.!
(sorry for my english..heheh)
Kisses.! I follow you..
Alexandra by http://beautydiarybyalexandra.blogspot.gr/
Love this project, my kids are growing out of there playset and I have been pondering a similar project, thanks for the swing tutorial, wondering about the frame though, how was it put together? It looks really durable, dose it stay put when they swing, or dose it do that funny bumping thing, you know like when were kids… lol it was fun! I remember but probably not so safe.. Would love to here a tutorial on the frame too.. Elle@sweetpeaschicnshabbies.blogspot.com
Hi Elle,
Yes, it stays put when we’re swinging, no wobble yet. But, my girls are big enough to know not to swing for the moon 🙂 Mr. SCC built the frame a few years ago, I can try to get you some instructions if you’ll email me – but he kinda built it from his head so that’s about as good as I can do.
Love this Gina! Just might try it this spring for our boys 🙂
This project is so fun to do. Thanks for sharing
That’s a cute swing. If you want to see another example that uses less rope and re-weaves the rope into itself for a good clean look you can take a look at http://www.treeswingstore.com/treeswingseats/ they have some nice options too.