Add some farmhouse wall decor to your front door! Make your own beautiful monogrammed burlap wreath that’s perfect for any season.
Why is it that almost anything becomes 100x prettier with a monogram on it? It’s like the finishing touch to almost any project. That’s actually what spawned this idea for may monogrammed burlap wreath.
This wreath is so, so simple! I originally shared this on my Facebook page, and after it went viral I had tons and tons of requests for a blog post – so I’m going to break it down… how to make a monogrammed burlap wreath.
First, you can watch the video:
Now let’s get down to the step by step. You’ll need these supplies:
*affiliate links for your convenience*
- polka dot burlap ribbon
- 10 inch embroidery hoop
- 10 inch wood letter
- craft paint
- hot glue gun + glue
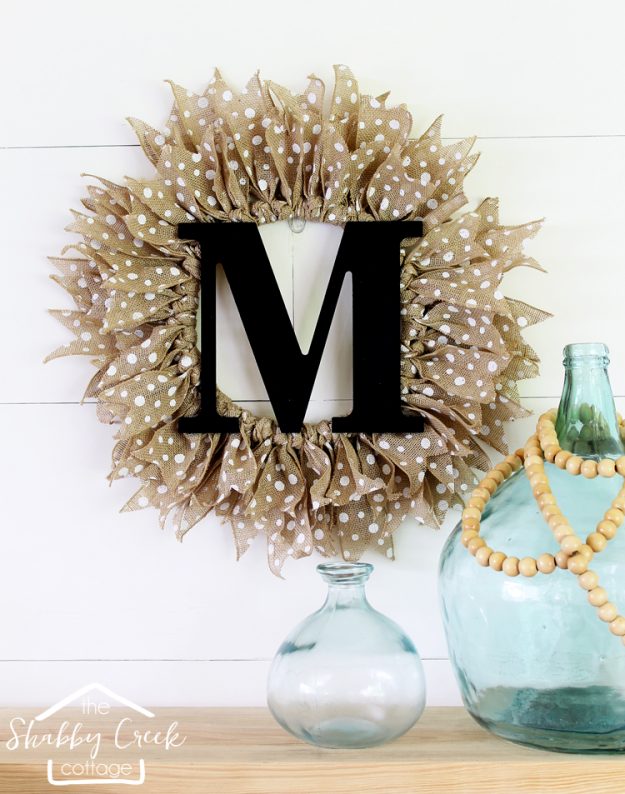
First I painted a 10 inch wood letter with craft paint (although you could totally use spray paint.) Then I let it dry while I made the wreath.
I cut 20 pieces of wired burlap ribbon that are 14 inches long and 18 inches long, so it would make the wreath have more dimension and appear thicker. I also cut a V out of each end so it wouldn’t fray.
Then I tied the pieces around a 10 inch embroidery hoop, using both pieces to give it more strength. After it was tied all the way around, I took off the screw and then bent the eye pieces so I could tie all the way around.
Once the wreath was finished, I hot glued the monogram to the wreath, then put heavy books on top to let the glue completely cool before hanging.
Like this post? You might also enjoy…
How to Make a Book Page Wreath
How many rolls of ribbon did it take?
It took 18 yards of ribbon total, so it depends on the size of the rolls you buy 🙂 Have fun making it!
Was that 1 inch wide ribbon? That is an adorable wreath
Thanks so much Janet, the ribbon I used was 2.5 inches:)
Do you tie a 10 inch and then an 18 inch and do that all around it
Thanks Barb 🙂
What size of ribbon?
Hi Sheila, I used 3 inch ribbon but you can mix it up and go with what you love and can find 🙂
I used about 18 yards of ribbon, so it would depend on the size of your rolls 🙂
I used 4 total or 3 1/2
Too hard to make…ribbon was too hard to attach.
On the ribbon did you use the different lengths every other one?
Yes Rebecca, one 14 inches and one 18 inches, alternating. Good luck!
I can also see this being done in Christmas or fall colors for whatever season of the year you are in. thanks for an easy tutorial.
Great idea Mary and it is my pleasure!
Gina: How wide was the ribbon you used to make the wreath? I would love to make these for housewarming gifts for two of my nieces.
It is standard 2 inch ribbon Dawn 🙂 Good luck !
You said 3 1/2 to 4 rolls of ribbon but how long are they? What is the length of the roll? Yard wise.
mine were 18 yards 🙂
I’m working on one of these today, your video is great ! I’m finding it hard to tie the ribbon is that normal?
Hey Debbie, just work with it, it will get easier as you move along 🙂 Good luck!
So I made you right wreath yesterday. Came out really nice. I’ll post a picture on your website. Couple things though, having a black door. Can’t really see my Initial. So I would recommend to use any color that works with the home. Second where did you find the burlap ribbon? I went to every craft store near me and never found it, I use wire ribbon. 7 big rolls and still needed one more.
I’d love to see it Heather! Yes, I agree, use whatever color that will work with your door. I got my ribbon at Hobby Lobby.
I couldn’t s white polka dot at my hobby lobby even looked online and didn’t carry it
How much would you charge to make these for people?
Hmmmm, I’m not sure Dawn. You could add up what it cost you to make it and then decide how much you would like to profit and add that to the cost. I just made mine for my door 🙂
Does the ribbon need to be wired? So cute can’t wait to make this 🙂
Awesome Sharon, have fun making it and yes I did use wired ribbon but you could use regular too, I just prefer the wired as it holds its shape better 🙂
Gina, where did you get your pattern for the Monogram?
Hey Candy, I got it from Amazon. Here is a link, https://www.amazon.com/gp/product/B018QOJQVA/ref=as_li_qf_sp_asin_il_tl?ie=UTF8&tag=theshachicot-20&camp=1789&creative=9325&linkCode=as2&creativeASIN=B018QOJQVA&linkId=70eaea034c0205810f3a26e273db468c
You also might be able to find one at Michaels or Hobby Lobby. Have fun!
In your tutorial you said you cut 20 strips 14″ & 18″ lengths. How many of each length did you use?
Hey Donna, I did 20 of each, I hope you enjoy making one of your own!!
So will it work with any wired ribbon not just burlap?
Absolutely Pamela, I just have a thing for burlap 🙂
It is amazing. It is looking very beautiful.
Thank you!!
Love it!
I made this wreath using wired burlap ribbon, not as we’d but in the same lengths. I have it hanging on my pantry door. Every time we close the door the top portion of the ribbon falls over, any suggestions?
Hmmm, I’m not sure Lana, you might try reinforcing the top portion somehow. I’ve not had that happen. Sorry I couldn’t be more helpful.
This is a very cute wreath. I love polka dots, too. I’m thinking of mixing burlap wired ribbon, with black ribbon with white polka dots. Great idea! Thanks for sharing and sharing all of your helpful hints.
I am wanting to make one for my front door, but am worried that the burlap or ribbon will lose its “stiffness” and get droopy. Do you have a suggestion to prevent this from happening? We have a covered front porch, but is in the direct sunlight in the afternoon. Thank you!
Hi Kari, I haven’t had a problem with mine but you could spray it with a finishing spray just to be safe 🙂
I made this for my daughter and it turned out great. she wanted a burgundy letter and it looked great. thanks for the tutorial it help a lot when making it. now i’m making myself one.
angela morris
Thank you Angela! I am so glad you found it helpful 🙂 Good luck with your wreath!
xoxo,
gina
I cannot find the ribbon with WHITE polka dots anywhere not even hobby lobby any suggestions even went to Amazon
I’m not sure Kim, maybe ask Hobby Lobby if they could order it for you? I’ve seen many of my readers post pictures of their versions of my wreath in other patterns, so if you can’t find it, pick something that speaks to you and your decor 🙂
Thanks for getting back to me, I found a zig zag one but really like The Polka Dots.
I am glad you found something you like 🙂
Bought the supplies to make this today and I’m just sitting down to make it. The tutorial says 3 yards of the polka dot burlap. I bought a roll that was 2.5 in wide and 15 ft so 5 yards. Thinking I had plenty. Reading your instructions I took it as 20 ribbons, 14 in and 18 in. Now that I read thru comments I see it’s actually 20 of EACH length. Also, the roll isn’t close to enough. I got 10 cuts of 14 in and 2 of the 18. Going to need a lot more burlap. My wreath of $10 is now double that! Back to hobby lobby tomorrow.
Hi Mary,
I am so sorry you have to trek back to Hobby Lobby, I’m not sure why but I hope the end result makes you happy 🙂
Love this! Making one right now. I just wish the ties were as easy as it looks in the video! The wires ribbon is not very user friendly when it comes to tying. But I ann sure he end result will be worth it!
Thanks Debbie! I have faith yours will be beautiful 🙂
My letter D, can only attach in two places. Got any ideas on how to brace the other side
I’m not sure without seeing it Sara. I just hot glued mine to the wreath.
Beautiful wreath! How wide is the ribbon that you used? Reading through the comments, three different sizes have been posted: 2, 2.5, and 3”.
I used 3 inch but I have had tons of my readers share theirs in all sizes and ribbon choices. Have fun, I am sure it will turn out great whatever you decide on, good luck!
Just finished tying on my 20 yds of ribbon – I need about 6 or 7 pieces to finish. That was using 2.5″ ribbon. Guess I will get my order in online so I can finish by the end of the week. So far so good for someone uncrafty like me!
Good for you Lori, I am sure it will be gorgeous!!
Awww how adorable thank you for showing how to
I tried to make this and the ribbon was way too hard to tie. I gave up. I will try again with fabric strips.
Fabric srips would look great too Becky 🙂
ANy tips for stopping burlap ribbon from fraying
You can spray with a sealant spray 🙂
Where do you get your ribbon. I’m always looking for something a little different. I love your wreath !
I got this ribbon at Hobby Lobby but Michaela also has a good selection as does Amazon 🙂
Could you post a video of just tying the ribbon it goes to fast for me to keep up? Thanks.
I would love one of these wreaths exactly like you made it with the letter M. Do you sell them? I would buy a ready made one from you.
Thanks so much Betty but I do not sell them, you should give it a try, I am confident you can do it!!
If I am using a 23 inch hoop, what suggestion do you have for the lengths I need to cut the ribbon? Thanks
Hi Alison, I cut 20 pieces of wired burlap ribbon that are 14 inches long and 18 inches long, so it would make the wreath have more dimension and appear thicker. I also cut a V out of each end so it wouldn’t fray. You will need more as your wreath is double mine. You could play with it to see if you prefer something different it is really up to you. Good luck and have fun 🙂
Thanks
I haven’t found the 2 1/2 wide of the dot burlap. But I did it with pearl ribbon. Let me know what you think
I think you did a great job Andy 🙂
How many times did you tie the ribbon ?
Hey Gina, I saw the video on one of your other pages, so searched for the post and ended here–but now the video says:
“Unavailable
This video can’t be embedded because it may contain content owned by someone else.”
I’m pretty sure you made this video, so you need to go talk to someone!
Love your fun ideas!
Do you think I can make it using a 9″ loop? I can find 9″ letters I like, already painted, and wondered if it would work out with 1″ less? Obviously I will probably use less ribbon but the instructions should be the same right? Thanks.